In the previous post, we came pretty far in implementing Event Sourcing with Axon and Spring Boot. However, we still didn’t have a proper way of testing our application. In this post, we will take care of that.
To do so, we would expose certain REST interfaces from our application. These interfaces will allow us to create an account and also perform other operations. Basically, you can think of these REST interfaces as APIs.
So without further ado, let’s start implementing.
The Service Layer
As a first step, we will create a service layer. We will have two service interfaces. First is AccountCommandService to handle the Commands. Second is AccountQueryService. At this point, the query service will just help in fetching a list of events.
Basically we try to follow SOLID principles. Therefore, we will code to interfaces. Below are the interfaces declarations for our services.
1 2 3 4 5 6 | public interface AccountCommandService { public CompletableFuture<String> createAccount(AccountCreateDTO accountCreateDTO); public CompletableFuture<String> creditMoneyToAccount(String accountNumber, MoneyCreditDTO moneyCreditDTO); public CompletableFuture<String> debitMoneyFromAccount(String accountNumber, MoneyDebitDTO moneyDebitDTO); } |
1 2 3 | public interface AccountQueryService { public List<Object> listEventsForAccount(String accountNumber); } |
Now, we implement these interfaces. First is the AccountCommandServiceImpl.
1 2 3 4 5 6 7 8 9 10 11 12 13 14 15 16 17 18 19 20 21 22 23 24 | @Service public class AccountCommandServiceImpl implements AccountCommandService { private final CommandGateway commandGateway; public AccountCommandServiceImpl(CommandGateway commandGateway) { this.commandGateway = commandGateway; } @Override public CompletableFuture<String> createAccount(AccountCreateDTO accountCreateDTO) { return commandGateway.send(new CreateAccountCommand(UUID.randomUUID().toString(), accountCreateDTO.getStartingBalance(), accountCreateDTO.getCurrency())); } @Override public CompletableFuture<String> creditMoneyToAccount(String accountNumber, MoneyCreditDTO moneyCreditDTO) { return commandGateway.send(new CreditMoneyCommand(accountNumber, moneyCreditDTO.getCreditAmount(), moneyCreditDTO.getCurrency())); } @Override public CompletableFuture<String> debitMoneyFromAccount(String accountNumber, MoneyDebitDTO moneyDebitDTO) { return commandGateway.send(new DebitMoneyCommand(accountNumber, moneyDebitDTO.getDebitAmount(), moneyDebitDTO.getCurrency())); } } |
The main thing to note here is the CommandGateway. Basically, this is a convenience interface provided by Axon. In other words, you can use this interface to dispatch commands. When you wire up the CommandGateway as below, Axon will actually provide the DefaultCommandGateway implementation.
Then, using the send method on the CommandGateway we can send a command and wait for the response.
In the example below, we basically dispatch three commands in three different methods.
Then we implement the AccountQueryServiceImpl. This class is not mandatory for Event Sourcing using Axon. However, we are implementing this for our testing purpose.
1 2 3 4 5 6 7 8 9 10 11 12 13 14 | @Service public class AccountQueryServiceImpl implements AccountQueryService { private final EventStore eventStore; public AccountQueryServiceImpl(EventStore eventStore) { this.eventStore = eventStore; } @Override public List<Object> listEventsForAccount(String accountNumber) { return eventStore.readEvents(accountNumber).asStream().map( s -> s.getPayload()).collect(Collectors.toList()); } } |
Notice that we wire up something called EventStore. This is the Axon Event Store. Basically, EventStore provides a method to read events for a particular AggregateId. In other words, we call the readEvents() method with the AggregateId (or Account#) as input. Then, we collect the output stream and transform it to a list. Nothing too complex.
The Data Transfer Objects
In the next step we create Data Transfer Objects. Even though our resource might be the entire account but different commands will require different payload. Therefore, DTO objects are required.
For our purpose, we will create the following DTO model classes.
AccountCreateDTO is used for creating a new account.
1 2 3 4 5 6 7 8 9 10 11 12 13 14 15 16 17 18 19 20 21 22 | public class AccountCreateDTO { private double startingBalance; private String currency; public double getStartingBalance() { return startingBalance; } public void setStartingBalance(double startingBalance) { this.startingBalance = startingBalance; } public String getCurrency() { return currency; } public void setCurrency(String currency) { this.currency = currency; } } |
Then, MoneyCreditDTO for crediting money to an account.
1 2 3 4 5 6 7 8 9 10 11 12 13 14 15 16 17 18 19 20 21 22 | public class MoneyCreditDTO { private double creditAmount; private String currency; public double getCreditAmount() { return creditAmount; } public void setCreditAmount(double creditAmount) { this.creditAmount = creditAmount; } public String getCurrency() { return currency; } public void setCurrency(String currency) { this.currency = currency; } } |
Lastly, we have the MoneyDebitDTO for debiting money from an account.
1 2 3 4 5 6 7 8 9 10 11 12 13 14 15 16 17 18 19 20 21 22 | public class MoneyDebitDTO { private double debitAmount; private String currency; public double getDebitAmount() { return debitAmount; } public void setDebitAmount(double debitAmount) { this.debitAmount = debitAmount; } public String getCurrency() { return currency; } public void setCurrency(String currency) { this.currency = currency; } } |
As you can see, these are just standard POJOs. So as to enable Jackson to be able to serialize and deserialize the objects we have declared standard getter and setter methods. Of course, in a real business case, you might also have some validations here. However, for the purpose of this example, we will keep things simple.
Defining the REST Controllers
This is the final piece of the whole application. In order to allow a consumer to interact with our application, we need to expose some interfaces. Spring Web MVC provides excellent support for the same.
So as to keep things properly segregated, we define two controllers. The first one is to handle the commands.
1 2 3 4 5 6 7 8 9 10 11 12 13 14 15 16 17 18 19 20 21 22 23 24 25 26 27 28 | @RestController @RequestMapping(value = "/bank-accounts") @Api(value = "Account Commands", description = "Account Commands Related Endpoints", tags = "Account Commands") public class AccountCommandController { private final AccountCommandService accountCommandService; public AccountCommandController(AccountCommandService accountCommandService) { this.accountCommandService = accountCommandService; } @PostMapping public CompletableFuture<String> createAccount(@RequestBody AccountCreateDTO accountCreateDTO){ return accountCommandService.createAccount(accountCreateDTO); } @PutMapping(value = "/credits/{accountNumber}") public CompletableFuture<String> creditMoneyToAccount(@PathVariable(value = "accountNumber") String accountNumber, @RequestBody MoneyCreditDTO moneyCreditDTO){ return accountCommandService.creditMoneyToAccount(accountNumber, moneyCreditDTO); } @PutMapping(value = "/debits/{accountNumber}") public CompletableFuture<String> debitMoneyFromAccount(@PathVariable(value = "accountNumber") String accountNumber, @RequestBody MoneyDebitDTO moneyDebitDTO){ return accountCommandService.debitMoneyFromAccount(accountNumber, moneyDebitDTO); } } |
Then, we create another controller to expose one end-point. Basically, this endpoint will help us list the events on an aggregate.
1 2 3 4 5 6 7 8 9 10 11 12 13 14 15 16 | @RestController @RequestMapping(value = "/bank-accounts") @Api(value = "Account Queries", description = "Account Query Events Endpoint", tags = "Account Queries") public class AccountQueryController { private final AccountQueryService accountQueryService; public AccountQueryController(AccountQueryService accountQueryService) { this.accountQueryService = accountQueryService; } @GetMapping("/{accountNumber}/events") public List<Object> listEventsForAccount(@PathVariable(value = "accountNumber") String accountNumber){ return accountQueryService.listEventsForAccount(accountNumber); } } |
As you can see, these controllers mainly use the Services we created earlier. The payload received is passed to the service that in turn uses the CommandGateway to trigger the commands. Then,the response is mapped back to the output of the end-point.
As a last bit of help, we configure Swagger for our application. Basically, Swagger provides a nice user interface that can be used to test our REST end-points. If you remember, we already added the Swagger dependencies to our POM.xml. Now, we create a configuration class to configure Swagger.
1 2 3 4 5 6 7 8 9 10 11 12 13 14 15 16 17 18 19 20 21 22 23 24 25 26 27 | @Configuration @EnableSwagger2 public class SwaggerConfig { @Bean public Docket apiDocket(){ return new Docket(DocumentationType.SWAGGER_2) .select() .apis(RequestHandlerSelectors.basePackage("com.progressivecoder.es")) .paths(PathSelectors.any()) .build() .apiInfo(getApiInfo()); } private ApiInfo getApiInfo(){ return new ApiInfo( "Event Sourcing using Axon and Spring Boot", "App to demonstrate Event Sourcing using Axon and Spring Boot", "1.0.0", "Terms of Service", new Contact("Saurabh Dashora", "progressivecoder.com", "coder.progressive@gmail.com"), "", "", Collections.emptyList()); } } |
Note that this is a very basic bare minimum configuration required for Swagger. There are lot more options available that we will explore in some other post.
Testing the Application
Finally, we are at the big moment. Our application is complete. We can test it now.
Run the application using IntelliJ maven plugin (since we are using IntelliJ for our coding). The command clean package spring-boot:run will do the trick.
Once the application starts up, you can visit http://localhost:8080/swagger-ui.html.
Step 1 – Creating the Account
To start off, let’s trigger POST /bank-accounts from the Swagger UI as below:
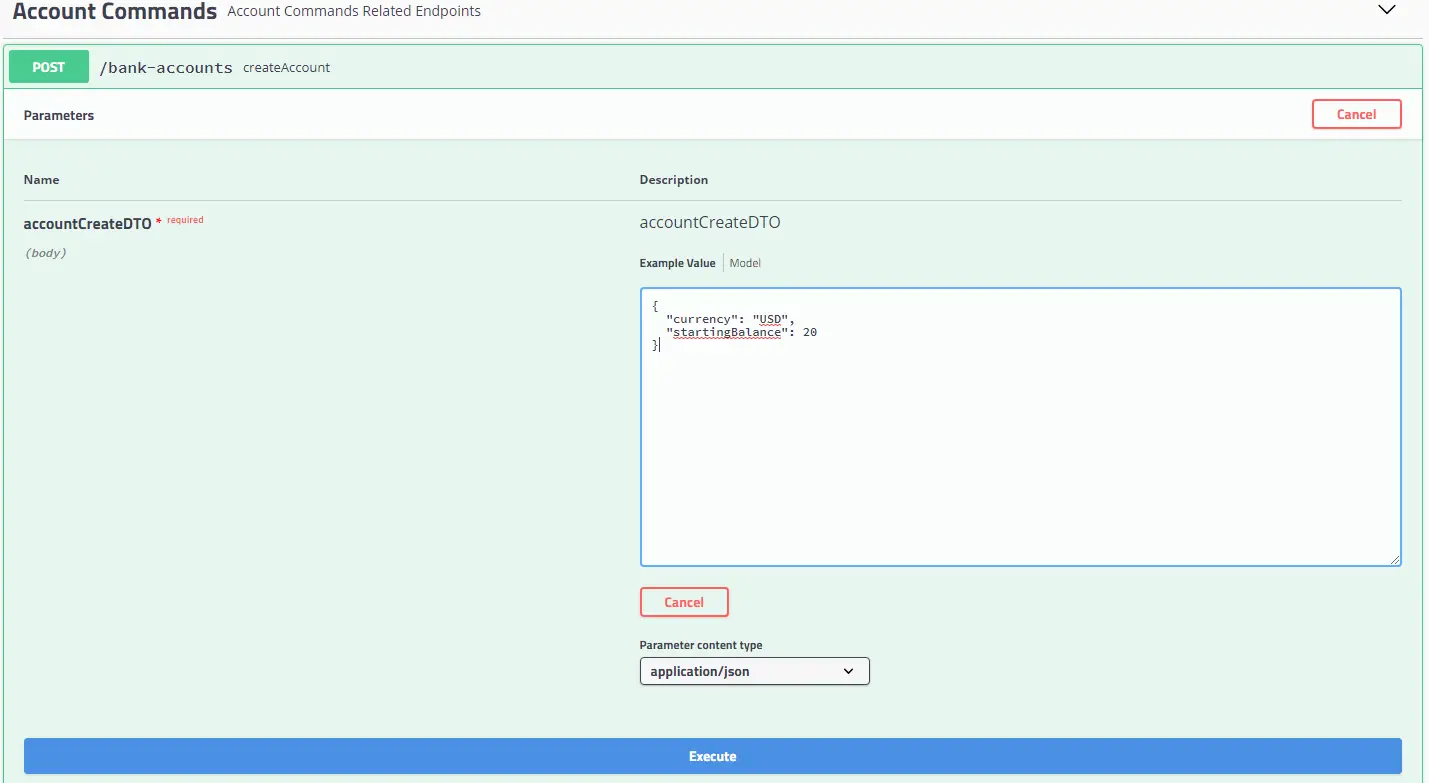
We fill the Currency Value and Starting Balance and click execute. Then, we scroll below to see the response.
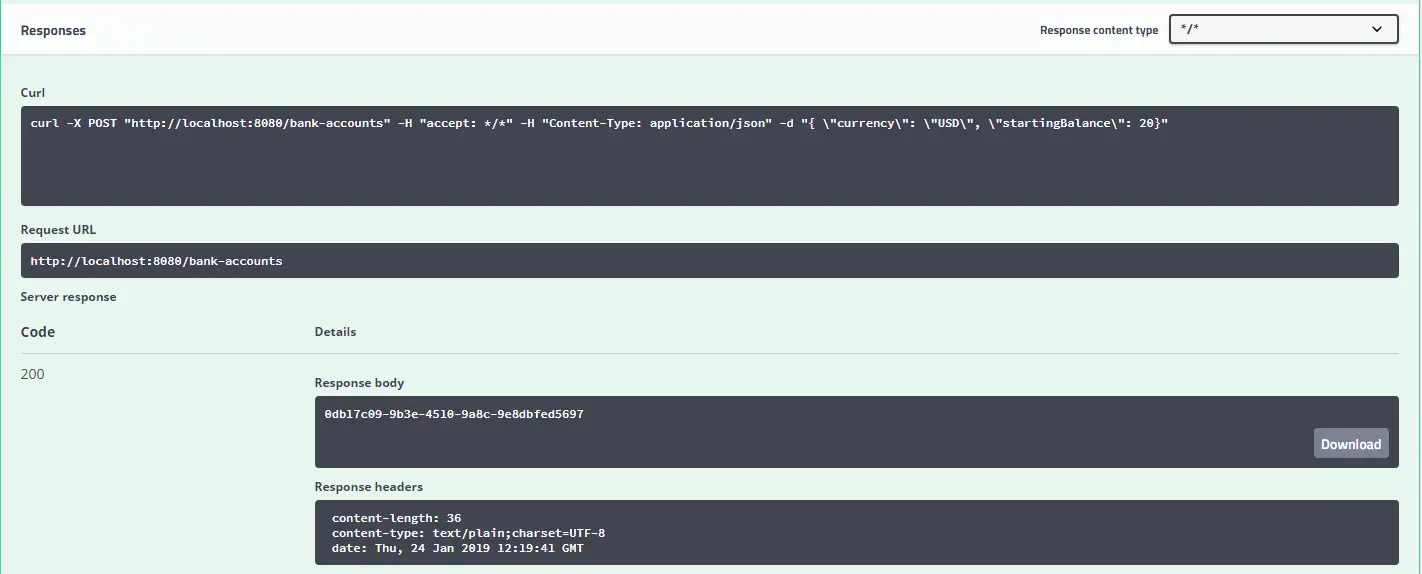
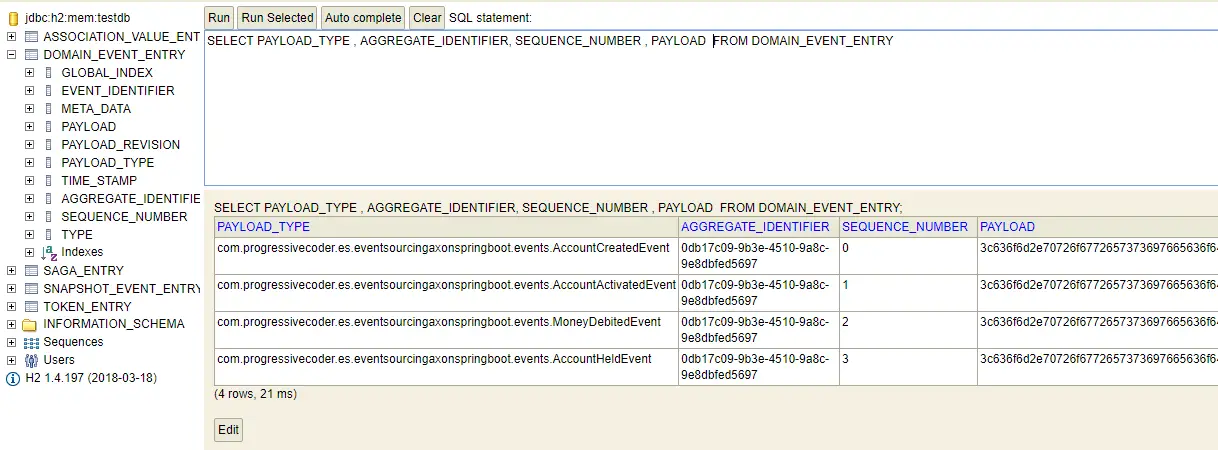
The response code is 200. This corresponds to HTTP Status OK. The response body has the Account Number of the account that was created. But how does the data look in the event store? We can easily check it out in the h2-console. In order to check the h2-console, we have to visit http://localhost:8080/h2-console.
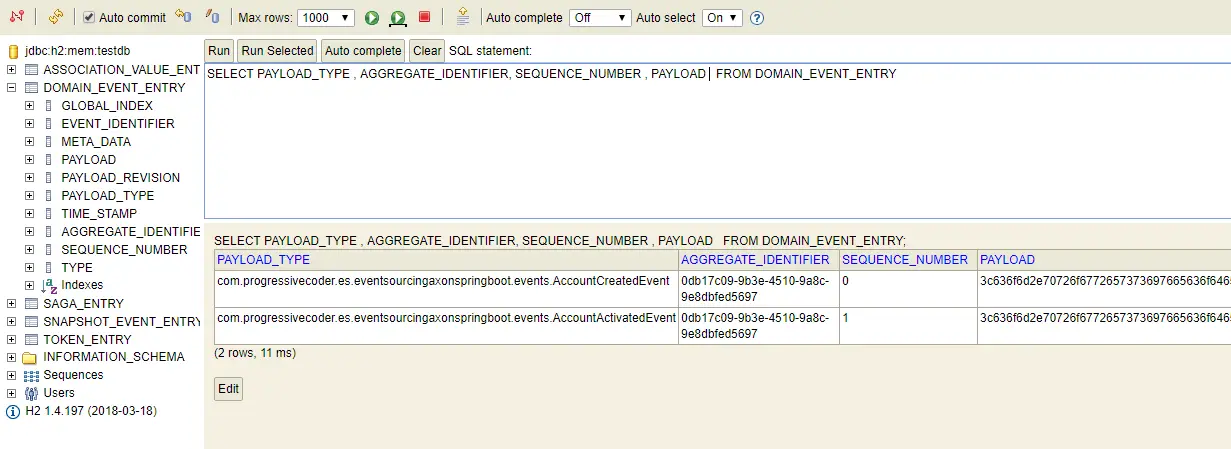
We login to testdb. Then, we can execute the below query in the console.
1 | SELECT PAYLOAD_TYPE , AGGREGATE_IDENTIFIER, SEQUENCE_NUMBER , PAYLOAD FROM DOMAIN_EVENT_ENTRY |
Basically, if everything has gone fine, we should see some results. In our case, there will be two events created at this point. First is the AccountCreatedEvent followed by the AccountActivatedEvent. Both events occur on the same instance of the Aggregate as evident by the Aggregate_Identifier. As you can see, the payload is encoded.
There are some other fields as well in the standard table created by Axon. You can have a look. However, I have tried to fetch the most important ones.
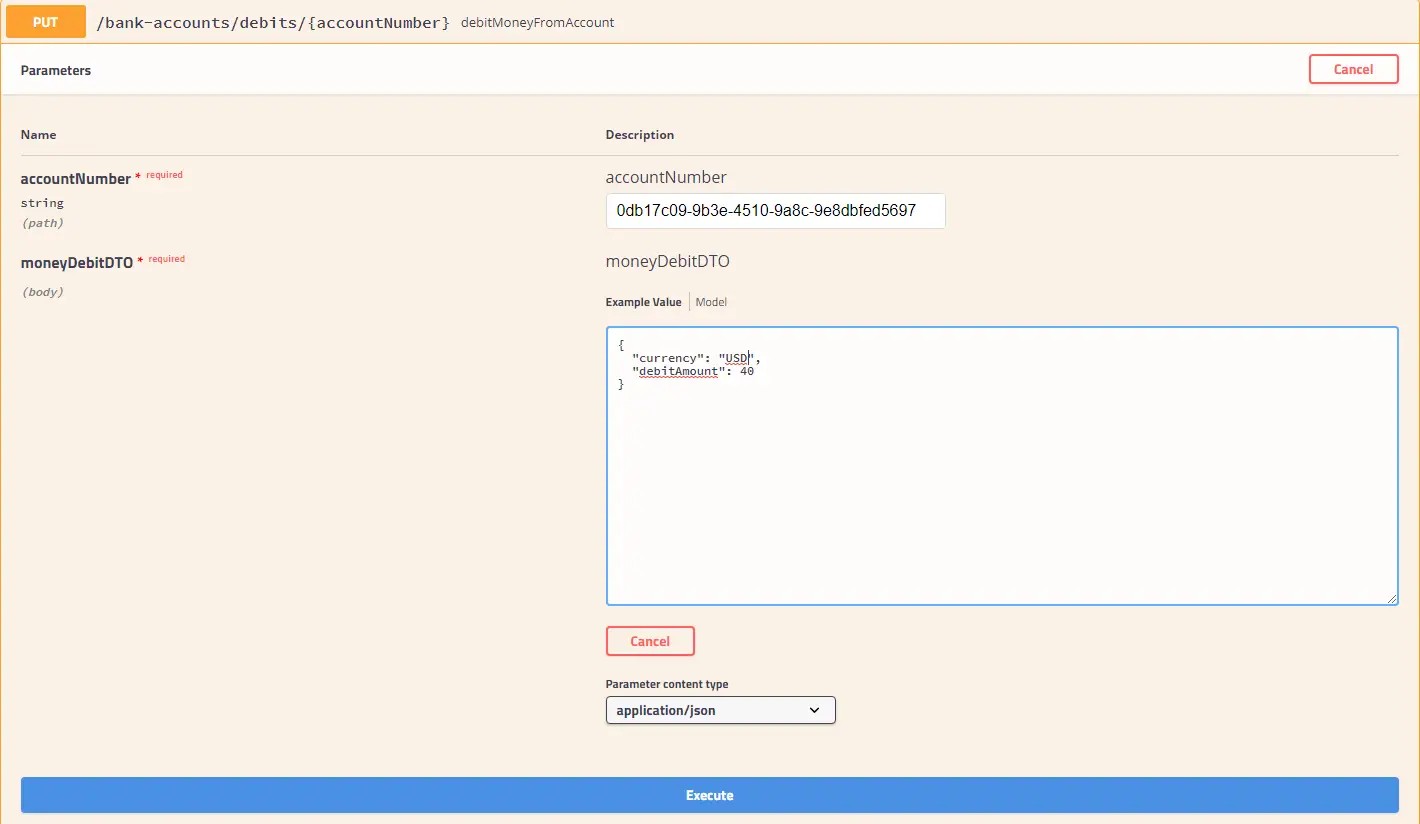
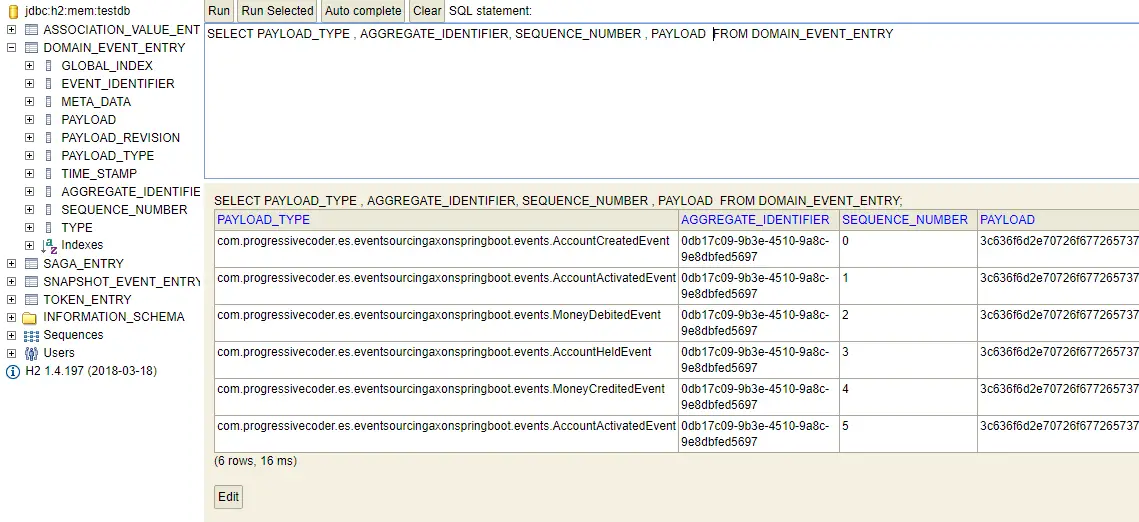
Step 2 – Debit Money from the Account
Next we will try to debit some money from our account. We have already implemented an end-point to do so. We provide the Account Number created earlier as an input along with the DTO.
After, triggering this transaction, we can visit the H2 console and run the same query as before.
We will see two more events on the same aggregate. The MoneyDebitedEvent and then, the AccountHeldEvent. This is because we have setup our Aggregate that once the account balance goes below 0, the Account is moved to HOLD status.
Step 3 – Credit Money to the Account.
Now we will credit some money to the account. Basically, we use Swagger to trigger the credit end-point i.e. PUT /bank-accounts/credits/{accountNumber}. To improve our financial situation, we will add 100 USD.
After triggering the end-point, we visit the H2 console. Now there should be two more events. The MoneyCreditedEvent and then, the AccountActivatedEvent.
Step 4 – Listing the Events
Lastly, we would also like to get a list of all the events on a particular aggregate or an account. After all, the whole point of Event Sourcing was to be able to read the events for some business purpose.
If you remember, we have already implemented an end-point to fetch the list of events. You can find it in the Account Queries section in Swagger UI view for our application. Basically, it is a GET method.
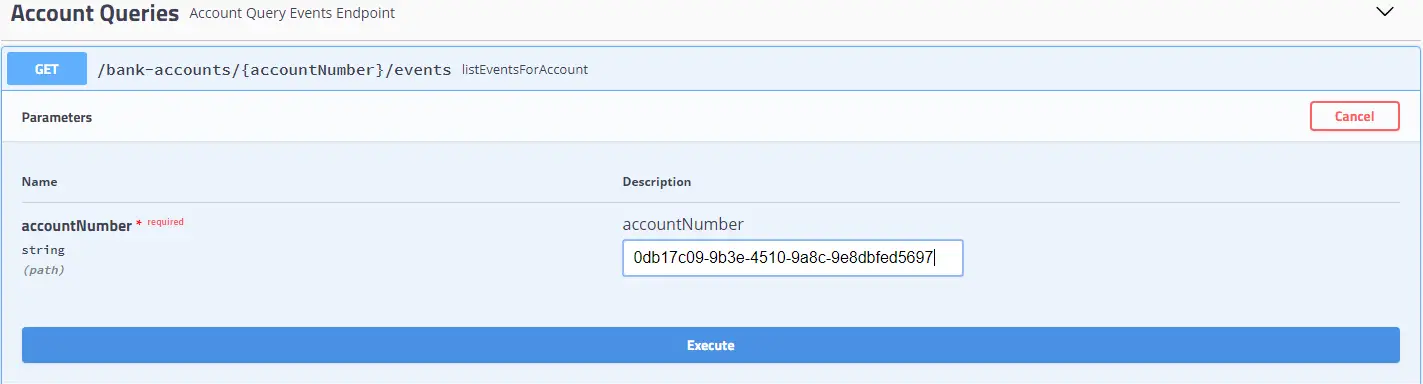
We provide the Account Number as input and click Execute.
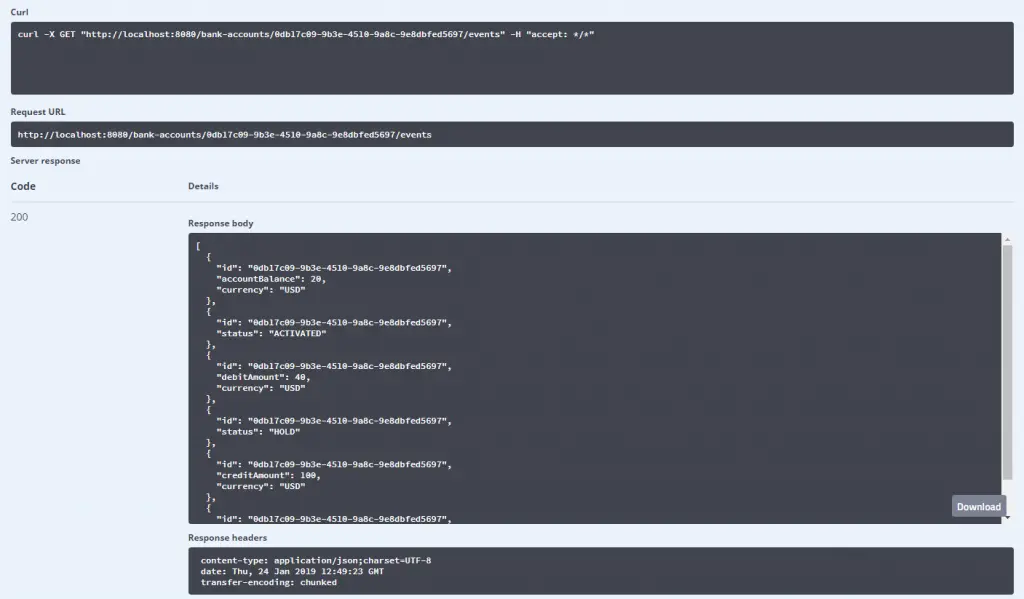
If everything has gone fine till now, we will see the list of events in the output. While fetching, Axon automatically decodes the payload to our usual data values.
Conclusion
With this, we have successfully implemented Event Sourcing with Axon and Spring Boot. The entire application code is available on Github for reference.
There is a lot more tweaking that can be done on the application for production purposes. However, on a conceptual level, we have implemented everything required for building an Event Sourcing application.
Event Sourcing goes very well with another popular microservices data management pattern known as CQRS (Command Query Responsibility Segregation). Axon allows us to implement CQRS views with ease. You can refer to the below posts:
In Event Sourcing and CQRS using Axon and Spring Boot – Part 1, we understand how Event Sourcing and CQRS go hand-in-hand with each other.
In Event Sourcing and CQRS using Axon and Spring Boot – Part 2, we implement Event Sourcing and CQRS together in a single Spring Boot application.
28 Comments
Alex · February 12, 2019 at 7:45 am
Great serie of articles, very clear and concise. I look forward the part of the CQRS and the Sagas 😉 .
Thank you
Poonam · May 6, 2019 at 1:06 pm
How to login in testdb?
Saurabh Dashora · May 8, 2019 at 12:04 pm
Hi Poonam,
You can login to testdb using http://localhost:8080/h2-console. You don’t need to enter any user id and password.
Michael · December 6, 2019 at 4:27 pm
Poonam this stumped my too. You need to enter this in the JDBC URL field before you log in
jdbc:h2:mem:testdb
Great example by the way. thanks
Saurabh Dashora · December 7, 2019 at 7:26 am
Thanks for the feedback Michael!
Kedar Nandimath · June 10, 2019 at 2:25 pm
Hi Saurabh, Very Precise and clear explanation. However, In axon official website it’s strongly recommended that, there should not be any business logic in @EventSourcingHandler method. Could you please elaborate the purpose of adding a business logic in @EventSourcingHandler method?
Saurabh Dashora · June 11, 2019 at 11:52 am
Hi Kedar, thanks for your feedback. I agree there should NOT be any business logic in Event Sourcing handler. It was there only for demo purposes. In a real prod level app, you should strive to put the business logic in the service layer.
Tushar Goel · September 2, 2019 at 5:43 am
Thanks for the article. while running the code, i am getting following error in axon server”
2019-09-02 08:32:51.781 WARN 6196 — [ool-4-thread-15] i.axoniq.axonserver.grpc.CommandService : 11900@NOI-DRN8FC2.default: Error on connection from subscriber – CANCELLED: ca
elled before receiving half close
But in REST response i am getting response string.. any idea?
Saurabh Dashora · September 3, 2019 at 12:57 pm
Hi Tushar,
Warning should not be an issue in this case. Is the data also getting persisted in the database as expected?
deni · December 18, 2019 at 4:28 am
Hi, very good tutorial.
I want to ask a question, i tried to create my own simple axon process following in your tutorial, but i always end up getting error when I ‘updated’ my data such as
– `Aggregate identifier must be non-null after applying an event. Make sure the aggregate identifier is initialized at the latest when handling the creation event.`
– `An event for aggregate [f585a4f5-6aed-4a71-b659-bcff0e24e2ca] at sequence [0] was already inserted`
when I debug your AccountAggregate in Debit/Credit process, how can you make the process restart from createAccountCommand ? because my own updated status never restart from createdEvent
thanks, sorry if my english is bad 😀
Saurabh Dashora · December 18, 2019 at 11:21 am
Hi Deni,
Create Account Command will be issued only once for a particular aggregate. All subsequent commands on the same id will create a new event for that particular id. Also, Create Account Command is set on the constructor of the Account Aggregate. That will be triggered only when the Account Aggregate is instantiated.
Anonymous · January 9, 2020 at 10:55 am
i don’t see the table DOMAIN_EVENT_ENTRY in H2 database, can anyone help here .
Saurabh Dashora · January 10, 2020 at 11:34 am
Hello, can you tell the connection parameters you are using to connect to the H2 database?
Sainath. · February 13, 2020 at 9:57 am
How the axon event store interact with H2 database and store information by the way after login to H2 database there is no DOMAIN_EVENT_ENTRY table.
Saurabh Dashora · February 16, 2020 at 10:39 am
Hi Sainath,
While opening the H2 console, which database are you connecting to?
If you are using the sample app, the database should be testdb.
Sainath · February 18, 2020 at 12:21 pm
I am connecting to default display config after accessing this url “http://localhost:8080/h2-console/”. It is connecting properly but there is DOMAIN_EVENT_ENTRY table in that.
Below or the default display details: and it seems like it is connects to testdb only.
Login
Saved Settings: Generic H2 (Embedded)
Setting Name: Generic H2 (Embedded)
Driver Class: org.h2.Driver
JDBC URL: jdbc:h2:~/test
User Name: sa
Password:
Saurabh Dashora · February 18, 2020 at 12:33 pm
Hi Sainath,
Could you please try changing the JDBC URL to jdbc:h2:mem:testdb and then try connecting?
Keshav · March 11, 2020 at 5:27 am
Hi Saurabh, great post!. The app works just fine with Axon version 3.2 as per your github repo, however when I upgrade to Axon version 4.3, I can’t see DOMAIN_EVENT_ENTRY table being created and events being persisted. I see my application instance connected to Axon server in Axon Dashboard. Could you please upgrade the Axon version in your github repo for a working example.
Saurabh Dashora · April 13, 2020 at 5:05 am
Hi Keshav,
Yes you are correct. Incidentally, I have already covered Axon version 4.* and its capabilities in another post. Also, the code for the same is available in another github repo.
https://progressive-coder.local/building-microservices-with-axon-server-and-spring-boot/
Sergey Dayneko · May 20, 2020 at 8:53 am
Thank you so much for the tutorial! Everything by necessity, nothing more!
Saurabh Dashora · May 20, 2020 at 9:03 am
Thanks for the great comment Sergey! Happy to help.
kamran · August 6, 2020 at 7:09 am
Hi Dashora, great post
thanks fo nice r article https://progressivecoder.com/implementing-event-sourcing-with-axon-and-spring-boot-part-3//
can you please advise , I want to store events(axon domain_events etc) in apache cassandra and application data in SQL (postgres) , how can we do that in spring boot.
Saurabh Dashora · August 6, 2020 at 10:13 am
Hi,
Happy to know that the article was useful. As to your question, while we can use any type of database as a event store (all you need to do is disable axon server and instead use another datasource), certain choices might not be good for performance reasons. You can check out this documentation from Axon itself about the choice of database.
Dnyaneshwar · August 17, 2021 at 6:50 am
HI Saurabh ,
Thanks for nice tnutorial,
Can you please provide the url that has complete flow CQRs + Saga
Saurabh Dashora · August 24, 2021 at 11:11 am
Hi,
For Saga implementation, please refer to the below post:
https://progressivecoder.com/saga-pattern-implementation-with-axon-and-spring-boot-part-1/
For CQRS, you can refer to the below post:
https://progressivecoder.com/event-sourcing-and-cqrs-with-axon-and-spring-boot-part-1/
Teli · September 1, 2021 at 8:34 am
Hi,
The amount of the various event are stored in db?
Saurabh Dashora · September 1, 2021 at 8:47 am
Yes, the entire event trail is stored.
jf · September 1, 2021 at 9:31 am
Hi,
It is stored in hashed form in the column payload of table DOMAIN_EVENT_ENTRY.