Spring Boot H2 Database is an extremely useful tool in the arsenal of any developer working on a Spring Boot application.
H2 database is a java in-memory database that allows you, as a developer, a large amount of freedom to work with database changes during development phase.
The Spring Boot H2 database can be embedded within a Java application or could also be run in client-server mode. It is also very useful during development phase for iterating through schema changes without worrying about making changes to the actual database such as MySQL or PostgreSQL.
To recap things, we looked at the Spring Boot Startup process, in the last post. Also, we took a high-level view of the various dependencies.
In this post, we will take our first step towards building production-ready Spring Boot Microservices. But for that, we will first learn the process of setting up Spring Boot H2 database.
Spring Boot H2 Database – The Required Dependencies
The main dependencies to enable H2 database in our Spring Boot application are as follows:
1 2 3 4 5 6 7 8 9 | <dependency> <groupId>org.springframework.boot</groupId> <artifactId>spring-boot-starter-data-jpa</artifactId> </dependency> <dependency> <groupId>com.h2database</groupId> <artifactId>h2</artifactId> <scope>runtime</scope> </dependency> |
Spring Boot Starter Data JPA pulls in Hibernate and JPA dependencies. But apart from these two, Spring Data JPA also provides several interfaces that make it super easy to build repositories.
H2 database pulls in support for H2 Spring Boot such as the data source, H2 console and drivers required to run it.
Declaring an Entity
An Entity is a Java class representation of a database table. The way it works is that you define a class in Java and annotate it with appropriate annotations. After that, Hibernate kicks in and takes care of mapping the objects to the underlying relational model.
Let’s see how we do that.
In our Spring Boot application, we create a package named entities. And within that, we create a class named Vehicle
1 2 3 4 5 6 7 8 9 10 11 12 13 14 15 16 17 18 19 20 21 22 23 24 25 26 27 28 29 30 31 32 33 34 35 36 37 38 39 40 41 42 43 44 45 46 47 48 49 50 51 52 53 54 55 56 57 58 | @Entity @Table(name = "vehicle") public class Vehicle { @Id private UUID id; private String vehicleIdentityNumber; private String make; private String model; public Vehicle() { } public UUID getId() { return id; } public void setId(UUID id) { this.id = id; } public String getVehicleIdentityNumber() { return vehicleIdentityNumber; } public void setVehicleIdentityNumber(String vehicleIdentityNumber) { this.vehicleIdentityNumber = vehicleIdentityNumber; } public String getMake() { return make; } public void setMake(String make) { this.make = make; } public String getModel() { return model; } public void setModel(String model) { this.model = model; } @Override public String toString() { return "Vehicle{" + "id=" + id + ", vehicleIdentityNumber='" + vehicleIdentityNumber + '\'' + ", make='" + make + '\'' + ", model='" + model + '\'' + '}'; } } |
The Vehicle class is annotated with @Entity annotation. This annotation basically tells JPA that this class should be mapped to its own table. In other words, @Entity is a type of marker interface similar to Serializable in Java.
Also, if we need more fine-grained control over the name of the table, we can use @Table annotation. However, the @Table annotation is not mandatory. Basically, if we don’t specify it, JPA will use the class name as the table name.
Next important bit to note here is the use of @Id annotation. An entity should have at least one Id field. Also, this will act as a primary key for the table. In our case, we have declared this Id field as a UUID.
This is almost enough to get up and running with a basic H2 Spring Boot configuration. However, to see something tangible, there are some more configuration settings.
Enabling the Spring Boot H2 Database Console View
Spring Boot H2 also provides a console view that can be used to see the tables created as well as the data inserted. It’s a pretty handy feature to see your persistence logic in action. Also, you can inspect the data in the h2 console view allowing you to test your application locally.
To enable the H2 console view, open the application.properties file in your application’s resources folder. Then, add the below statements in the file:
1 2 3 | #H2 settings spring.h2.console.enabled=true spring.h2.console.path=/h2-console |
The above statements are pretty self-explanatory. The first one enables h2 console whereas, the second statement defines the path on which the console would be accessible.
Run the application now. And visit http://localhost:8080/h2-console
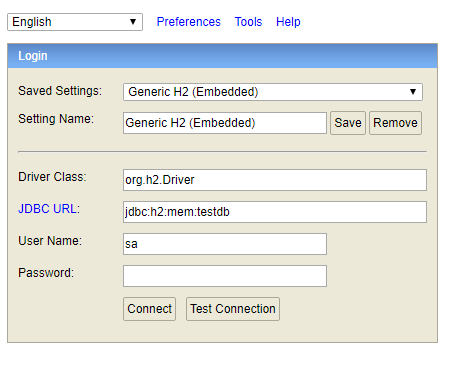
Note the JDBC URL. If you have used Spring Boot H2 the first time, you might see a different URL. However, in such a case, you should change it to the one shown in the picture above where we are trying to connect to testdb. Also, you can leave the default user name and password as it is.
Click Connect. After this, you would be able to see the h2 console view. Basically, if you’ve followed the steps in this article, you should see a Vehicle table. Also, this table should have all the fields defined in the Entity class.
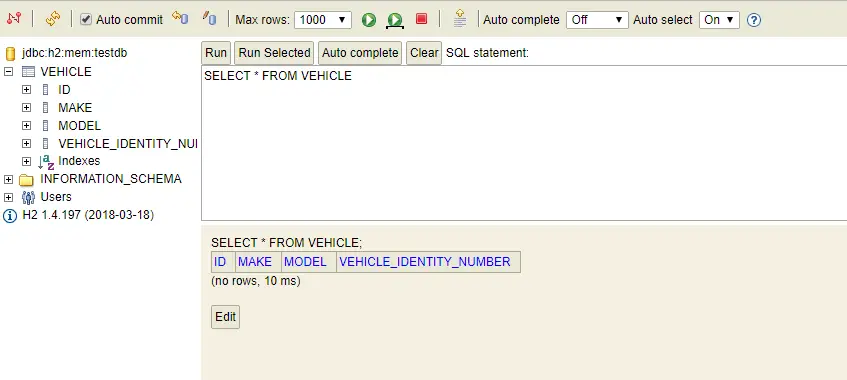
Right now, the table wold be empty because we haven’t inserted any records.
Controlling the H2 Database Properties
You might have a requirement to control the URL and other parameters for your H2 console. Basically, this is useful if you have a need to use the same H2 database in multiple Spring Boot applications.
In that case, you can specify some more settings in the application.properties file as below:
1 2 3 4 5 6 7 8 9 | #H2 settings spring.h2.console.enabled=true spring.h2.console.path=/h2-console spring.datasource.url=jdbc:h2:mem:mytestdb spring.datasource.driverClassName=org.h2.Driver spring.datasource.username=sa spring.datasource.password= spring.jpa.hibernate.ddl-auto=create |
Now, start-up the Spring Boot application again and navigate to http://localhost:8080/h2-console
This time you will need to change the JDBC URL to the one you specified in the application.properties.
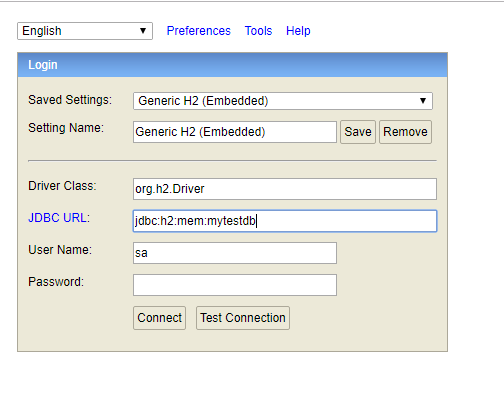
Note that we changed the URL to point to mytestdb instead of the default value.
You can now click Connect and see the Spring Boot H2 schema and tables as before.
Conclusion
With this we have basically completed setting up Spring Boot H2 Database for a sample application.
The code sample for this post is available on Github for reference.
In the next post, we will look at how to insert records in the H2 database using Spring Boot’s CommandLineRunner interface.
0 Comments