Exception Handling is one of the most important aspects of a production-level Spring Boot Microservice. In the last post, we had added the functionality to read, create and update records using our application. However, our application was not very robust. In this post, we will look at exception handling in a Spring Boot application.
What is Exception Handling?
Consider some of the below scenarios:
- What happens when someone calls your API to fetch a record but that record is not present in the database?
- If someone calls your API with invalid input, what do you do?
- What happens when something unexpected happens in your application?
The answer to some of these questions leads to the concept behind exception handling. More often than not, the difference between a good API and a bad API lies in how exceptions are handled. Basically, consumers are more likely to use an API depending on the quality of its exception handling.
This is in-line with one of the core tenets of API.
Think about your API Consumers. Have empathy for the Consumer.
In a nutshell, one should strive to handle exceptions in the best possible manner:
- Return a clear message explaining the error
- Include important information
- Return proper response status or response code.
- Avoid returning sensitive information. This is especially important after GDPR enforcement.
The HTTP Error Response Codes
Response Codes in case of an exception should be according to the type of exception. Some common error status codes followed in the industry are as follows:
404 (Resource Not Found) – This is one of the most popular status codes. Basically, this status code is used to communicate that the resource requested by the consumer was not found on the server.
400 (Bad Request) – If there is something inherently wrong in the request, this status code is used. Example could be bad data.
401 (Unauthorized) – This is used if the consumer is not authorized to access a particular resource. In other words, the consumer either doesn’t have access or didn’t use the right credentials.
500 (Internal Server Error) – This is used when something goes wrong on the server.
Response Codes and HTTP Methods
Usually, we use certain response status with particular HTTP methods. Let’s examine them:
GET method should not be updating or creating a new resource. Also, this method should be idempotent in nature. In other words, calling the method multiple times should give the same result. Some return codes often used with GET are 200 (OK) or 404 (Resource Not Found) or 400 (Bad Request). You could also potentially get 401 (Unauthorized)
POST method is used to create new resource on the server. If the resource is created synchronously, it should return 201 (CREATED). In case of asynchronous operation, one could consider using 202 (ACCEPTED)
PUT method is used to update an existing resource. It can return the same response codes as GET i.e. 200, 404 or 400.
DELETE method is used to remove a resource from the server. It can return 200 (OK) or even 404 (Resource Not Found). Basically, it depends on the situation.
Exception Handling with Spring Boot
Spring Boot provides excellent support for exception handling using the @RestControllerAdvice annotation. Basically, this enables us to handle exceptions in our application in a global manner.
Some of the features provided are as follows:
- Full control over the response body. Also, we can change the status code if we want.
- Mapping of multiple exceptions to a single handler method.
- Usage of ResponseEntity field for building the output.
Defining the Error Model
Usually, it is a good idea to define a specific model class for populating the error output. We declare a special class to act as our Error Model.
public class ErrorModel {

    private HttpStatus httpStatus;

    private LocalDateTime timestamp;

    private String message;

    private String details;

    public ErrorModel(HttpStatus httpStatus, String message, String details) {
        this.httpStatus = httpStatus;
        this.timestamp = LocalDateTime.now();
        this.message = message;
        this.details = details;
    }

    public HttpStatus getHttpStatus() {
        return httpStatus;
    }

    public LocalDateTime getTimestamp() {
        return timestamp;
    }

    public String getMessage() {
        return message;
    }

    public String getDetails() {
        return details;
    }
}
Global Exception Handler Class
We now create a class to handle the exceptions globally. It would be a good idea to put this class in a separate package within your Spring Boot application. Below is how the class could appear like:
@RestControllerAdvice
public class RestExceptionHandler extends ResponseEntityExceptionHandler {

    @ExceptionHandler(EntityNotFoundException.class)
    private ResponseEntity<ErrorModel> handleEntityNotFound(EntityNotFoundException ex){
        ErrorModel error = new ErrorModel(HttpStatus.NOT_FOUND, "Entity not found", ex.getMessage());

        return new ResponseEntity<>(error, HttpStatus.NOT_FOUND);
    }
}
Basically, this class extends the ResponseEntityExceptionHandler class provided by Spring. Within this class,we can define methods to handle specific exceptions. In the above example, we have declared a method to handle EntityNotFoundException.
Here, we are using the ErrorModel class we just declared. Based on our requirements, the ErrorModel class instance takes the Response Code, a customized message and the exception message as input. We wrap the same in the ResponseEntity object along with the HTTP Status. In this case, we are mapping EntityNotFoundException to HttpStatus.NOT_FOUND or 404.
Usage of the Exception Handling
Basically, our application is now ready to handle the exceptions. Now we simply need to throw the exceptions where they can occur.
We do that in the VehicleQueryServiceImpl as follows:
@Service
public class VehicleQueryServiceImpl implements VehicleQueryService {

    @Autowired
    private VehicleRepository vehicleRepository;

    @Override
    public VehicleQueryDTO getVehicle(UUID id) {
        if (vehicleRepository.findById(id).isPresent()){
            Vehicle fetchedVehicle = vehicleRepository.findById(id).get();
            return new VehicleQueryDTO(fetchedVehicle.getId(), fetchedVehicle.getVehicleIdentityNumber(), fetchedVehicle.getMake(), fetchedVehicle.getModel());
        }else{
            throw new EntityNotFoundException("Vehicle Id " + id.toString() + " not found in the database");
        }
    }

    @Override
    public List<VehicleQueryDTO> listAllVehicles() {
        List<VehicleQueryDTO> vehicleList = new ArrayList<>();

        vehicleRepository.findAll().forEach(vehicle -> {
            vehicleList.add(new VehicleQueryDTO(vehicle.getId(), vehicle.getVehicleIdentityNumber(), vehicle.getMake(), vehicle.getModel()));
        });

        if (vehicleList.size() > 0){
            return vehicleList;
        }else{
            throw new EntityNotFoundException("No Vehicles Found in the Database");
        }
    }
}
Note the EntityNotFoundException being thrown in case we don’t find a vehicle with a particular id or we don’t find any vehicles in the database.
We can also use the exception in the update method when we don’t find the record the consumer wants to update.
@Override
public VehicleQueryDTO updateVehicle(UUID id, VehicleUpdateDTO vehicleUpdateDTO) {

        if (vehicleRepository.findById(id).isPresent()){
            Vehicle existingVehicle = vehicleRepository.findById(id).get();

            existingVehicle.setMake(vehicleUpdateDTO.getMake());
            existingVehicle.setModel(vehicleUpdateDTO.getModel());

            Vehicle updatedVehicle = vehicleRepository.save(existingVehicle);

            return new VehicleQueryDTO(updatedVehicle.getId(), updatedVehicle.getVehicleIdentityNumber(),
                    updatedVehicle.getMake(), updatedVehicle.getModel());
        }else{
            throw new EntityNotFoundException("Vehicle Id " + id.toString() + " not found in the database");
        }
}
Testing the Exception Handling
Now it’s time to test whether our exception handling setup is working as expected. To test it, build the application. Once the application starts up, we can trigger the GET method using POSTMAN. We already looked at setting up POSTMAN in the previous post.
See below:
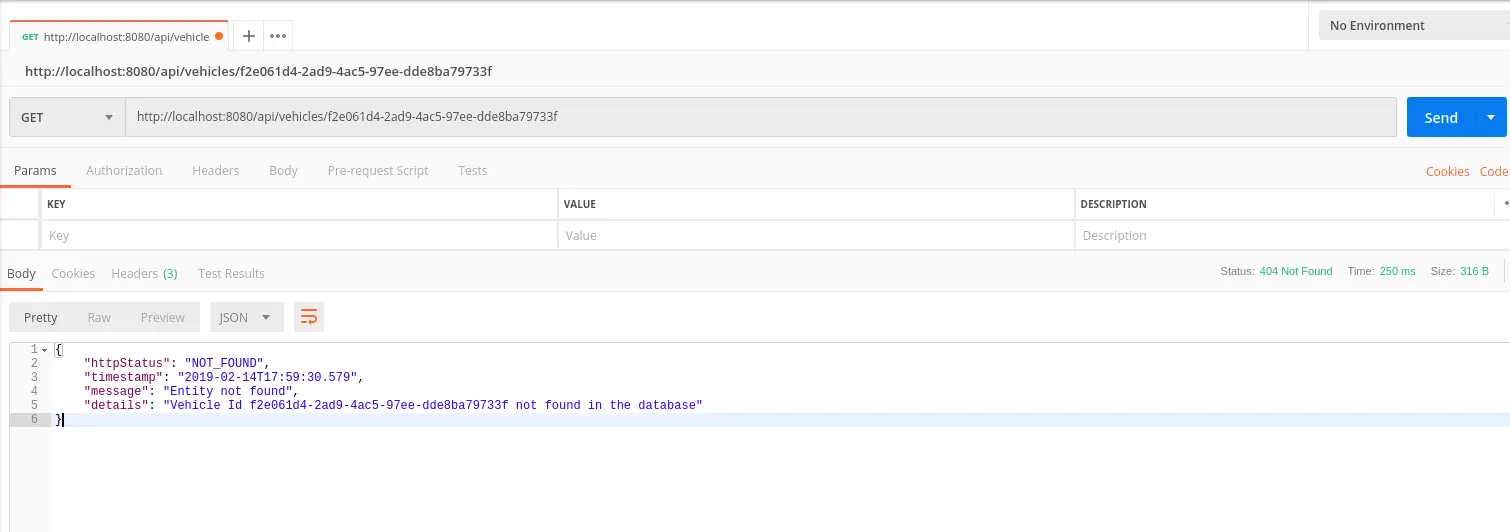
All the required fields are populated correctly. The HTTP Status is showing NOT_FOUND or 404. We also have the timestamp. Lastly, we have the high-level error reason and the detailed error message. Using this output, consumers of the API can decide on the next action.
Conclusion
In this post, we saw how to perform exception handling in a Spring Boot application. The code for this is available on Github.
Of course, it is a small working demo. However, a real production app will have a lot of different types of exceptions and handlers to handle them appropriately. But with this initial setup also, our application is now a lot more robust and user friendly.
In the next post, we will look at how we can add validations to our starter application.
0 Comments