Apache Airflow is an open-source tool for orchestrating complex computational workflows and create data processing pipelines. In this post, we will create our first Airflow DAG and execute it. If you are looking to setup Airflow, refer to this detailed post explaining the steps.
1 – What is a DAG?
A workflow in Airflow is designed as a Directed Acyclic Graph (DAG). In other words, while designing a workflow, we should think of dividing the workflow into small tasks that can execute independently of each other.
But what is a DAG really?
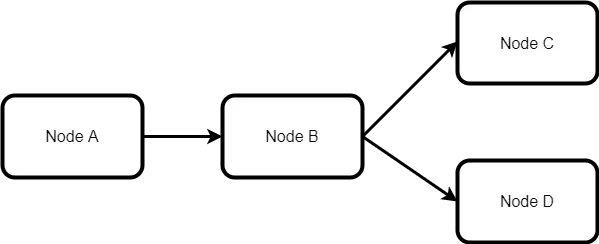
In simple terms, a DAG is a graph with nodes connected via directed edges. Also, there should be no cycles within such a graph. For example, the below diagram represents a DAG.
However, the below example is not a DAG:

Why is it so?
It is because there is a cycle in the second diagram from Node C to Node A. Due to this cycle, this DAG will not execute. However, the first diagram is a valid DAG.
A valid DAG can execute in an Airflow installation. Whenever, a DAG is triggered, a DAGRun is created. We can think of a DAGrun as an instance of the DAG with an execution timestamp.
2 – What are Nodes in a DAG?
The next aspect to understand is the meaning of a Node in a DAG. A Node is nothing but an operator.
To elaborate, an operator is a class that contains the logic of what we want to achieve in the DAG. For example, if we want to execute a Python script, we will have a Python operator. If we wish to execute a Bash command, we have Bash operator. There are several in-built operators available to us as part of Airflow. Documentation about them can be found here.
When a particular operator is triggered, it becomes a task and executes as part of the overall DAG run.
3 – Creating a Hello World DAG
Assuming that Airflow is already setup, we will create our first hello world DAG. All it will do is print a message to the log.
Below is the code for the DAG.
from datetime import datetime
from airflow import DAG
from airflow.operators.dummy_operator import DummyOperator
from airflow.operators.python_operator import PythonOperator

def print_hello():
    return 'Hello world from first Airflow DAG!'

dag = DAG('hello_world', description='Hello World DAG',
          schedule_interval='0 12 * * *',
          start_date=datetime(2017, 3, 20), catchup=False)

hello_operator = PythonOperator(task_id='hello_task', python_callable=print_hello, dag=dag)

hello_operator
We place this code (DAG) in our AIRFLOW_HOME directory under the dags folder. We name it hello_world.py.
├── airflow-webserver-monitor.pid
├── airflow-webserver.err
├── airflow-webserver.log
├── airflow-webserver.out
├── airflow-webserver.pid
├── airflow.cfg
├── airflow.db
├── airflow.db-journal
├── dags
│   ├── __pycache__
│   │   └── hello_world.cpython-36.pyc
│   └── hello_world.py
Let us understand what we have done in the file:
- In the first few lines, we are simply importing a few packages from airflow.
- Next, we define a function that prints the hello message.
- After that, we declare the DAG. It takes arguments such as name, description, schedule_interval, start_date and catchup. Setting catchup to false prevents Airflow from having the DAG runs catch up to the current date.
- Next, we define the operator and call it the hello_operator. In essence, this uses the in-built PythonOperator to call our print_hello function. We also provide a task_id to this operator.
- The last statement specifies the order of the operators. In this case, we have only one operator.
4 – Running the DAG
To run the DAG, we need to start the Airflow scheduler by executing the below command:
airflow schedulerAirflow scheduler is the entity that actually executes the DAGs. By default, we use SequentialExecutor which executes tasks one by one. In case of more complex workflow, we can use other executors such as LocalExecutor or CeleryExecutor.
If we have the Airflow webserver also running, we would be able to see our hello_world DAG in the list of available DAGs.

To start the DAG, we can to turn on the DAG by clicking the toggle button before the name of the DAG. As soon as that is done, we would be able to see messages in the scheduler logs about the DAG execution.
[2021-07-03 11:49:16,962] {scheduler_job.py:1212} INFO - Executor reports execution of hello_world.hello_task execution_date=2021-07-01 12:00:00+00:00 exited with status success for try_number 1
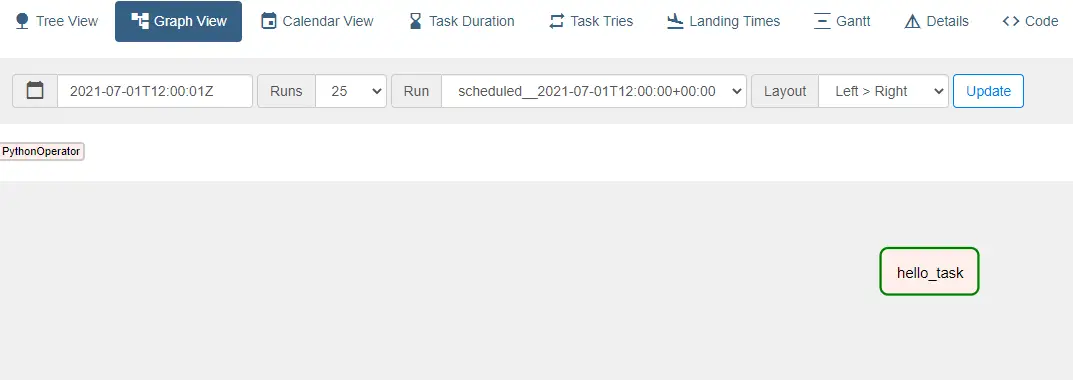
[2021-07-03 11:49:17,100] {dagrun.py:444} INFO - Marking run <DagRun hello_world @ 2021-07-01 12:00:00+00:00: scheduled__2021-07-01T12:00:00+00:00, externally triggered: False> successfulWe can also see the DAG graph view where the hello_world operator has executed successfully.
By clicking on the task box and opening the logs, we can see the logs as below:
[2021-07-03 11:49:16,755] {python.py:151} INFO - Done. Returned value was: Hello world from first Airflow DAG!
[2021-07-03 11:49:16,768] {taskinstance.py:1191} INFO - Marking task as SUCCESS. dag_id=hello_world, task_id=hello_task, execution_date=20210701T120000, start_date=20210703T061916, end_date=20210703T061916
[2021-07-03 11:49:16,781] {taskinstance.py:1245} INFO - 0 downstream tasks scheduled from follow-on schedule check
[2021-07-03 11:49:16,820] {local_task_job.py:151} INFO - Task exited with return code 0
Here, we can see the hello world message. In other words, our DAG executed successfully and the task was marked as SUCCESS.
With this Airflow DAG Example, we have successfully created our first DAG and executed it using Airflow. Though it was a simple hello message, it has helped us understand the concepts behind a DAG execution in detail.
In case of any comments or queries, please write in the comments section below.
4 Comments
vicky · February 4, 2022 at 5:57 pm
Nice and informative
Saurabh Dashora · February 5, 2022 at 1:25 am
Thanks for the nice feedback!
DevPalani · February 15, 2022 at 3:29 pm
could you explain what this schedule interval means? schedule_interval=’0 12 * * *’
Saurabh Dashora · February 18, 2022 at 9:46 am
Hi, schedule_interval describes the schedule of the dag. The value is a CRON expression.