Docker Compose is a tool that allows us to define and run multiple containers. In this post, we will create a Docker Compose NodeJS application and integrate it with Redis. Specifically, we will leverage multiple docker container approach.
If you are new to docker or dockerizing NodeJS applications, check out these posts.
Understanding the Basics of Docker
>>Click to understand the basics of Docker
Creating an efficient Dockerfile for NodeJS application
>>Creating Dockerfile for NodeJS application
Below is our plan for this post:
- Understand the need of Docker Compose.
- Create a NodeJS application and dockerizing it using a Dockerfile.
- Create a Docker Compose YAML file.
- Setup networking with Docker Compose.
- Start up application using Docker Compose Build command.
- Stop Docker Compose Containers.
By the end of this post, we will have a pretty good understanding of Docker Compose. We will also have a Docker Compose NodeJS application with Redis integration.
So let’s start with the above plan and go though it step-by-step.
1. Need for Docker Compose
Docker Compose comes into the picture as soon as multiple docker containers are involved. In other words, if our application becomes complex enough to warrant multi-container approach, Docker Compose becomes important to manage the same.
But why do even need multiple containers?
Consider a situation where we are building a NodeJS application that has to interact with Redis for some reason. Basically, in this case we can follow the below approach using a single Docker container.

If you see above, our single docker container is running both the Node application as well as Redis. We have built an image that has both the NodeJS and Redis. Then, we have used that image to create a docker container.
However, if our humble application becomes popular over time, this single container, we will see a need to scale up our application. In other words, we would like to increase the number of containers. The below illustration depicts such a situation.
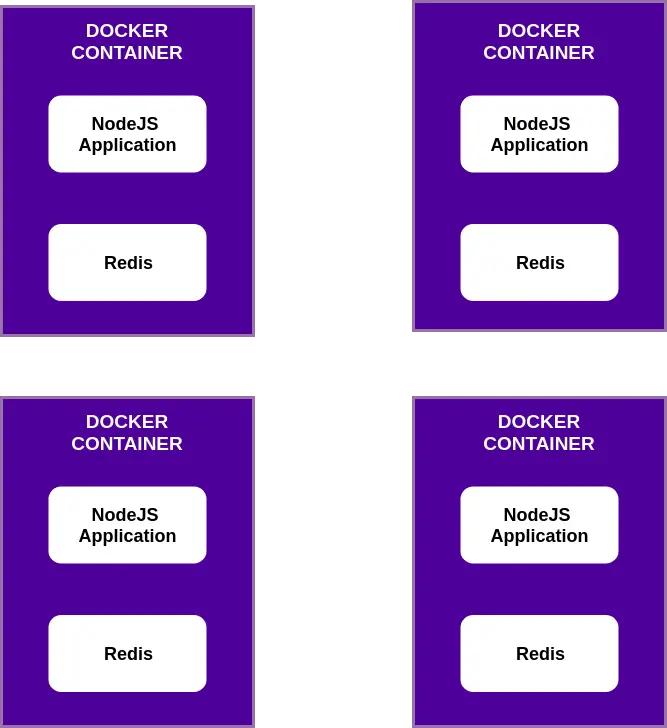
As you can see, we are now running multiple docker containers using the image. However, as soon as this happens, we run into issues because now our data on Redis is no longer consistent across these different instances. Basically, each container is its own isolated world.
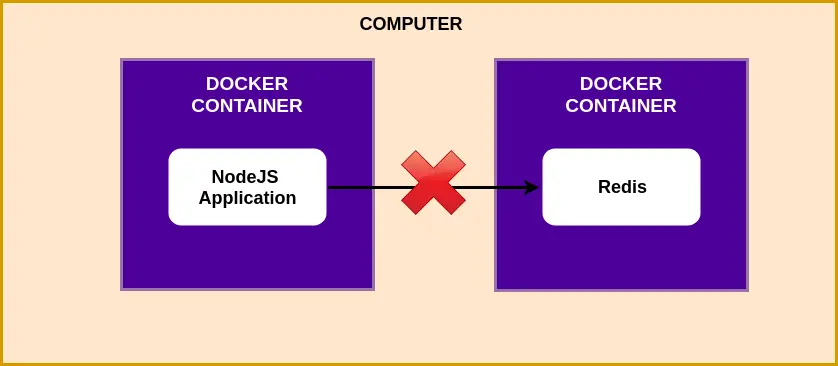
A better approach to designing such an application would be as below:
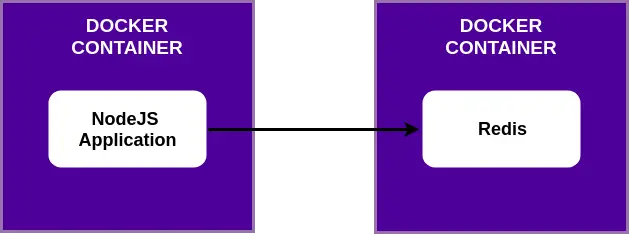
If you see above, we have one container for just the NodeJS application. And the second docker container is for running Redis. In this case, we can also increase the number of docker containers running NodeJS application without running into data issues.
And this is where Docker Compose helps us in defining and running multiple containers that belong to the same application.
2. Create a NodeJS Application and Dockerizing it using Dockerfile
To demonstrate the use of Docker Compose, we will now start creating a small application using NodeJS and Redis. The job of this small application is to keep track of the number of visits. Basically, each time someone visits the application, it increments the visitor count.
We will be using the below approach to make this application.
Basically, one Docker container will host our NodeJS application. The other container will have a copy of Redis.
STEP 1 – Defining the Dependencies
To make our NodeJS application, we need to put together a package.json file. This file lists all the dependencies our application needs to work properly.
We will create a project folder named docker-compose-nodejs-redis. And within that folder we will create the package.json file as below.
{
    "dependencies": {
        "express": "*",
        "redis": "2.8.0"
    },
    "scripts": {
        "start": "node index.js"
    }
}
Basically, here we specify that we need express for our application. Any version would be fine for our need. Also, we are specifying redis as the second dependency. Lastly, we also define a start script to start up our application.
STEP 2 – Writing the Application Logic
The overall logic for our application is very simple. Below is what we need to add in the index.js file.
const express = require('express')
const redis = require('redis')

const app = express()
const client = redis.createClient()

//Set initial visits
client.set('visits', 0);

//defining the root endpoint
app.get('/', (req, res) => {
    client.get('visits', (err, visits) => {
        res.send('Number of visits is: ' + visits + 1)
        client.set('visits', parseInt(visits) + 1)
    })
})

//specifying the listening port
app.listen(8081, ()=>{
    console.log('Listening on port 8081')
})
Let’s walk-through what we are doing in this application.
- We create an express application. Also, we create a client to connect to Redis. Here, we have intentionally left the arguments to createClient() function as blank. We are going to update the same later in this post.
- After the client is initialized, we use to to set the initial visits counter to 0.
- Next, we create a express route handler. Each time someone accesses our application, we fetch the visits counter from Redis using the client. We send the response back to the caller and also update the visits counter by 1.
- Lastly, we set the application to start listening on port 8081.
Basically, that’s all we need in our application.
STEP 3 – Creating the Dockerfile for NodeJS Application
Now we can put together a Dockerfile for our NodeJS application. In the project folder, create a file named Dockerfile and add the below contents to the same.
#Specify a base image
FROM node:alpine

#Specify a working directory
WORKDIR /usr/app

#Copy the dependencies file
COPY ./package.json ./

#Install dependencies
RUN npm install

#Copy remaining files
COPY ./ ./

#Default command
CMD ["npm","start"]
To get a detailed rundown of the all the options in the above file, you can refer to Creating Dockerfile for NodeJS application. Basically, in a nutshell, we are using a base image and then copying our project artifacts to that image. Lastly, we attach a run command that will be used to start the container.
Next we can build the Docker image using the docker build command.
docker build .Once the image is created, we can create a running container with the image id.
docker run <image-id>At this point, we will receive the below error.
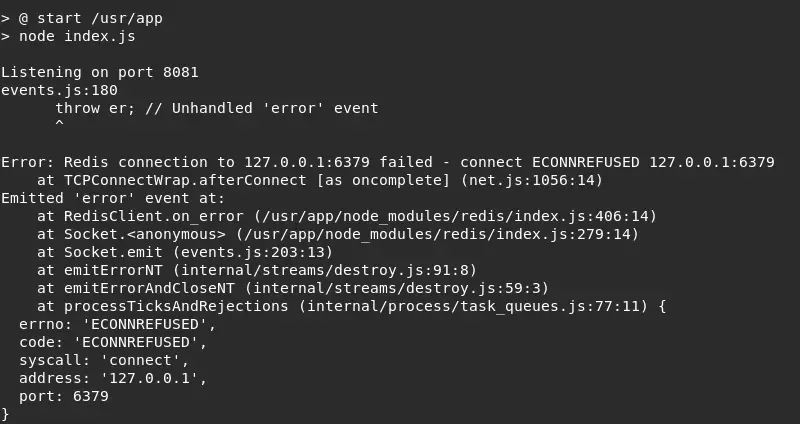
Basically, our Docker NodeJS application is not able to find the Redis instance. By default, our application tries to access Redis at 127.0.0.1:6379. However, we don’t have Redis currently running. However, we have a successfully dockerized Node application.
We will be fixing the issue with Redis in the upcoming sections.
3. Create Docker Compose YAML file
Before we create an actual Docker Compose YAML file let’s check out a simple case. We will run Redis in a separate container on our machine using the below command.
docker run redisA Redis server will come up on our machine. We will be able to see something like below in the logs.
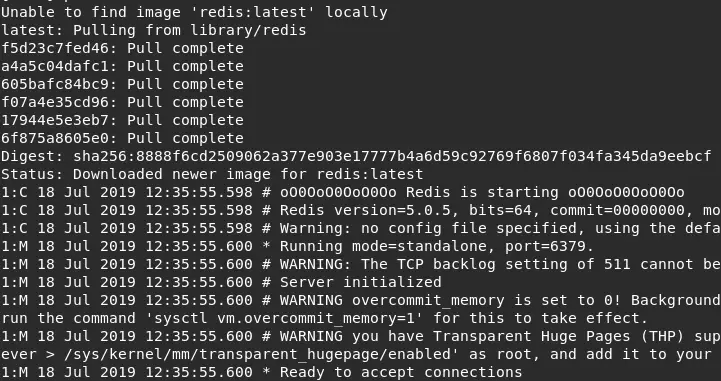
The message ‘Ready to accept connections‘ means that our Redis server is ready to be connected to.
Now, we can again start our NodeJS Docker Container using the docker run command. However, even now, we get the same error saying ‘Error: Redis Connection to 127.0.0.1:6379 failed‘.
But why did this happen?
Shouldn’t our NodeJS Docker Container successfully managed to connect to the Redis container?
The answer is that no it won’t. By default, when you have two containers running on your local machine, they don’t have any direct connection with each other. In essence, both the containers are sort of isolated processes running in their world.
And this is where Docker Compose comes to our aid. In other words, Docker Compose makes it easy for us to connect multiple Docker containers without forcing us to write complicated commands using the Docker CLI.
With this, let’s put together our Docker Compose YAML file. To do so, we need to create a file named docker-compose.yml in the root of our project. Once we create the file, we can add the below configuration to the same.
version: '3'
services:
  redis-server:
    image: 'redis'
  node-app:
    build: .
    ports:
      - "4001:8081"
Understanding the Docker Compose YAML file
Let’s understand what we are doing in this file.
- The version tag defines the Docker Compose version we want to use.
- The services section can be used to define the various Docker Compose Services we want to be part of this Docker Compose build. Basically, you can think of service as a docker container we want to create.
- In this case, the first service we declare is the redis-server. Also, we specify that to create a container for this service, the redis image from Docker Hub should be used.
- The second service is the node-app. For this, we specify the build instruction saying that we need to build using the Dockerfile in the root directory. Also, we specify a port mapping using the ports tag. Here, 4001 is the port on our local machine. And 8081 is the port of the docker container.
And with this, our Docker Compose YAML file is done.
4. Setup Container Networking with Docker Compose
The major need of Docker Compose is that the multiple containers connect to each other seamlessly. However, in our Docker Compose YAML file, we haven’t specified any networking parameters to connect the Node application to Redis.
Basically, when we use Docker Compose to create multiple containers, our containers are created on the same network. In other words, just by using Docker Compose, we ensure that our containers can talk to each seamlessly.
The only change we need to perform is in our index.js file where we create a Redis client.
const app = express()
const client = redis.createClient({
    host: 'redis-server',
    port: 6379
})
Basically, when we create the client, we need to pass in parameters such as the host and port of our Redis server. Usually, the host would be a URL of some sort. However, when we use Docker Compose to create our containers, we can specify the host name by its Docker Compose service name.
In this case, we named our Redis service as redis-server in the docker-compose.yml file. We use the same name i.e. redis-server to create a client in the index.js.
5. Start Containers using Docker Compose Up Command
Now we are all set to start up our containers using Docker Compose commands.
To start up the containers, we can open the terminal (or command prompt) in the root folder of our project and issue the below command.
docker-compose upWe can see the start up logs as shown in the screenshot below.

Basically, our Dockerized NodeJS Application started successfully. It was also able to connect to our Redis docker container.
We can now access the application at http://localhost:4001.
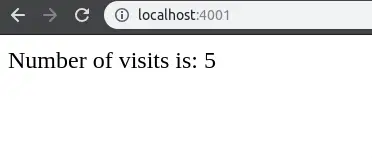
As you can see, the number of visits is being displayed. If we hit refresh on the page, we will be able to see the visit counter getting updated with every hit.
Another useful command for docker compose is when you want to rebuild a new image for your container. Basically, this is for a case where you have made some changes to your application code and want to rebuild the images.
docker-compose up --buildThe –build flag ensures that new images for your containers are built.
6. Stop Docker Compose Containers in background
A couple of useful commands can help us start and stop our Docker Compose Containers in the background.
To start up Docker Compose in the background we can use the below command
docker-compose up -dThe Docker containers will start up in the background and control returns to the terminal.

To stop these running containers, we can then execute the below command.
docker-compose down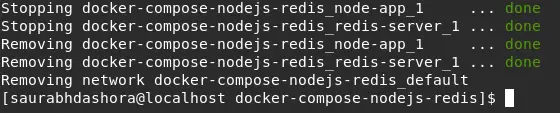
As you can see in the above screenshot, we first stop the NodeJS Docker Container followed by the Redis Container. Then, we remove the containers and finally, we remove the network.
Conclusion
With this, we have completed our goal of creating a Docker Compose NodeJS Application with Redis Integration.
Basically, we have created a visitor tracking application using NodeJS and Redis. To run these applications, we have dockerized them and then, used Docker Compose to spin up multiple containers. To define the Docker Compose services or containers, we created a Docker Compose YAML file.
Using the networking feature available out of the box with Docker Compose, we have been also able to connect our NodeJS application to the Redis server.
The code for this post is available on Github for your reference.
If you have any queries or doubts, please write in the comments section below.
Happy Learning!
17 Comments
Anonymous · September 20, 2019 at 11:12 am
not able to connect to Redis, when I try to run the image from the place other than root.
Saurabh Dashora · September 21, 2019 at 2:56 am
Hi, could you please elaborate on the issue you are facing? Like what are the steps you followed and what is the error you are facing…
Anonymous · September 25, 2019 at 9:31 am
https://stackoverflow.com/questions/58027368/docker-not-able-to-connect-to-redis-when-using-docker-run-instead-of-docker-com/58036524#58036524
Vivek Choudhary · September 25, 2019 at 9:40 am
sorry for not being specific earlier, my question is that how does docker-compose solve the problem of our app being popular over time?
like if I build the image of it using docker-compose up –build, it just creates the image of the container but isn’t it the same thing we wanted to avoid? don’t we have the node app and the redis-server on the same image?
is docker-compose just for development purposes?
becuase when I tried running.
docker run -it –net default_directory_bridge myusername/myimage
my node app wasn’t able to find the redis-server
Saurabh Dashora · September 26, 2019 at 12:27 pm
Hello Vivek,
With regards to your application becoming popular over time, you can actually scale an application up or down using Docker compose as well.
I don’t have a post about it right now. But there are some nice articles explaining how to do it.
https://pspdfkit.com/blog/2018/how-to-use-docker-compose-to-run-multiple-instances-of-a-service-in-development/
https://medium.com/@karthi.net/how-to-scale-services-using-docker-compose-31d7b83a6648
Saurabh Dashora · September 26, 2019 at 12:24 pm
Hello,
I’m not sure about Docker run with –net option. It might have different behavior on different host machines.
shippingpp · March 24, 2020 at 11:55 am
This is the most comprehensive nodejs + redis tutorial I’ve read so far. Thank you Saurabh 🙂
Saurabh Dashora · April 13, 2020 at 3:41 am
Thanks for the wonderful feedback!
Anonymous · April 3, 2020 at 8:38 am
Log: Listening to port is not getting printed
Saurabh Dashora · April 13, 2020 at 3:42 am
Can you share your code repo link?
Iam · October 14, 2020 at 8:39 am
Your tutorial is the quick and clear tutorial I was looking for, in order to get started using redis.
Thank you very much!
+1 for the github repo, enabling an even faster overview.
Saurabh Dashora · October 14, 2020 at 2:16 pm
Thanks for the great feedback!!
Kiran · January 22, 2021 at 7:59 am
THis was what I needed to fix my issue 1 week back
Bocar · September 26, 2021 at 3:51 pm
This is exactly what I needed. Thanks a lot.
Saurabh Dashora · September 27, 2021 at 3:26 am
Glad the post was of help!
Catur Bagaskara · July 22, 2022 at 3:02 am
Whoa, thanks for sharing! This tutorial helps me a lot more than several other tutorials. Well, great man!
Saurabh Dashora · July 22, 2022 at 4:42 am
Thanks for the great feedback!