In this post, we will learn how to create a NestJS Redis Microservice. Basically, we will learn how to use the Redis transporter. This transporter leverages the publish/subscribe messaging paradigm.
This post uses the NestJS Microservice package. If you are new to the same, please refer to this detailed post about creating a NestJS Microservice.
1 – The Need for Redis Transporter
In order to understand the need for Redis transporter, we will look at the below illustration.
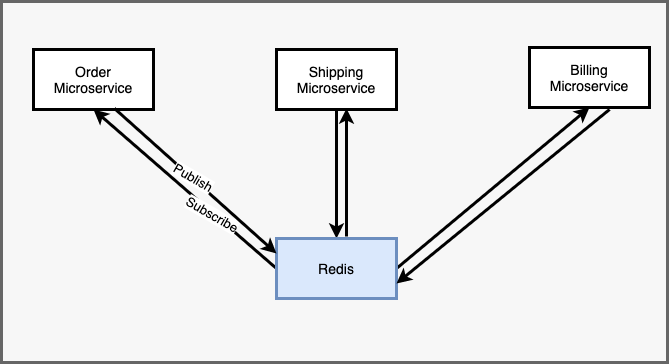
In the above illustration, each service publishes messages to Redis. They also subscribe to messages from Redis. Published messages are categorized into channels without knowing what services will receive the message. Also, it is entirely possible that no service receives a particular type of message.
Each microservice can subscribe to many number of channels. Alternatively, each channel can also be subscribed by multiple services. The basic idea is that the messages are fire and forget. In other words, if a message is published and no service subscribes to it, the message will be removed. Basically, there is no guarantee that every message will reach a subscriber.
In this approach, the various microservices are largely decoupled from each other. There is no need for any microservice to know about the existence of other services. In other words, each microservice can evolve on its own with a common intermediary for communication with its peers.
2 – Installation
We first install the below packages in the client and the microservice.
$ npm i --save @nestjs/microservices
$ npm i --save redis
Basically, the client will publish a message to Redis. The service will subscribe to the message and do something with the message.
Also, we need Redis to make things work. We will be using docker to quickly create a Redis container using the below command:
$ docker run --name demo-redis -p 6379:6379 -d redisIn case you are new to Docker and wish to learn more about it, please refer to this step-by-step guide to learning Docker.
Once the container is up and the packages are installed, we can start with the next steps.
3 – Configuring the NestJS Redis Microservice
To use the Redis transporter, we pass the options object to the createMicroservice() method of the NestFactory class.
import { NestFactory } from '@nestjs/core';
import { MicroserviceOptions, Transport } from '@nestjs/microservices';
import { AppModule } from './app.module';

async function bootstrap() {
  const app = await NestFactory.createMicroservice<MicroserviceOptions>(
    AppModule,
    {
      transport: Transport.REDIS,
      options: {
        url: 'redis://localhost:6379',
      }
    }
  )
  await app.listen();
}
bootstrap();
Basically, we specify the transport type. In this case, we use the Transport.REDIS enum for the same. Also, we specify the URL for our running Redis container.
Note here that the options object depends on the type of transporter. Apart from URL, some other properties available are retryAttempts and retryDelay. You can check out details for all the available properties at this link.
4 – Subscribing to Event in NestJS Redis Microservice
We can now subscribe to a particular event or a message in the NestJS Redis Microservice.
See below code:
import { Controller } from '@nestjs/common';
import { EventPattern, MessagePattern } from '@nestjs/microservices';

@Controller()
export class AppController {

  @MessagePattern({cmd: 'greeting'})
  getGreetingMessage(name: string): string {
    return `Hello ${name}`;
  }

  @MessagePattern({cmd: 'greeting-async'})
  async getGreetingMessageAysnc(name: string): Promise<string> {
    return `Hello ${name} Async`;
  }

  @EventPattern('book-created')
  async handleBookCreatedEvent(data: Record<string, unknown>) {
    console.log(data);
  }

}
Basically, we are using MessagePattern and EventPattern to receive messages. You can read more about these patterns in NestJS Microservice using Request Response and NestJS Event-Based Microservice.
For the purpose of this post, you can simply think of these methods as handlers for different types of messages.
5 – Publish a Message
To publish a message using Redis transporter, we need to configure the client application. First, we have to specify how the client should communicate to Redis.
import { Module } from '@nestjs/common';
import { ClientsModule, Transport } from '@nestjs/microservices';
import { AppController } from './app.controller';
import { AppService } from './app.service';

@Module({
  imports: [
    ClientsModule.register([
      {name: 'GREETING_SERVICE',transport: Transport.REDIS,
      options : {
        url: 'redis://localhost:6379',
      }
    }
    ])
  ],
  controllers: [AppController],
  providers: [AppService],
})
export class AppModule {}
Basically, here we use the register() method of the ClientsModule to register our Redis server. We specify a token name GREETING_SERVICE in the configuration. Basically, using this token name and ClientProxy, we can inject this service within our application.
See below:
import { Inject, Injectable } from '@nestjs/common';
import { ClientProxy } from '@nestjs/microservices';

@Injectable()
export class AppService {

  constructor(@Inject('GREETING_SERVICE') private client: ClientProxy){}

  async getHello(){
    return this.client.send({cmd: 'greeting'}, 'Progressive Coder');
  }

  async getHelloAsync() {
    const message = await this.client.send({cmd: 'greeting-async'}, 'Progressive Coder');
    return message;
  }

  async publishEvent() {
    this.client.emit('book-created', {'bookName': 'The Way Of Kings', 'author': 'Brandon Sanderson'});
  }
}
The ClientProxy instance comes with methods such as send() and emit(). Using these methods, we can send or publish messages. If we are strictly going the publish-subscribe route, it is better to use the emit() method.
Below is a controller implementation to trigger these service methods.
import { Controller, Get } from '@nestjs/common';
import { AppService } from './app.service';

@Controller()
export class AppController {
  constructor(private readonly appService: AppService) {}

  @Get("/greeting")
  async getHello() {
    return this.appService.getHello();
  }

  @Get("/greeting-async")
  async getHelloAsync() {
    return this.appService.getHelloAsync();
  }

  @Get("/publish-event")
  async publishEvent() {
    this.appService.publishEvent();
  }
}
Conclusion
With this, we have successfully learnt how to create a NestJS Redis Microservice. We learnt how to configure Redis transporter and use it to implement publish-subscribe messaging approach.
The code for this post is available on Github.
If you have any comments or queries, please mention in the comments section below.
4 Comments
Bruno · June 21, 2022 at 4:22 pm
Hello Saurabh, can you please exemplify how could we test if redis is receiving the message? (by configuring redis image on docker-compose etc)
Saurabh Dashora · June 23, 2022 at 1:33 am
Hello Bruno, ultimately for testing, we need to read the message. That is what we are doing in the example. You could also probably access the Redis instance directly by connecting through command line.
Mateo · September 8, 2022 at 10:42 am
This is one of the best articles I found about creating a NestJS Redis microservice. Works like a charm. Just wanted to say thank you for your contribution 🙂
Saurabh Dashora · September 19, 2022 at 1:42 am
Hi Mateo…thanks for the wonderful feedback! Happy to help!