In this post, we will learn how to create a NestJS GraphQL Application.
Since, we won’t be going into the basics of NestJS or GraphQL, I will recommend you go through these posts on Getting Started with NestJS and Introduction to GraphQL in case you are new to these topics.
NestJS is a great framework for building backend applications or microservices. On the other hand, GraphQL provides a radical new way of building APIs. With the flexibility of GraphQL coming together with the declarative nature of NestJS, it provides a robust mechanism to build highly adaptable APIs with type-safety.
1 – Installation
The first step is to install the necessary packages.
Nest provides the @nestjs/graphql module. This module provides the core integration between NestJS and GraphQL.
Basically, this module wraps around the industry-standard Apollo server. Therefore, we also need the apollo-server-express package.
Lastly, we need the core graphql package. This is the basis for all GraphQL features.
We can install all of these packages using the below command:
$ npm i @nestjs/graphql graphql apollo-server-express2 – Configuring the GraphQLModule
The next step is to configure the GraphQLModule. To do so, we have to import the GraphQLModule to the App module with some configuration parameters.
See below:
import { Module } from '@nestjs/common';
import { GraphQLModule } from '@nestjs/graphql';
import { join } from 'path';
import { AppController } from './app.controller';
import { AppService } from './app.service';

@Module({
  imports: [GraphQLModule.forRoot({
    autoSchemaFile: join(process.cwd(), 'src/schema.gql'),
    debug: false,
    playground: true
  })],
  controllers: [AppController],
  providers: [AppService],
})
export class AppModule {}
As you can see, we use the forRoot() method to configure the GraphQLModule.
Below are the parameters we provide as part of the configuration object:
- The autoSchemaFile is an important aspect of the code-first approach of NestJS GraphQL integration. We will get into different approaches in a later post. However, important point to understand is that NestJS can automatically generate a GraphQL schema based on a typescript class. The autoSchemaFile property value is the path to the automatically generated schema. In case, we want to keep the schema in memory, we can also set the value of autoSchemaFile as true.
- The debug property sets the mode of the application. In our case, we set it as false.
- GraphQL comes with its own playground to test queries. We enable the playground feature by setting the playground property value as true.
With this, our basic configuration for NestJS GraphQL integration is complete. We need to now create a resolver.
3 – Creating the Resolver
A client sends queries to a GraphQL server. The server receives those queries and looks for an appropriate resolver to resolve the query.
In other words, the job of resolvers is to provide a response to the incoming queries. In this way, you can think of resolvers as request handlers. However, they are governed by the schema supported by the application.
In NestJS GraphQL integration, we can create a resolver as below:
import { Query, Resolver } from "@nestjs/graphql";

@Resolver()
export class HelloResolver {

    @Query(returns => String)
    async hello() {
        return "Hello, World"
    }
}
In a typical GraphQL application, we create a resolver map. However, the @nestjs/graphql generates a resolver map automatically by looking at the metadata of our classes. For example, we annotate the HelloResolver class with the @Resolver() decorator. This tells NestJS that HelloResolver is a resolver.
Next, we annotate the hello() function with @Query() decorator. If no name is specified, the name of the function is treated as the query name (in this case, hello). Within the function, we simply return a string message.
Basically, this whole setup means that whenever a GraphQL query of type hello is received, the hello() function will be invoked and response will be sent to the client.
4 – The App Module Configuration
Now that our resolver is ready, we simply need to tell NestJS about its existence.
We can do it by adding the HelloResolver to the providers array. See below:
import { Module } from '@nestjs/common';
import { GraphQLModule } from '@nestjs/graphql';
import { join } from 'path';
import { AppController } from './app.controller';
import { AppService } from './app.service';
import { HelloResolver } from './hello.resolver';

@Module({
  imports: [GraphQLModule.forRoot({
    autoSchemaFile: join(process.cwd(), 'src/schema.gql'),
    debug: false,
    playground: true
  })],
  controllers: [AppController],
  providers: [AppService, HelloResolver],
})
export class AppModule {}
When a class is added to the providers, NestJS will instantiate it automatically. If interested, you can read more about providers in this detailed post on NestJS Providers.
5 – Testing the Application
Our basic application is now ready. We can start the GraphQL server using npm run start command and test it using the playground.
The playground will be available at http://localhost:3000/graphql. We can trigger the query and see the result as below:
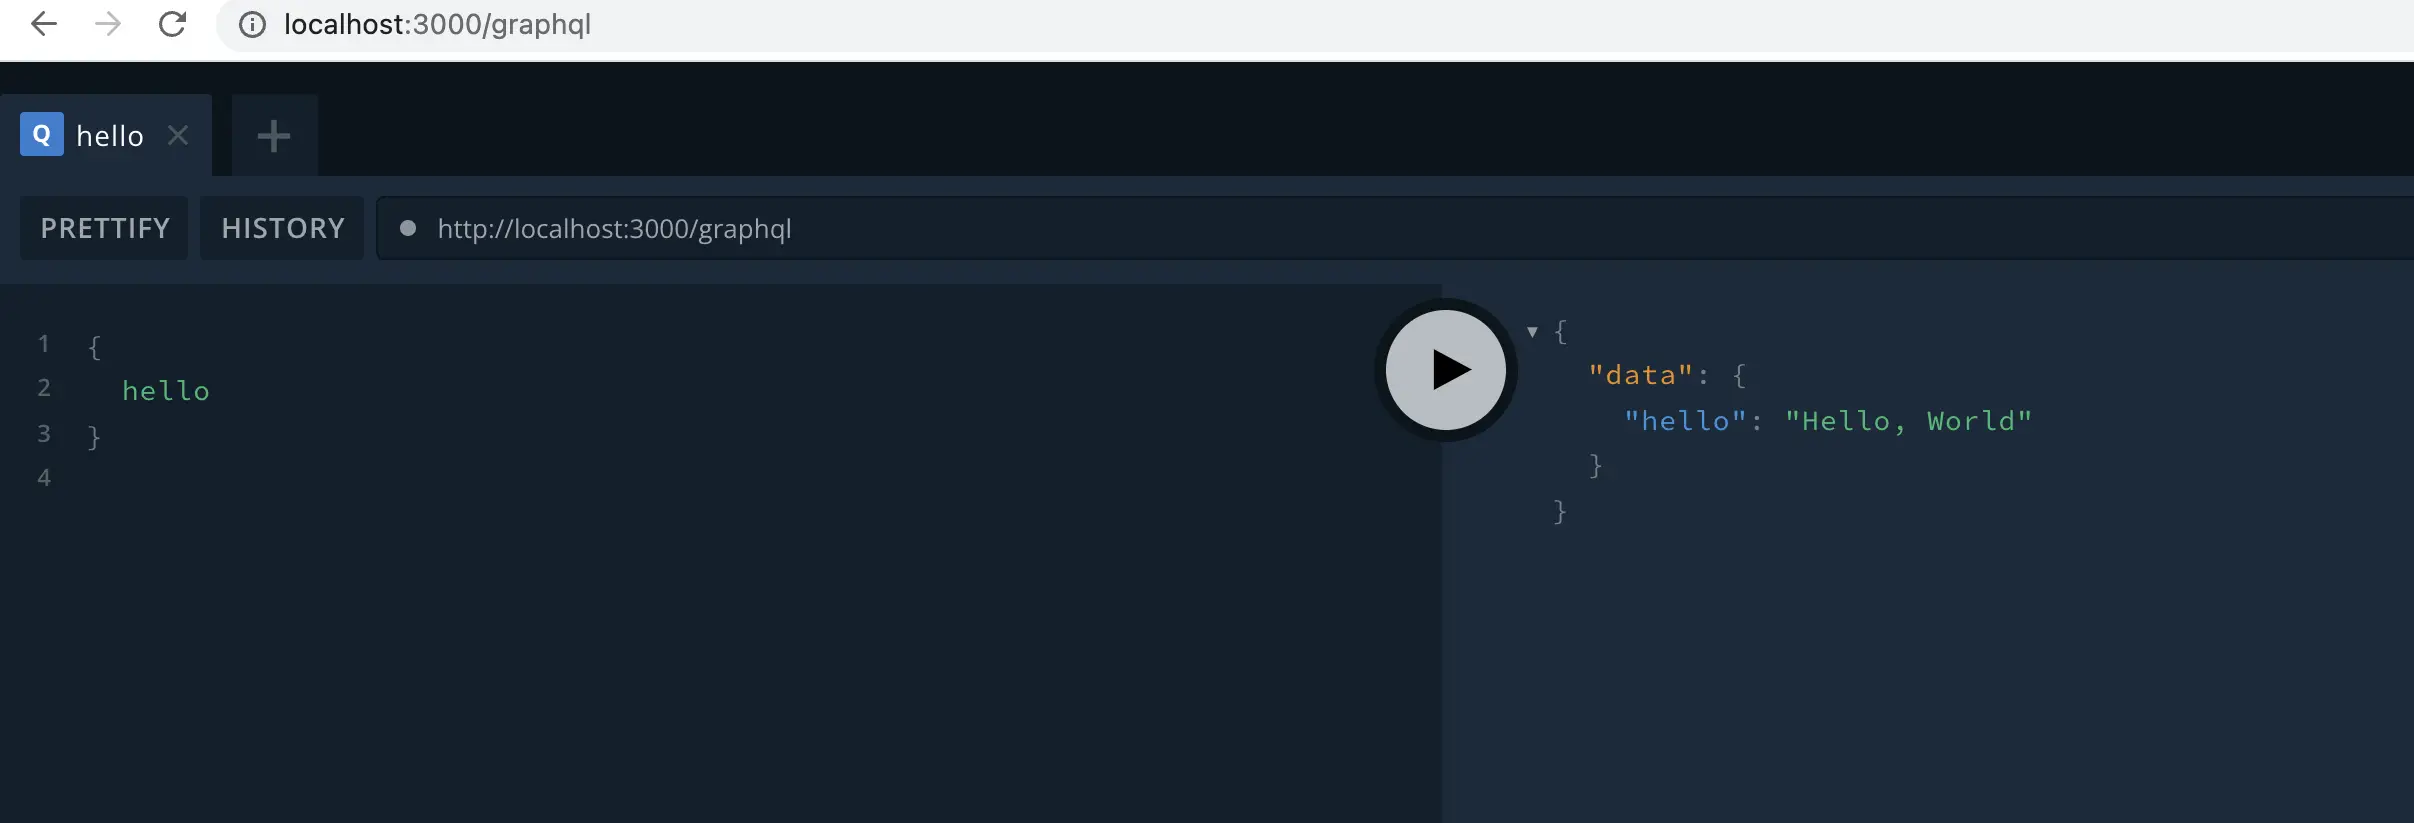
As you can see, when we fire the hello query, we get the Hello, World message as response. GraphQL wraps the response within the data object.
At this point, you can also check your src folder for a file named schema.gql.
# ------------------------------------------------------
# THIS FILE WAS AUTOMATICALLY GENERATED (DO NOT MODIFY)
# ------------------------------------------------------

type Query {
  hello: String!
}
Basically, this file was automatically generated by the NestJS GraphQL package. This is nothing but the schema file for our application. It follows the resolver class we had declared for our application.
If we trigger a query that is not present (for example, test), we get the below response.
{
  "error": {
    "errors": [
      {
        "message": "Cannot query field \"test\" on type \"Query\".",
        "locations": [
          {
            "line": 2,
            "column": 3
          }
        ],
        "extensions": {
          "code": "GRAPHQL_VALIDATION_FAILED"
        }
      }
    ]
  }
}
Basically, the server is telling us that there is no query with the name of test.
Conclusion
With this, we have successfully learnt how to create our first NestJS GraphQL application. We specifically used the @nestjs/graphql package with the code-first approach to create a resolver.
If you have any comments or queries about this post, please feel free to mention in the comments section below.
2 Comments
Sean · September 6, 2022 at 4:21 pm
It might be worthwhile to add even a single mention of a database, to this post. Like how or where an integration for one might eventually go. Anything. Not a mention of “database” or “db” in the whole tutorial.
Saurabh Dashora · September 19, 2022 at 1:47 am
There are several ways you could connect a NestJS application to a database of your choice. You could refer to some other posts on the site for the same.
NestJS TypeORM integration
NestJS Sequelize