Fanout Pattern is a commonly used pattern while implementing publish and subscribe between microservices. In this post, we will be looking at the process of Implementing RabbitMQ Fanout Exchange using Spring Cloud Stream.
If you are completely new to Spring Cloud Stream and RabbitMQ, I strongly recommend going through my previous post about microservices communication using Spring Cloud Stream and RabbitMQ.
Our plan for this post is as follows:
- Understand what is fanout in the publish subscribe process.
- Plan our implementation details.
- Implement the subscriber applications.
- Connect the subscriber applications to a RabbitMQ server running on Docker.
- Implement the publisher application.
- Test the overall fanout functionality.
So let’s begin with the first point.
What is Fan-out Pattern?
In messaging terms, fanout pattern is a messaging pattern where messages are broadcast to many receivers at the same time. These receivers are also known as subscribers.
As a message broker, RabbitMQ also embraces this idea. In fact, the core idea in messaging model of RabbitMQ is that the publisher never sends any message directly to any queue. Instead, the publisher simply publishes a message to an exchange.
So what is an exchange really?
An exchange is basically a simple construct. It receives messages on one side from publishers and on the other side, it pushes those messages to one or more queues. In fact, the publisher does not even care whether there are any queues that are getting the message.
The below illustration describes the concept of a RabbitMQ fanout exchange.
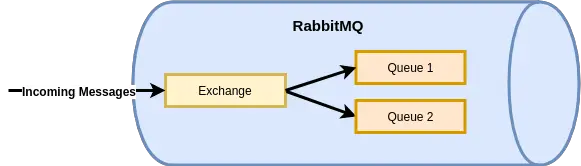
The fanout pattern is very commonly used in situations where we want a message to be available to various microservices. Each microservice application may or may not want to perform some action based on the received message.
RabbitMQ Fanout Exchange Implementation
Now that we have understood what is fan-out pattern, let’s chalk up the implementation plan for RabbitMQ Fanout Exchange.
For demo purposes, we will keep things simple. We will have one publisher application that can publish messages to a RabbitMQ exchange. This application will use Spring Boot and Spring Cloud Stream to talk to the RabbitMQ server.
As subscribers we will have two Spring Boot applications. Each of these applications will subscribe to the RabbitMQ exchange using their separate queues using Spring Cloud Stream.
The below illustration shows the implementation plan in a pictorial manner.

Implement the Subscriber Applications
Let’s now look at how we will create the subscriber applications using Spring Cloud Stream and RabbitMQ.
The Dependencies
The best way to quickly get up and running with these applications is to use the Spring Initializr. We can access Spring Initializr at https://start.spring.io.
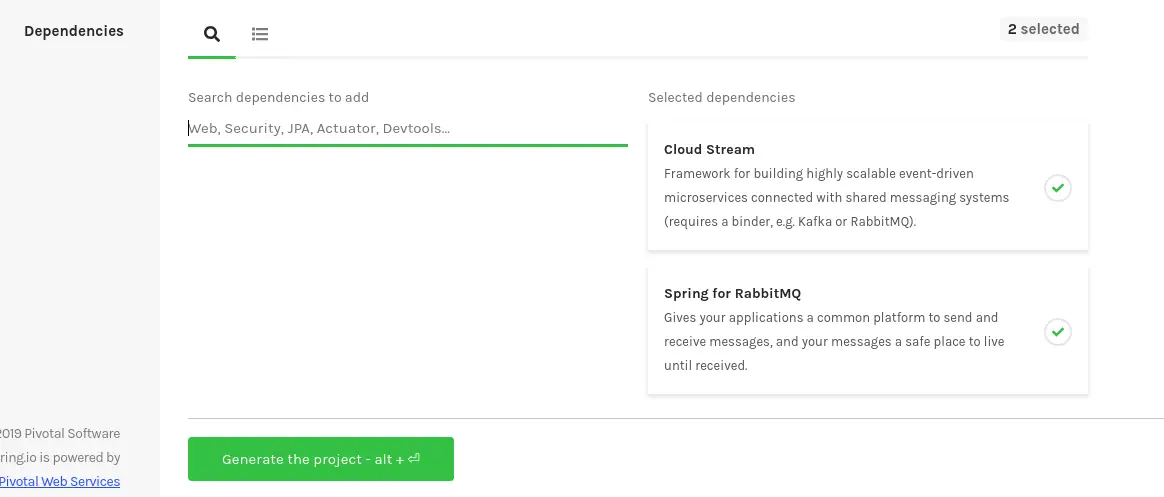
As can be seen in the above screenshot, we need mainly two dependencies – Spring Cloud Stream and Spring RabbitMQ Binder. Also, we will name these application as subscriber-application and another-subscriber-application. But you can name them whatever you feel like.
After selecting the dependencies, we can simply click Generate the Project button to download the zip files to our computer. Then, we can unzip them and open the files in the IDE of choice. I personally prefer IntelliJ.
Implementing the Subscriber Logic
Once we have the applications open in our IDE, we need to make these applications subscribe to our RabbitMQ server.
With Spring Cloud Stream we can define our configurations in the application. When the application starts up, it can also create the necessary exchanges and queues in RabbitMQ automatically.
As per our plan, we want an exchange in RabbitMQ named Messages. Our subscriber applications will have their own queues subscribing to these Messages exchange.
To do so, we have to first declare an interface as below:
import org.springframework.cloud.stream.annotation.Input;
import org.springframework.messaging.SubscribableChannel;

public interface MessageChannel {

    String MESSAGES="messages";

    @Input
    SubscribableChannel messages();
}
Here, we are defining our @Input channel similar to the how it is in the Sink interface provided by Spring Cloud Stream.
Next, we need to attach a listener method to this channel. We can do it directly in the main class as below:
import org.springframework.boot.SpringApplication;
import org.springframework.boot.autoconfigure.SpringBootApplication;
import org.springframework.cloud.stream.annotation.EnableBinding;
import org.springframework.cloud.stream.annotation.StreamListener;

@SpringBootApplication
@EnableBinding(MessageChannel.class)
public class SubscriberApplication {

	public static void main(String[] args) {
		SpringApplication.run(SubscriberApplication.class, args);
	}

	@StreamListener(MessageChannel.MESSAGES)
	public void handleMessage(Message message){
		System.out.println("Subscriber Received Message is: " + message);
	}

	public static class Message{
		private String message;

		public String getMessage() {
			return message;
		}

		public void setMessage(String message) {
			this.message = message;
		}

		@Override
		public String toString() {
			return "Message{" +
					"message='" + message + '\'' +
					'}';
		}
	}

}
Important things to note here:
- The @EnableBinding allows us to bind the class with the MessageChannel interface. This basically signals the framework to initiate binding to the messaging middleware on the classpath. In other words, with this statement, Spring automatically creates the necessary infrastructure items on the Rabbit MQ server (i.e. exchange, queue and so on).
- Then, we also create a handler method. The responsibility of this method is to receive the incoming messages and do something with them. In our case, we are simply printing the messages to the console.
We also make the same changes in the another-subscriber-application as well. See below piece of code from the main class. Only difference is in the message to be printed on the console.
import org.springframework.boot.SpringApplication;
import org.springframework.boot.autoconfigure.SpringBootApplication;
import org.springframework.cloud.stream.annotation.EnableBinding;
import org.springframework.cloud.stream.annotation.StreamListener;

@SpringBootApplication
@EnableBinding(MessageChannel.class)
public class AnotherSubscriberApplication {

	public static void main(String[] args) {
		SpringApplication.run(AnotherSubscriberApplication.class, args);
	}

	@StreamListener(MessageChannel.MESSAGES)
	public void handleMessage(Message message) {
		System.out.println("Another Subscriber Received Message is: " + message);
	}

	public static class Message{
		private String message;

		public String getMessage() {
			return message;
		}

		public void setMessage(String message) {
			this.message = message;
		}

		@Override
		public String toString() {
			return "Message{" +
					"message='" + message + '\'' +
					'}';
		}
	}

}
With this, our subscriber application are ready to receive messages. Let’s move on to the next step.
Setting up RabbitMQ Server on Docker
RabbitMQ can be easily setup on your local machine as well. To do so, you can follow the official guide and perform the instructions as per your operating system.
We will, however, use Docker. If you don’t know what Docker is, you can read my detailed post about the Basics of Docker.
If you have Docker setup, you can use the official RabbitMQ Docker Image and start a container with the below command:
docker run -d --hostname my-test-rabbit --name test-rabbit -p 15672:15672 -p 5672:5672 rabbitmq:3-managementThis will start the RabbitMQ server on port 5672. Also, it will expose a management console on port 15672 that we can use to login to the server and check out things.
Once the server is up and running, we need to start our Spring Boot applications (the subscriber-application and the another-subscriber-application).
You can do so by using the below command for both the applications.
clean package spring-boot:runAt this point, magic will happen in the background and Spring Cloud Stream will create a bunch of things in the RabbitMQ depending on our configuration.
Once the application starts up successfully, we can login to the RabbitMQ management console and see things for ourselves.
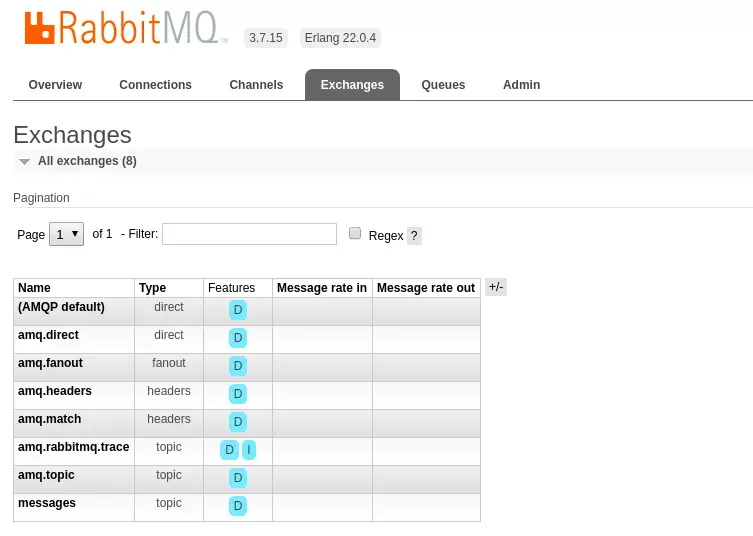
If we check the Exchanges tab in the console, we should see an exchange named messages that got created. Also, two queues that subscribe to this exchange got created.
With this we have successfully setup our RabbitMQ server and connected our subscriber applications to the appropriate exchange.
Implement the Publisher Application
Now is the time to implement the publisher application. This will be the application that will publish messages to the exchange.
The Dependencies
Below are the dependencies we need to select for the publisher application. Basically, we are using the Web Starter, Spring Cloud Stream and Spring RabbitMQ Binder dependencies.

You can simply click Generate the Project button to download the source code and open it in an IDE of choice.
Implementing the Publisher Logic
To enable our application to publish messages we make the below changes, we need to make the below changes to the main class.
import org.springframework.beans.factory.annotation.Autowired;
import org.springframework.boot.SpringApplication;
import org.springframework.boot.autoconfigure.SpringBootApplication;
import org.springframework.cloud.stream.annotation.EnableBinding;
import org.springframework.cloud.stream.messaging.Source;
import org.springframework.messaging.support.MessageBuilder;
import org.springframework.web.bind.annotation.GetMapping;
import org.springframework.web.bind.annotation.RestController;

@SpringBootApplication
public class PublisherApplication {

	public static void main(String[] args) {
		SpringApplication.run(PublisherApplication.class, args);
	}

}

@RestController
@EnableBinding(Source.class)
class MessagePublisher{

	@Autowired
	private Source source;

	@GetMapping(value = "/api/publish")
	public void sendMessage(){
		Message message = new Message("Hello World from Publisher");

		source.output().send(MessageBuilder.withPayload(message).build());

	}
}

class Message{
	String message;

	public Message(String message) {
		this.message = message;
	}

	public String getMessage() {
		return message;
	}

	public void setMessage(String message) {
		this.message = message;
	}
}
Important things to note here are as follows:
- We implement a RestController that allows us to call an end-point from the browser to publish a message. We bind this Controller class to Source interface provided by Spring Cloud Stream. Basically, this Source interface acts as the bridge between the application and the RabbitMQ server. The concrete implementation for this is provided by Spring framework. You could also define your own interface if required like we did in the subscriber applications.
- We auto-wire an instance of the Source interface and use it to publish a message when /api/publish end-point is invoked.
- We also define a Message class to create a message object.
Lastly, we need to add a couple of properties in the application.properties file as below:
spring.cloud.stream.bindings.output.destination=messages
spring.cloud.stream.default.contentType=application/json
The below illustration can help understand what is happening here.
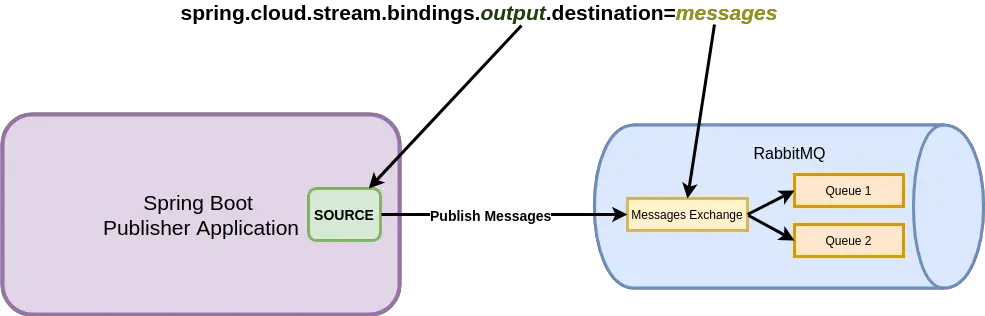
Basically, we are connecting the Output channel exposed by the Source interface to the messages exchange we have created on the RabbitMQ server.
Testing the Fanout Functionality
Now is the time to test our fanout functionality. We can now simply start up the publisher-application.
Once the application starts up successfully, we can visit the end-point http://localhost:8080/api/publish to publish a message to the messages exchange.
Nothing will be shown in the browser as response. However, if we visit our subscriber applications, we should see the below logs printed in the console.
2019-06-30 16:49:08.754  INFO 7587 --- [           main] c.p.d.s.SubscriberApplication            : Started SubscriberApplication in 3.399 seconds (JVM running for 13.051)
Subscriber Received Message is: Message{message='Hello World from Publisher'}
2019-06-30 16:24:31.423 INFO 5473 --- [ main] c.p.a.AnotherSubscriberApplication : Started AnotherSubscriberApplication in 3.105 seconds (JVM running for 12.84)
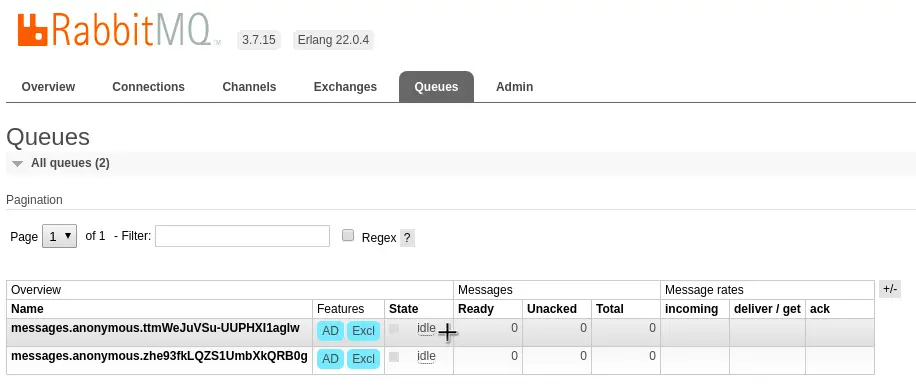
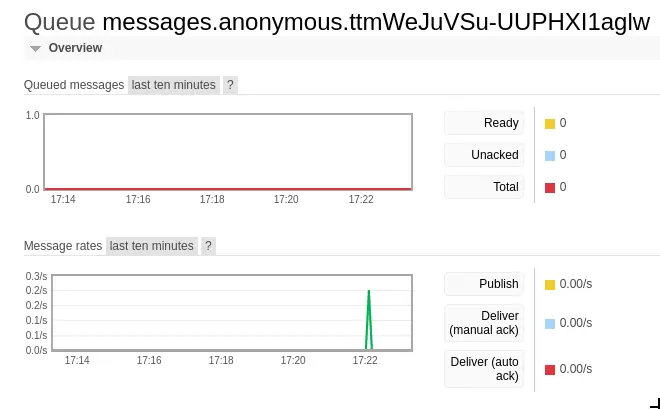
Another Subscriber Received Message is: Message{message='Hello World from Publisher'}If we visit the RabbitMQ console, we should also be able to see a small spike in the monitoring dashboard indicating a message was received and processed. This will occur for both the subscriber queues.
Conclusion
With this we have been successful in implementing RabbitMQ Fanout Exchange using Spring Cloud Stream.
The code for this demo is available on Github for your reference.
If you have any comments or queries, sounds off in the comments section below.
Happy Learning!
6 Comments
Mayur · May 27, 2020 at 6:34 pm
Do you have any production ready Spring Cloud Stream code for publisher and consumer components ?, so that I can refer that implement by taking care of all small things.
Saurabh Dashora · May 29, 2020 at 2:26 am
Hi Mayur…the closest I have on this site is described in this other post. Link below:
https://progressivecoder.com/microservice-communication-using-spring-cloud-stream-and-rabbitmq/
It has both the publisher and subscriber. Of course, production-ready has a lot of aspects that I think you should try and build based on your organization and application needs. I have built such applications in my organization but I can’t share those things on a blog.
Davy Steegen · July 1, 2020 at 7:30 am
Nice article 🙂 Just one quick question, it seems that in your example you do not use an exchange of type fanout. In your screenshot I see that the messages exchange is of type topic. It seems that topics also result in the same behaviour.
Saurabh Dashora · July 1, 2020 at 8:47 am
Thanks for the nice feedback.
And yes, you are correct. The Topic Exchange acts as a Fanout since we haven’t specified any routing key.
Davy Steegen · July 2, 2020 at 8:08 am
That was also what I was thinking. Thanks for confirming this 😉
Saurabh Dashora · July 2, 2020 at 9:25 am
No problem 🙂