Application developers always strive to improve the performance of their application.
However, if an application receives a large number of requests, the performance can take a hit. This is specially true if the request flow involves disk access or fetching records from a database.
A particularly frustrating case is when the user requests for the same data multiple times and our application goes to the database to retrieve the data every single time. Think about a bestseller product list on an e-commerce website, list of country codes or the most popular posts on your blog.
Why not store the frequently accessed data in a temporary storage that is faster than database or disk access?
The temporary storage is known as the cache.
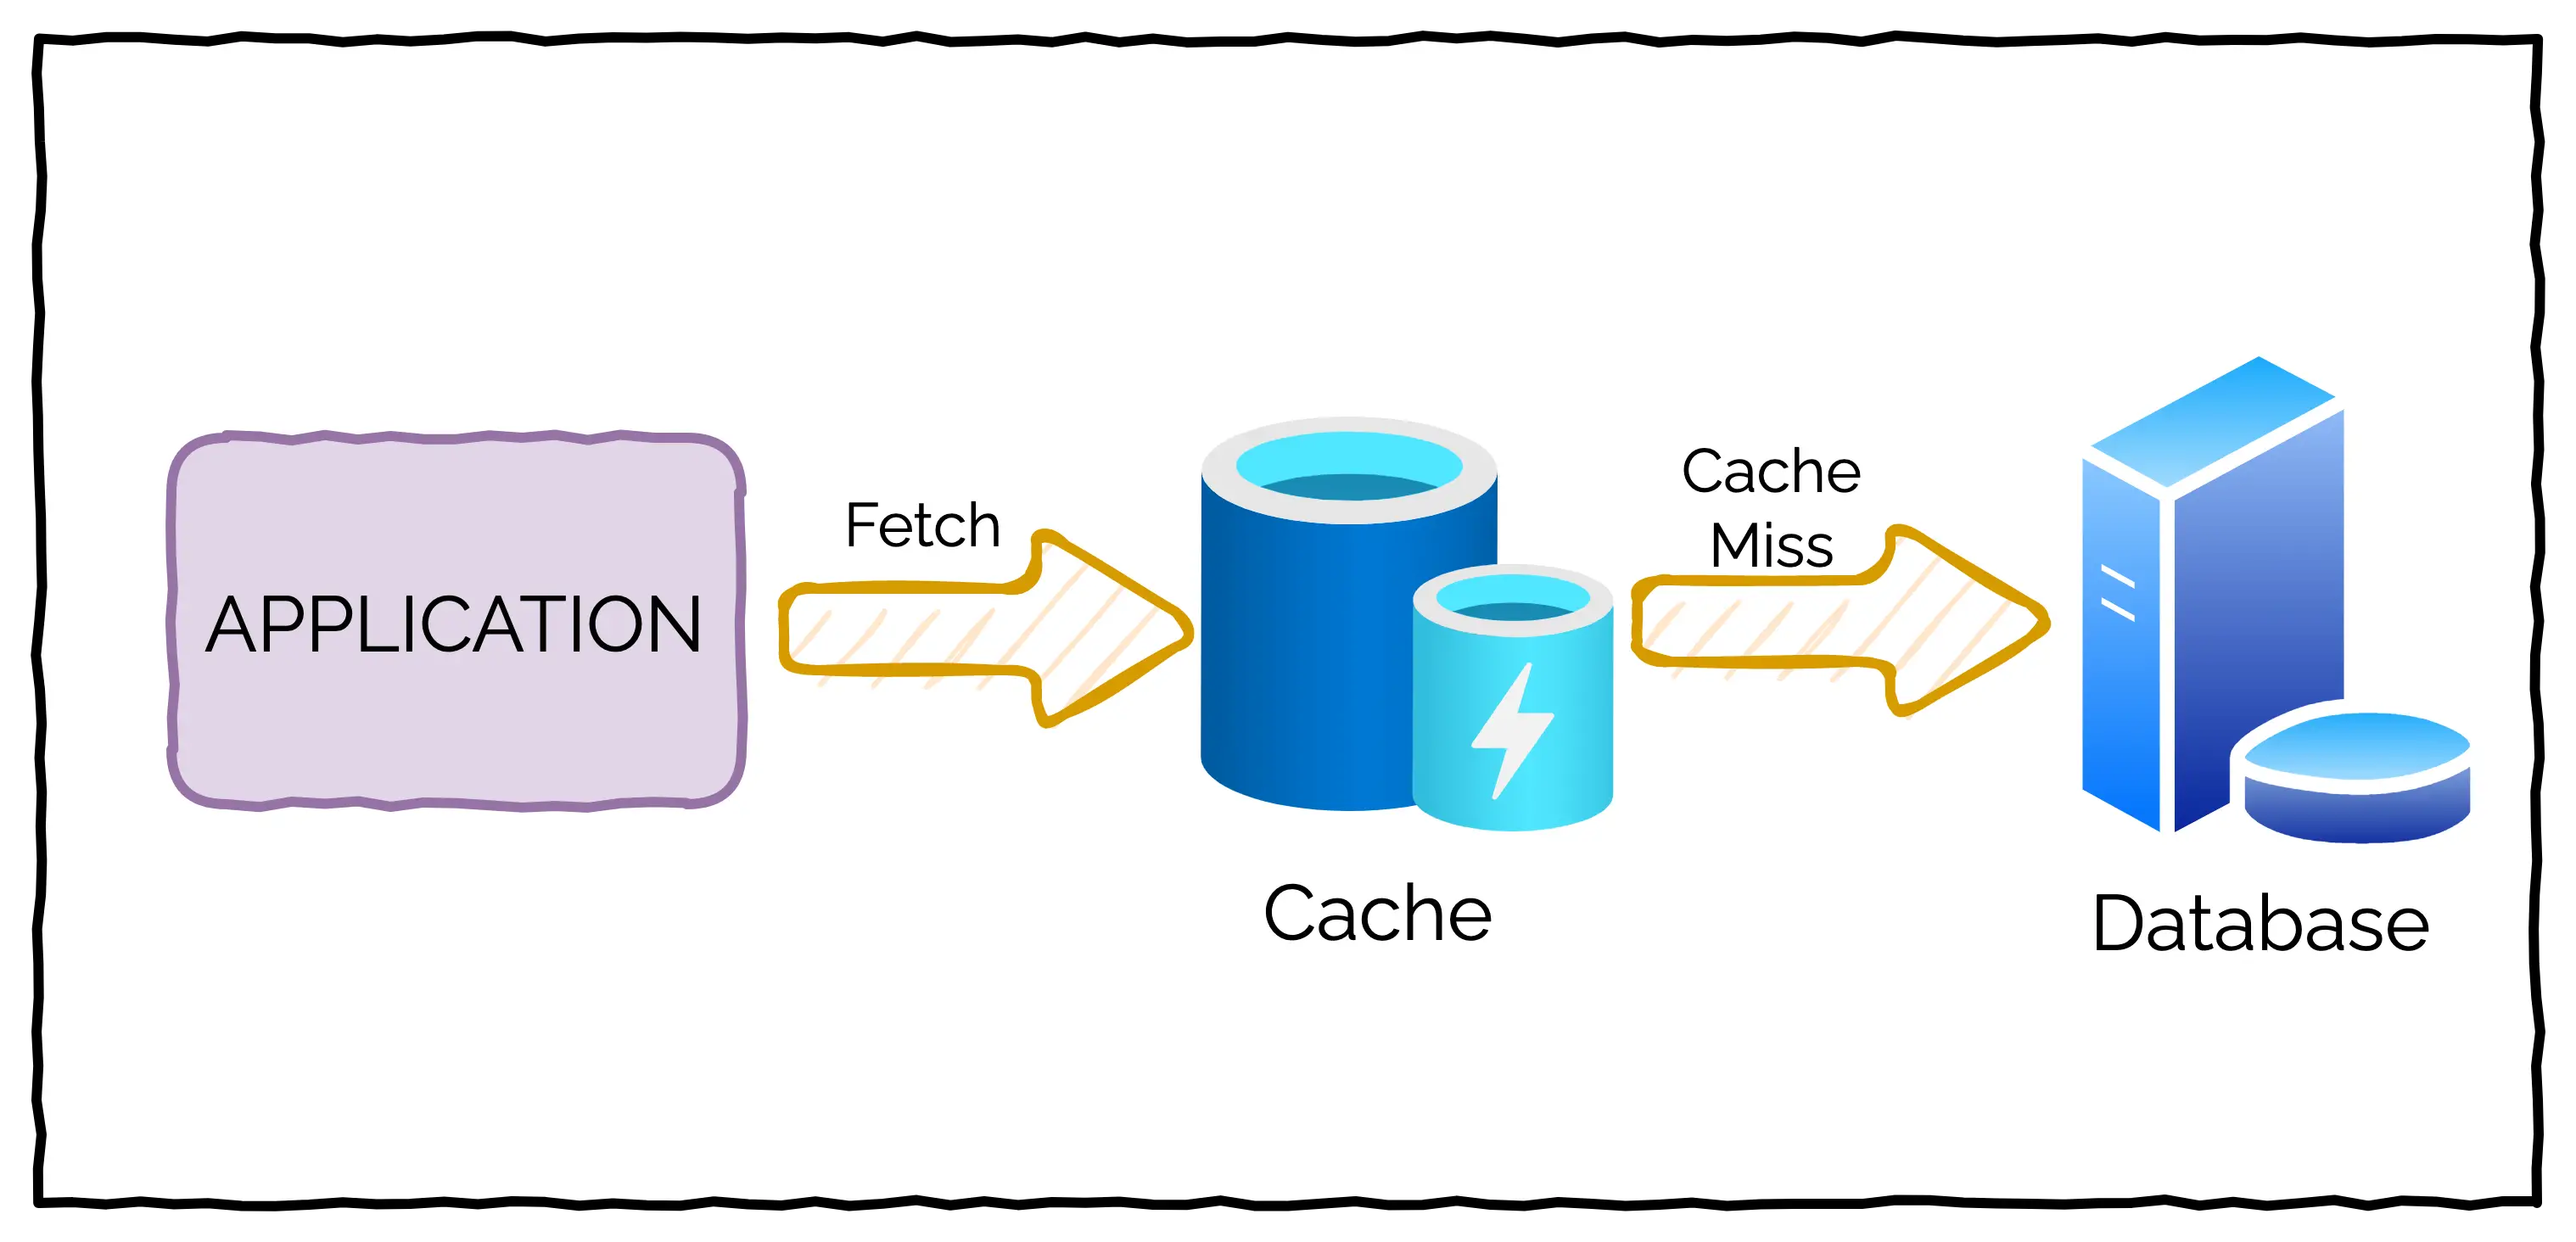
The general idea behind caching is that when an application needs to fetch some data, it first checks within the cache. If it finds the information in the cache, it can access the data much faster when compared to getting it from a slower storage medium.
Check out the below illustration for an extremely basic cache setup.
In this post, we will learn how to implement in-memory caching in Node.js application using the node-cache package.
Though there are several caching solutions available, in-memory caching is the easiest way to begin with caching in your application
1 – Setting up the In-Memory Node.js Caching Project
To start building the application, you need to first create a project directory to keep the source files.
Within the project directory node-cache-demo, execute the npm init command to initialize the project. You can answer the questionnaire or execute npm init -y to settle for the default values.
Next, you need to install some basic packages using the below command:
$ npm install --save express node-cache isomorphic-fetch
- The
expresspackage is to setup an endpoint to handle requests. - The
node-cachepackage is a simple in-memory caching module available on NPM. - Lastly,
isomorphic-fetchpackage is to bring in support for the Fetch API to Node.js
After the installation, your project’s package.json file should look like below:
{
  "name": "node-cache-demo",
  "version": "1.0.0",
  "main": "index.js",
  "devDependencies": {},
  "scripts": {
    "test": "echo \\"Error: no test specified\\" && exit 1"
  },
  "keywords": [],
  "author": "Saurabh Dashora",
  "license": "ISC",
  "description": "Node.js Cache Demo",
  "dependencies": {
    "express": "^4.18.2",
    "isomorphic-fetch": "^3.0.0",
    "node-cache": "^5.1.2"
  }
}
By the way, if you are interested in backend frameworks and concepts such as caching, you’d love the Progressive Coder newsletter where I talk about such concepts in a fun and interesting manner.
Subscribe now and join along.
2 – In-Memory Node.js Caching with node-cache
For demonstration purpose, I recommend using the free fake API service hosted at JSONPlaceHolder.
The JSONPlaceHolder provides several endpoints for todos, posts and users. We will specifically use the /posts endpoint that provides a list of posts and individual posts depending on the input id.
See the below code from the index.js file of our project.
//Required Imports
const express = require('express');
const nodecache = require('node-cache');
require('isomorphic-fetch');

//Setting up Express
const app = express();

//Creating the node-cache instance
const cache = new nodecache({stdTTL: 10})

//We are using the fake API available at <https://jsonplaceholder.typicode.com/>
const baseURL = '<https://jsonplaceholder.typicode.com/posts/>';

//API Endpoint to demonstrate caching
app.get('/posts/:id', async (req, res) => {
    const id = req.params.id;
    if (cache.has(id)) {
        console.log('Fetching data from the Node Cache');
        res.send(cache.get(id));
    }
    else {
        const fakeAPIURL = baseURL + id
        const data = await fetch(fakeAPIURL).then((response) => response.json());

        cache.set(req.params.id, data);
        console.log('Fetching Data from the API');
        res.send(data);
    }
})

//Starting the server
app.listen(3000, () => {
    console.log('The server is listening on port 3000')
})
Understanding the Code
So, what’s going on in the above example?
- In the first segment, you need to import the necessary packages –
express,node-cacheandisomorphic-fetch - Next, create an Express application instance using the
express()function. If you are new to Express, check out this post to get started with Express framework. - Next, initialize the cache instance using the
nodecache()function from thenode-cachepackage. This function takes a configuration object as input. The only property you need to set here isstdTTLof 10 seconds. There are several other properties available that we will discuss shortly - Next, declare a constant to store the base URL of the fake API
- Now, it’s time to use the cache. For this purpose, you need to implement a request handler for fetching the post information (
/posts/:id). Here,idis the post id. Within the request callback, check if the data for a particular post id is available in the cache using the functioncache.has(id). If yes, return the data from the cache - If the data is not available in the cache, you can get it using the API call. Once there is a response from the
await fetch, you can also store the data in the cache usingcache.set(req.params.id, data)and return the fetched data by callingres.send(). Here,req.params.idis the key - In the last segment of the program, you can simply start the application server by calling
app.listen(). The server is configured to listen on port 3000.
? The keys can be either string or number, but are cast to a
stringinternally anyway. All other types will throw an error.
Testing
You can test the application by executing node index.js command and visiting http://localhost:3000/posts/1 in the browser.
The first time you make the call, you will see the data is being fetched from the API. If you access the same post again, you’ll find that the data comes from the cache. However, the stdTTL is set to only 10 seconds. So, after 10 seconds, the data will be deleted from the cache.
With this, we can say that in-memory caching in Node.js is working successfully. However, there are quite a few more things to learn about the node-cache package.
3 – Node.js node-cache Configuration Options
As mentioned earlier, node-cache also provides some important configuration options:
stdTTL– This is the standard TTL or Time to Live for every cache element. Default value is 0 which means unlimited. You can also set the TTL at the level of a cache element to have more fine-grained control.checkPeriod– This is the period in seconds for an automatic delete check interval. Default value is 600. Setting it to 0 disables any periodic check.deleteOnExpire– This property determines whether an element will be automatically deleted when it expires. Default value is true which means the element will be deleted.maxKeys– This property specifies the maximum number of keys that can be stored in the cache at any given point of time. The default is -1 which means there is no limit. If you set themaxKeysvalue to 1 and try to make 2 inserts into the cache, you will encounter the below error.
ECACHEFULL: Cache max keys amount exceeded
    at NodeCache._error (/Users/saurabhdashora/NodeProjects/node-cache-demo/node_modules/node-cache/lib/node_cache.js:762:17)
    at NodeCache.set (/Users/saurabhdashora/NodeProjects/node-cache-demo/node_modules/node-cache/lib/node_cache.js:412:23)
    at /Users/saurabhdashora/NodeProjects/node-cache-demo/index.js:26:15
    at processTicksAndRejections (node:internal/process/task_queues:96:5) {
  errorcode: 'ECACHEFULL',
  data: {}
4 – Node.js Pre-caching using node-cache
One of the most useful practical caching approaches is pre-caching.
Pre-caching is a technique that improves the performance of an application by storing commonly accessed data into the cache before the application starts serving requests. This makes it possible for the application to retrieve the data directly from the cache even on the first request.
Pre-caching is a powerful strategy to support things like popular products in an e-commerce store or trending posts in a blog.
In the demo application, you can implement pre-caching for some posts. See below example:
//We are using the fake API available at <https://jsonplaceholder.typicode.com/>
const baseURL = '<https://jsonplaceholder.typicode.com/posts/>';

//Pre-caching Popular Posts
[1, 2, 3].map(async (id) => {
    const fakeAPIURL = baseURL + id
    const data = await fetch(fakeAPIURL).then((response) => response.json());
    cache.set(id, data);
    console.log(`Post Id ${id} cached`);
})

//API Endpoint to demonstrate caching
app.get('/posts/:id', async (req, res) => {
    const id = req.params.id;
    if (cache.has(id)) {
        //Printing the current cache stats
        console.log(cache.getStats());
        console.log('Fetching data from the Node Cache');
        res.send(cache.get(id));
    }
    else {
        const fakeAPIURL = baseURL + id
        const data = await fetch(fakeAPIURL).then((response) => response.json());

        cache.set(req.params.id, data);
        console.log('Fetching Data from the API');
        res.send(data);
    }
})
Assuming that posts 1, 2 & 3 are most popular, these posts are pre-fetched and stored in the cache when the application is started. When a request is made for these posts, the application fetches the data directly from the cache.
5 – Node.js node-cache events
Apart from the methods to set and get data from the cache, the node-cache package also provides several events you can hook into.
Let us look at a few important events that could be useful in various scenarios.
The Set Event
This event is fired when a key is added or changed. See below example:
cache.on("set", function(key, value) {
    console.log(`New Key ${key} inserted into cache`);
    console.log(cache.keys())
    console.log(cache.getStats())
})
The cache.on() function lets us listen to specific events such as set. Along with the event type, you can provide a callback function as input to cache.on() function.
The callback gets the key and value of the newly inserted element as input. Depending on our requirement, you can perform some action using this information. In the example, we are simply logging the details of the cache to the console.
Note the new methods we used in this example:
cache.keys()returns a list of all the keys within the cache.cache.getStats()provides statistics about the current state of the cache. Below is a sample output from this method
{ hits: 0, misses: 0, keys: 3, ksize: 3, vsize: 960 }
The Del Event
As the name suggests, this event is triggered when a key is deleted from the cache. The implementation of listening to this event is quite similar to the set event.
cache.on("del", function(key, value) {
    console.log(`Key ${key} deleted from the cache`);
    console.log(cache.keys())
    console.log(cache.getStats());
})
The Expired Event
Another useful event is expired. This gets fired when a particular element in the cache expires. In other words, it exceeds the TTL value. See below example:
cache.on("expired", function(key, value) {
    console.log(`Key ${key} expired from the cache`);
    console.log(cache.keys())
    console.log(cache.getStats());
})Setting callbacks for cache events
6 – The node-cache useClones Property
One interesting property provided by node-cache is the useClones property. You can set this property while configuring node-cache.
const cache = new nodecache({ useClones: true })
There are two possible values for useClones – true or false.
If the value is set to true, it enables cloning of the elements. In other words, you get a copy of the cached variables.
If false, you save the variable in the cache and just get the reference.
But what is the meaning of all this?
Refer to the below example:
const cache = new nodecache({useClones: true})

const post = {
    id: 5,
    title: 'Test Title...',
    body: 'Description...'
}

cache.set("A", post);
cache.set("B", post);

const fetchedPost = cache.get("A");
fetchedPost.title = "New Title";

console.log( "Complex - useClones = " + true + " --- fetchedPost.title: '"
    + fetchedPost.title + "' != b.title: '"
    + cache.get("B").title + "'" )
The output will be:
Complex - useClones = true --- fetchedPost.title: 'New Title' != b.title: 'Test Title...'
Though the same post was stored for both keys “A” and “B”, they are two different copies. Changing one does not impact the other.
However, if you set useClones to false and run the same code, you will get the below response.
Complex - useClones = true --- fetchedPost.title: 'New Title' != b.title: 'New Title'
Changing the post’s title changes both the cache items. This is because we are storing the reference in this case.
For the sake of simplicity, setting useClones to true is the safest option. You should use false only when you have some specific performance objectives or you expect the objects to be mutable.
Conclusion
With this, we have successfully learnt how to perform in-memory caching in Node.js.
The node-cache package by Node.js is the fastest way to have a caching solution up-and-running in your application. Since it is an in-memory cache, it does not need any special server setup and therefore, saves a lot of development time.
The code from this post is available on Github for reference.
Suggested Further Reading:
If you enjoyed this article or found it helpful, consider sharing it with friends and colleagues
Anyways, before we end this post, a quick reminder about the Progressive Code Newsletter where I explain backend frameworks and concepts in a fun & interesting manner so that you never forget what you’ve learned.
I’m 100% sure you’d love it.
Subscribe now and see you over there.
0 Comments