When you join a new organization, you usually face issues accessing the internet. Upon asking around, someone would provide you the proxy settings using which your workstation is able to go through the firewall and access the internet.
These proxy settings essentially belong to the forward proxy server.
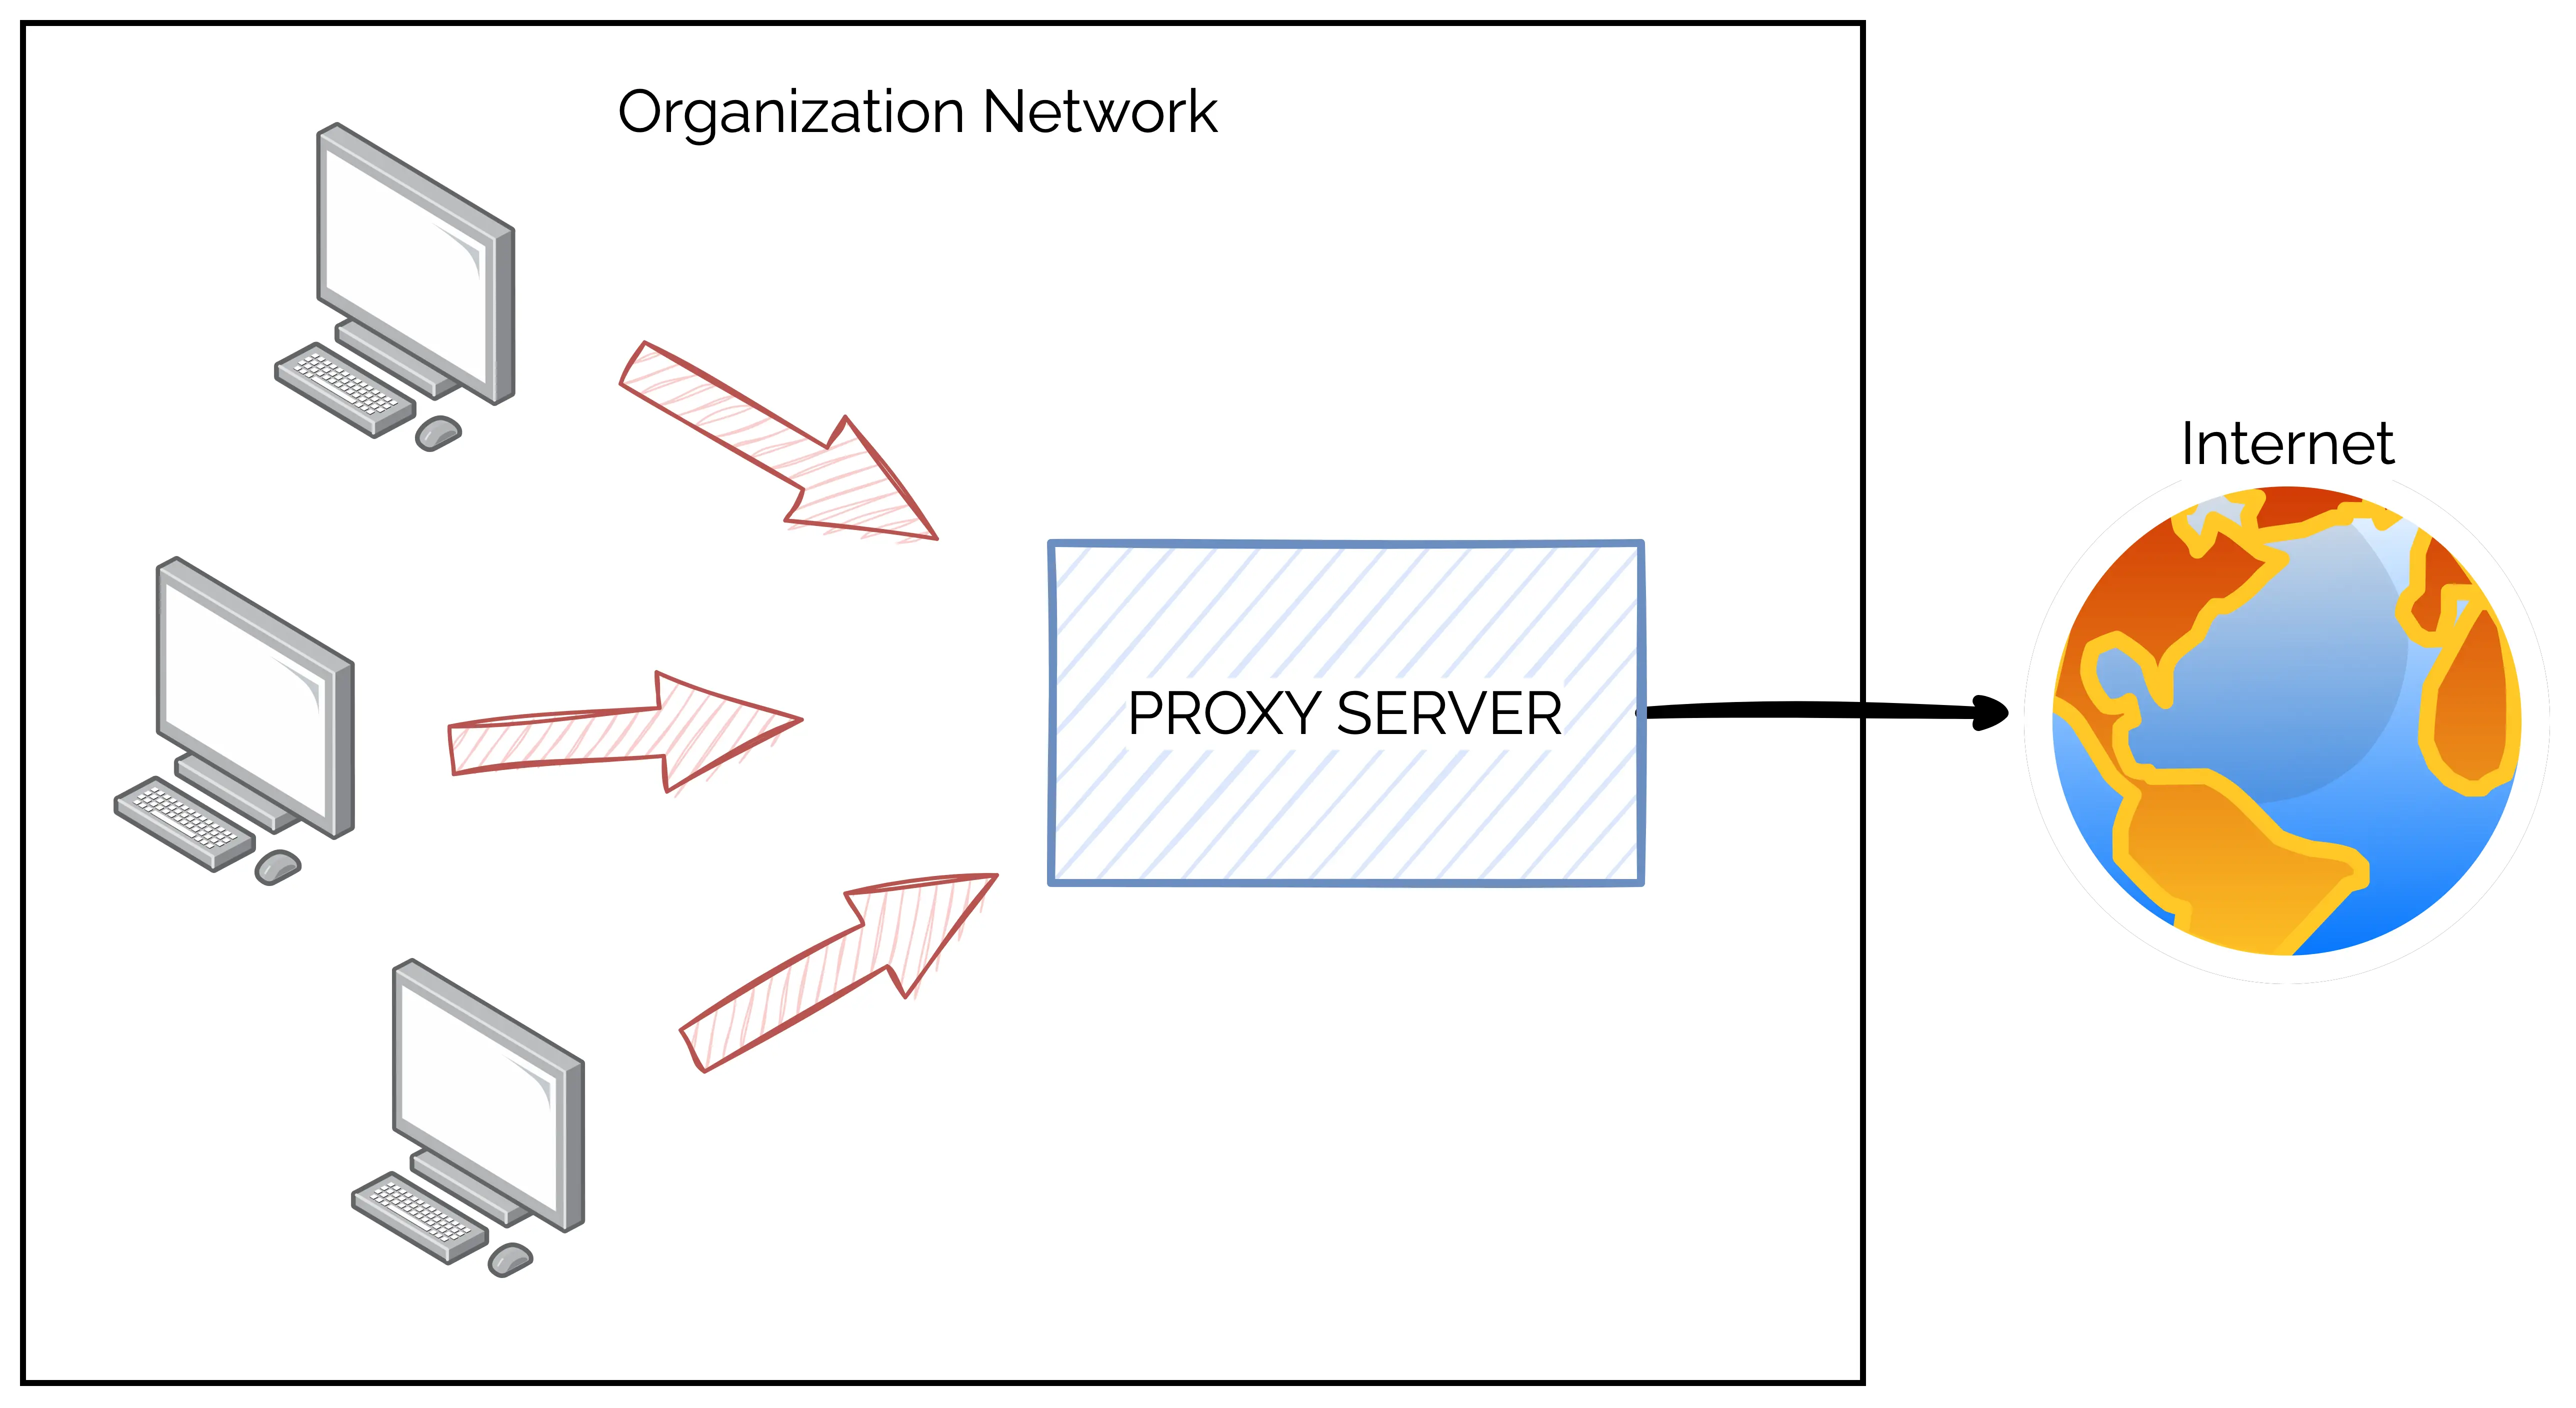
You can think of the proxy server as an intermediary between a client and a server. The proxy server’s job is to receive requests from the client, forward those requests to the server and return the server’s response back to the client.
Check the below illustration where the proxy server sits between the organization’s internal systems and the internet.
But why do you need a forward proxy?
There are a number of reasons such as:
- A forward proxy helps improve security and privacy by masking the client’s IP address and encrypting the connection between the client and the proxy
- You can use a forward proxy to enforce access control policies and block unwanted traffic. Organizations use them all the time to prevent employees from accessing malicious websites
- A forward proxy can be used to cache resources in order to improve performance and scalability
- Lastly, forward proxies are often used to bypass restrictions or censorship
In this post, you will use Node.js and the net module to implement your own forward proxy server.
1 – Setting up the Node.js Forward Proxy Project
Setting up a project to implement a simple Node.js Forward Proxy is pretty straightforward.
You need to first create a project directory to keep your source code.
$ mkdir nodejs-forward-proxy-demo
$ cd nodejs-forward-proxy-demo
Next, you need to run npm init -y command to initialize the package.json file. This file stores the project’s meta-data and also the startup scripts.
{
  "name": "nodejs-forward-proxy-demo",
  "version": "1.0.0",
  "description": "",
  "main": "index.js",
  "scripts": {
    "test": "echo \\"Error: no test specified\\" && exit 1",
    "start": "node index.js"
  },
  "keywords": [],
  "author": "",
  "license": "ISC"
}
Typically, the package.json file also stores a list of project dependencies. However, we will be using only the net module which happens to be a Node.js core module. If interested, you can learn more about modules in this detailed post on Node.js Module System.
The Node.js **net**module provides an asynchronous network API for creating stream-based TCP servers and clients.
Basically, you can use this module to implement a Node.js forward proxy by creating a TCP server. The job of the TCP server is to listen for incoming requests from clients and forward those requests to the target server.
2 – Implementing the Node.js Forward Proxy
Create a file named index.js in your project’s directory and paste the below contents:
const net = require("net");
const server = net.createServer();

server.on("connection", (clientToProxySocket) => {
    console.log("Client connected to proxy");
    clientToProxySocket.once("data", (data) => {
        let isConnectionTLS = data.toString().indexOf("CONNECT") !== -1;

        let serverPort = 80;
        let serverAddress;

        if (isConnectionTLS) {
            serverPort = 443;

            serverAddress = data
            .toString().split("CONNECT")[1]
            .split(" ")[1]
            .split(":")[0];
        } else {
            serverAddress = data.toString().split("Host: ")[1].split("\\n")[0];
        }

        let proxyToServerSocket = net.createConnection(
            {
                host: serverAddress,
                port: serverPort
            },
            () => {
                console.log("Proxy to server is setup");
            }
        )

        if (isConnectionTLS) {
            clientToProxySocket.write("HTTP/1.1 200 OK\\r\\n\\n");
        } else {
            proxyToServerSocket.write(data);
        }

        clientToProxySocket.pipe(proxyToServerSocket);
        proxyToServerSocket.pipe(clientToProxySocket);

        proxyToServerSocket.on("error", (err) => {
            console.log("Proxy to server error");
            console.log(err);
        })

        clientToProxySocket.on("error", (err) => {
            console.log("Client to proxy error");
        })
    })
})

server.on("error", (err) => {
    console.log("Internal server error");
    console.log(err);
})

server.on("close", () => {
    console.log("Client disconnected");
})

server.listen(
    {
        host: "0.0.0.0",
        port: 8080,
    },
    () => {
        console.log("Server listening on 0.0.0.0:8080");
    }
);
What’s going on in this code? Let’s understand step-by-step.
Creating the Server Instance
At the top of the file, you import the net module and use it to create a server instance.
const net = require("net");
const server = net.createServer();

server.listen(
    {
        host: "0.0.0.0",
        port: 8080,
    },
    () => {
        console.log("Server listening on 0.0.0.0:8080");
    }
);
The call to net.createServer() method returns a new TCP server instance.
The server’s job is to listen connections. This is enabled by calling the listen() method and configuring it to listen on port 8080.
The Connection Event
When a client connects to the server, it triggers the connection event. The event payload contains a socket object that represents the connection.
You can handle this event by using the server.on() function.
server.on("connection", (clientToProxySocket) => {
   //logic
})
The function basically takes the event name (in this case, connection) and a callback function as input. The callback function has only one argument clientToProxySocket. This is the socket object that represents the connection to the client.
Listening to the Data Event
When the client actually sends data, the data event is emitted. You need to set up another event listener for the data event on the clientToProxySocket.
clientToProxySocket.once("data", (data) => {
   //logic
})
Since you need to get the data only once, you need to listen for the data event only for the first time and gather enough data from it.
Evaluating HTTP vs HTTPS Requests
Within the callback to the data event, you need to handle the actual logic for the forward proxy.
let isConnectionTLS = data.toString().indexOf("CONNECT") !== -1;

let serverPort = 80;
let serverAddress;

if (isConnectionTLS) {
    serverPort = 443;

    serverAddress = data
       .toString().split("CONNECT")[1]
       .split(" ")[1]
       .split(":")[0];
} else {
    serverAddress = data.toString().split("Host: ")[1].split("\\n")[0];
}
First, you check whether the client’s request is a “CONNECT” request using the indexOf() method. If yes, set the serverPort variable to 443. This is the default port for HTTPS. Also, you need to set the serverAddress variable to the hostname of the server that the client wants to connect to.
Alternatively, if the request is not a “CONNECT” request, you need to set the serverPort variable to 80 (the default port for HTTP). Also, set the serverAddress variable to the hostname of the server that the client wants to connect to. This can be extracted from the request headers.
Create connection from Proxy to Server
Next, you need to establish a new socket for the connection from the proxy to the server using net.createConnection() function. You need to provide the host and port as input to this function.
The connection is established as soon as the function is called.
let proxyToServerSocket = net.createConnection(
    {
        host: serverAddress,
        port: serverPort
     },
     () => {
        console.log("Proxy to server is setup");
     }
)

if (isConnectionTLS) {
     clientToProxySocket.write("HTTP/1.1 200 OK\\r\\n\\n");
} else {
     proxyToServerSocket.write(data);
}
There are two conditions that need to be handled over here:
- If the request is a “CONNECT” request (in other words, HTTPS), you send an “HTTP/1.1 200 OK” response to the client to indicate that the connection to the server has been established.
- If the request is not a “CONNECT” request (basically, HTTP), it writes the data from the client’s request to the server.
Setting Two-Way Piping
Once all of the above steps are done, you need to connect the client to the server via proxy. This is done by using the below code:
clientToProxySocket.pipe(proxyToServerSocket);
proxyToServerSocket.pipe(clientToProxySocket);

proxyToServerSocket.on("error", (err) => {
   console.log("Proxy to server error");
       console.log(err);
   })

   clientToProxySocket.on("error", (err) => {
            console.log("Client to proxy error");
   })
In the first two lines, you are setting up two-way data piping between the clientToProxySocket and the proxyToServerSocket sockets using the pipe() method.
What does the pipe() method actually do?
The pipe() method belongs to the Readable stream class inherited by the Socket class. Its job is to read data from a readable stream (clientToProxySocket) and write it to a destination writable stream (proxyToServerSocket).
Any data written to the clientToProxySocket by the client will be automatically written to the proxyToServerSocket. Also, any data written to the proxyToServerSocket by the server will be automatically written to the clientToProxySocket. In other words, this lets the proxy act as an intermediary between the client and the server.
Also, you need to finally set up error event listeners for both the client and server sockets to log any errors that might occur during the proxying process.
3 – Testing the Node.js Forward Proxy
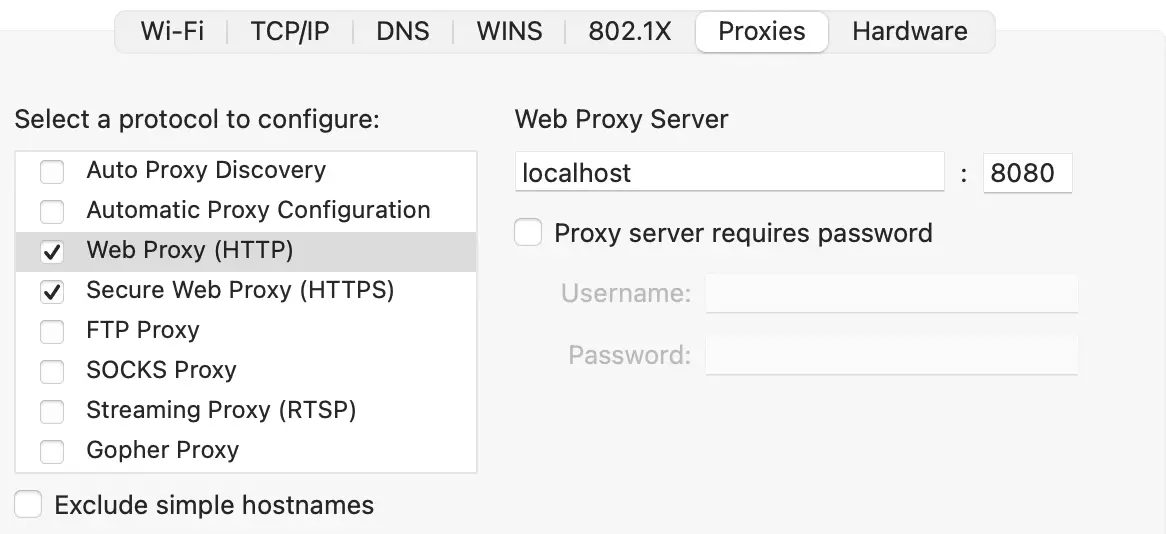
To setup the test environment, you need to tweak the proxy settings of your system. For example, you need to enable the proxy for HTTP and HTTPS.
Check the below screenshot for reference. For both HTTP and HTTPS, set the Web Proxy Server to localhost:8080.
Finally, you can test the Node.js proxy server by starting the application (npm run start).
Now, when you open any webpage in your browser (for example, google.com), you should see the requests flowing through the proxy.
> nodejs-forward-proxy-demo@1.0.0 start
> node index.js

Server listening on 0.0.0.0:8080
Client connected to proxy
Proxy to server is setup
4 – Node.js Forward Proxy Security Concerns
Forward proxies have some really useful applications. But while deciding to use one, you need to take care of the security concerns:
- An important consideration is the encryption of the connection between the client and proxy and also between the proxy and the target server. This becomes very important if the client is accessing sensitive information or the connection happens over an untrusted network
- You should also ensure that the proxy is properly authenticated and authorized to access the target server on the client’s behalf
- Apart from the first two points, you also need to consider the security implications of any logging that the proxy server might be performing. It should not log sensitive information
The idea behind these points is not to restrict the use of a proxy but to mitigate the security risks while implementing a Node.js forward proxy.
Conclusion
With this, we have successfully learnt how to implement a Node.js forward proxy. To do so, we used the Node.js net module to establish a two-way binding between the client and the target server.
The code for this post is available on Github for reference.
You might also be interested in our detailed post on building a Node.js API Proxy.
If you found this post useful, consider sharing it with friends and colleagues.
0 Comments