In this post, we will look at OpenShift NodeJS Application Deployment using the NodeJS builder image available in OpenShift. NodeJS is a Javascript engine that allows us to build web applications as well as APIs.
If you want to install OpenShift on your local machine, I have a detailed post about OpenShift Installation using Minishift.
Also, if you want an introduction to OpenShift, you can refer to the OpenShift Web Console overview.
So let’s start with OpenShift NodeJS application deployment steps.
Step 1 – The NodeJS Application
For this post, we will use a very simple NodeJS application. Our goal is not to learn about NodeJS in this post but to look at deploying an application to OpenShift.
Below is a very simple NodeJS application that can suffice for our purpose.
const http = require("http");

const server = http.createServer((req, res) => {
  res.writeHead(200, {
    "Content-type": "text/html",
  });
  res.end("<h1>Hello World from OpenShift NodeJS App</h1>");
});

server.listen(8000, () => {
  console.log("Listening to requests on Port 8000");
});
Basically, here we are using only the relevant core modules available with NodeJS. For example, we use the http module to create a HTTP server. All incoming requests to our application will be handled by this server object.
In this application, we simply return a small HTML object in the response saying Hello World from OpenShift NodeJS App.
Finally, we configure the server to listen to port 8000. Please do keep in mind the port 8000 as we will have to perform some configuration in OpenShift to handle this.
Step 2 – The Application Start Script
By default, for a NodeJS application, OpenShift looks for a start script to execute. If there is no start script, OpenShift cannot decide what to do with our application code.
The start script is specified in the package.json file in the scripts section. See below example.
{
  "name": "openshift-nodejs-demo",
  "version": "1.0.0",
  "description": "OpenShift NodeJS Demo Application",
  "main": "index.js",
  "scripts": {
    "test": "echo \"Error: no test specified\" && exit 1",
    "start": "node index.js"
  },
  "author": "Saurabh Dashora",
  "license": "ISC"
}
Basically, here we are simply saying that to start the application execute the command node index.js.
The other properties in our package.json file are pretty self-explanatory. In fact, they are all generated out of the box by using npm init.
With this, our source code is ready. We can deploy it to OpenShift. If you want to reuse this code for your trial, I have kept it at the Github repository.
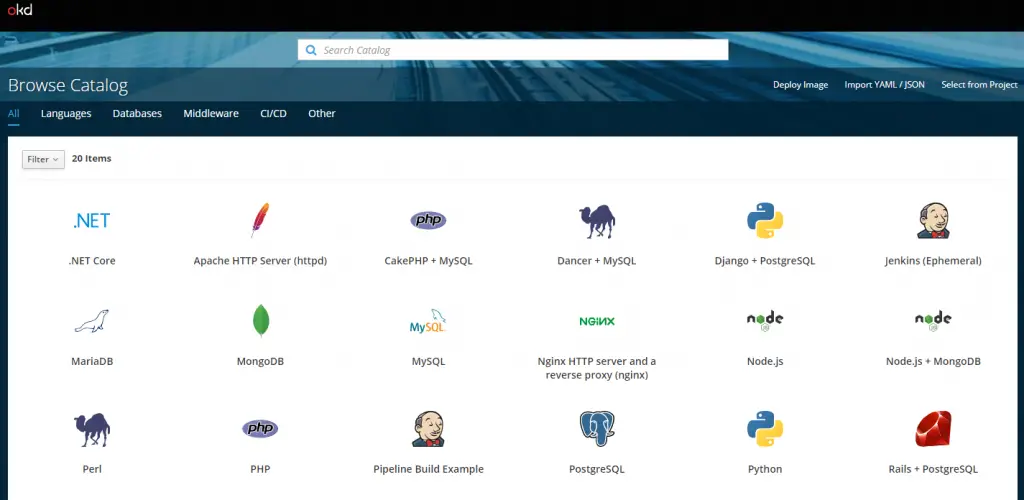
Step 3 – Deploying the Application to OpenShift
In OpenShift, we will use the OpenShift S2I NodeJS image. This image is available in the standard catalog.
Once we click on the image name, a dialog box will open where we have to fill in the details about our application.
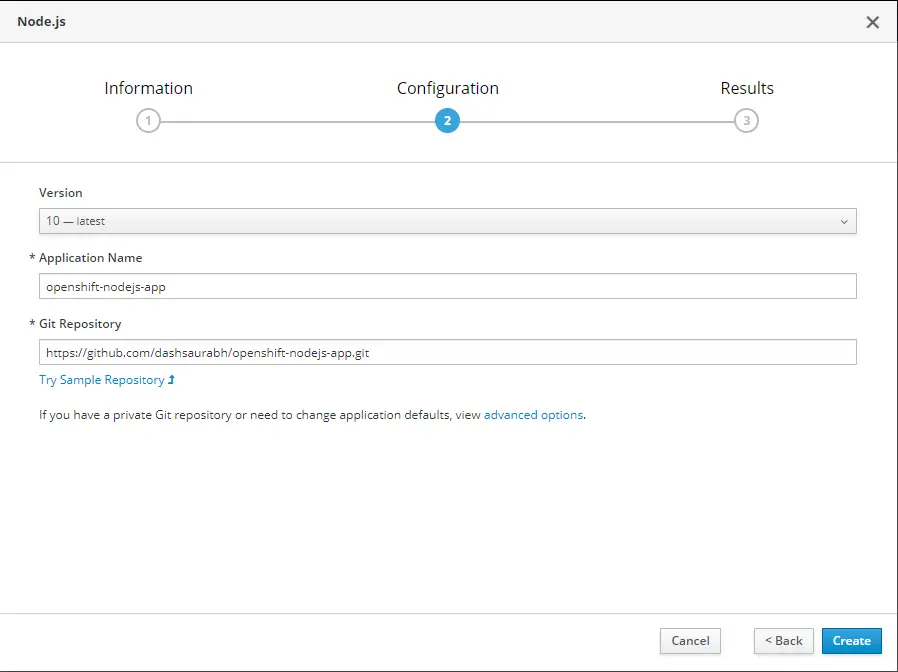
Here, the details we fill are Application Name and Git Repository of our application. After filling up the details, we need to click Create.
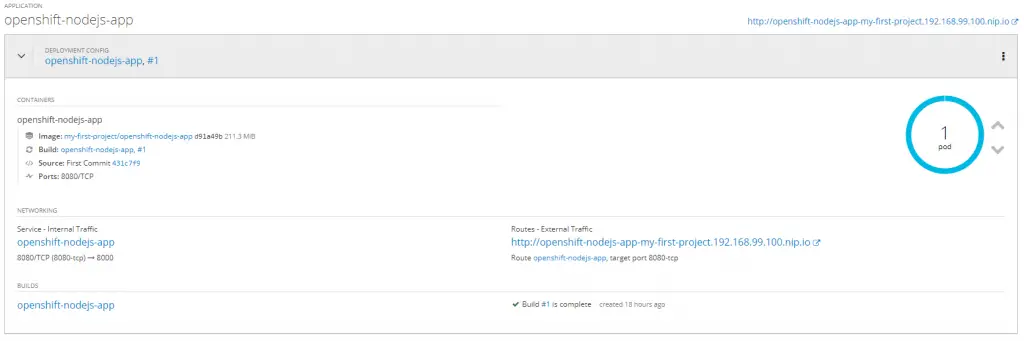
This will automatically create a bunch of resources for us. The Build process will clone our source code from Github and build our application into a new image.
Next, OpenShift creates a new Pod and then deploys the image on that Pod. The deployment process will use the start script from our package.json and use that to start up the application. Once the circle turns dark blue, it signifies that our application is up and running.
Step 4 – Service Port Mapping
Now if we had used port 8080, our application would be able to return a proper response. However, if you remember, we had configured our NodeJS application to listen on port 8000.
By default, OpenShift tries to map the incoming traffic to port 8080 on the container. In our application, there is nothing available on port 8080. Therefore, we have to change the mapping in our application’s Service to point to port 8000 on the container.
To do so, we can click on the Service -> Actions (Top Right Corner) -> Edit YAML. Basically, all the resources in OpenShift are defined using YAML.
Here, we can change the Target Port to 8000 as below:
spec:
  clusterIP: 172.30.95.200
  ports:
    - name: 8080-tcp
      port: 8080
      protocol: TCP
      targetPort: 8000
  selector:
    deploymentconfig: openshift-nodejs-app
  sessionAffinity: None
  type: ClusterIP
Once we change it, we can save the file and then, if we access the URL for our application, we should see response like below:

Basically, our application is up and running and able to receive traffic.
Conclusion
With this, we have successfully completed our goal of OpenShift NodeJS Application Deployment.
We also looked at the importance of the start script and also the port mapping for Service layer.
In the subsequent posts, we will look at more deeper concepts with regards to deployments.
0 Comments