You must have heard about Nginx. If not, here’s a quick reference:
Nginx is a webserver. But it can wear many hats. You can use it as a reverse proxy, a load balancer and even as an HTTP cache. Websites expecting high traffic often rely on Nginx because of its fantastic performance, stability and low resource consumption.
There is no doubt that Nginx is a popular tool and that makes it a frequent item of deployment on cloud platforms. In this post, you are going to learn how to use Terraform to deploy Nginx webserver instance on AWS EC2 Instance.
In case you are new to Terraform working with AWS, check out the post where we provision an EC2 instance using Terraform configuration.
1 – Terraform Nginx AWS EC2 Deployment Plan
Here’s the plan for the deployment of Nginx on EC2 using Terraform.
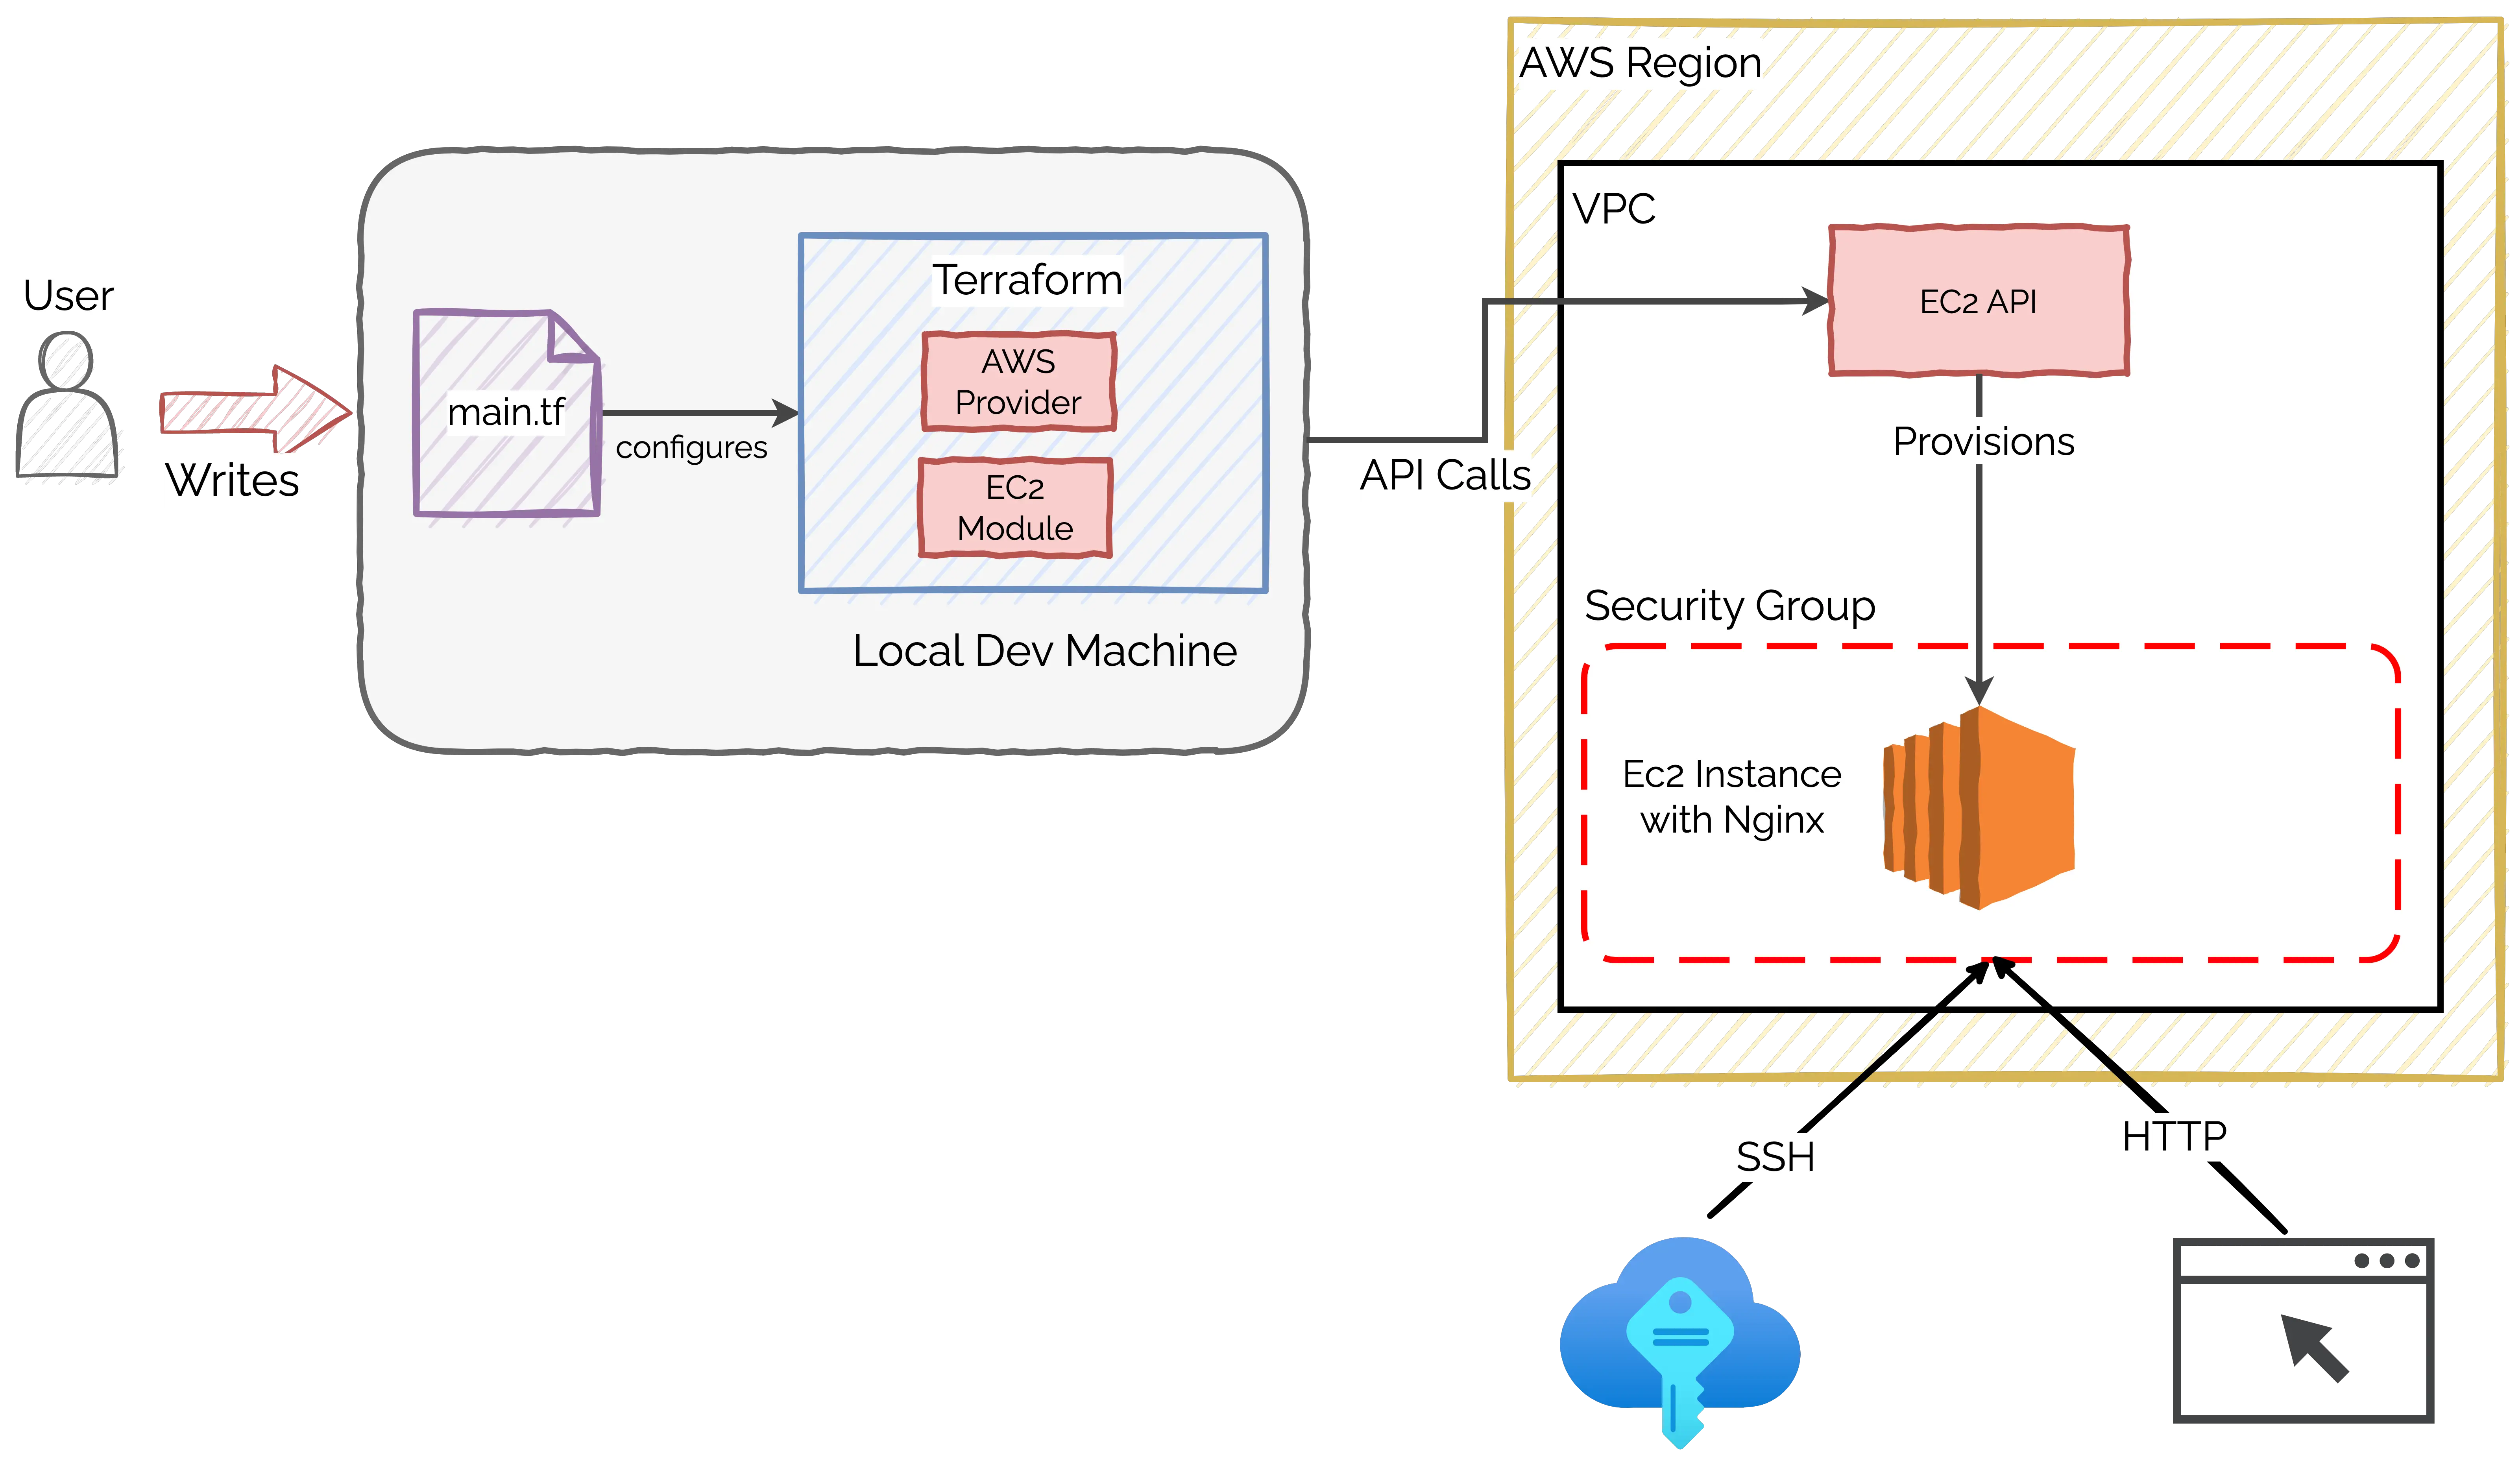
What’s going on here?
- You’ll write a configuration file using Terraform HCL (also known as Hashicorp Configuration Language) and pass it to Terraform.
- This file will leverage the AWS Provider and Terraform Registry Module for AWS to provision an EC2 instance.
- For the sake of simplicity, I recommend using the default VPC and subnet. You can always expand your configuration later on to provision a brand new VPC.
- Lastly, you need to get an Nginx instance up and running on the EC2 instance. For that, we will use the EC2 user-data feature to install and start up the Nginx instance. Also, we will configure the appropriate security group settings that will allow SSH and HTTP access on specific ports.
There is something great about all the above points!
Everything will be done via the Terraform configuration file. No manual intervention.
2 – Terraform Nginx AWS EC2 Configuration File
To start building the configuration, you need to create a project directory. This is like the source code of your infrastructure.
$ mkdir terraform-ec2-nginx-demo
$ cd terraform-ec2-nginx-demo
2.1 – Configuring Terraform
Create a file named terraform.tf and paste the below code inside the file.
terraform {
    required_providers {
        aws = {
            source = "hashicorp/aws"
            version = "~> 4.4.0"
        }
    }
    required_version = ">=1.1.0"
}
This is basically the configuration for Terraform itself.
The terraform {} block specifies the AWS provider version. In this case, that’s v4.4.0. Also, you need to specify the minimum Terraform version (v1.1.0).
2.2 – Terraform Main Configuration File
Next, you need to create a file for the main configuration.
Check out this code for the main.tf file.
provider "aws" {
    region = "us-west-2"
    profile = "terraform-user"
}

data "aws_ami" "ubuntu" {
    most_recent = true

    filter {
        name = "name"
        values = ["ubuntu/images/hvm-ssd/ubuntu-focal-20.04-amd64-server-*"]
    }

    owners = ["099720109477"]
}

module "ec2_instances" {
    source = "terraform-aws-modules/ec2-instance/aws"
    version = "3.5.0"
    count = 1

    name = "ec2-nginx-demo"

    ami = data.aws_ami.ubuntu.id
    instance_type = "t2.micro"
    vpc_security_group_ids = [aws_security_group.nginx_demo.id]
    key_name = var.key_name
    user_data = file("userdata.tpl")

    tags = {
        Name = "NginxDemo"
    }
}

resource "aws_default_vpc" "default" {

}

resource "aws_security_group" "nginx_demo" {
    name = "nginx_demo"
    description = "SSH on port 22 and HTTP on port 80"
    vpc_id = aws_default_vpc.default.id

    ingress {
        from_port = 22
        to_port = 22
        protocol = "tcp"
        cidr_blocks = ["0.0.0.0/0"]
    }

    ingress {
        from_port = 80
        to_port = 80
        protocol = "tcp"
        cidr_blocks = ["0.0.0.0/0"]
    }

    egress {
        from_port        = 0
        to_port          = 0
        protocol         = "-1"
        cidr_blocks      = ["0.0.0.0/0"]
    }
}
So what’s going on over here?
Basically, this is the deployment blueprint for our Terraform Nginx EC2 instance.
Let’s break it down.
The first block is the provider {} block, you need to configure the AWS Provider. Basically, you need to tell which AWS region you want to use while provisioning resources. Second, you need to specify the user profile.
In the example, you can something called the terraform-user. This is just a user you need to create in the AWS IAM service. After obtaining the credentials, you have to setup the same user within the local machine so that the Terraform commands can utilize the credentials to create the various resources. Refer to this link to configure the credentials in your system.
Moving on, you declare a data {} block for setting up the AWS AMI. Unless you have a specific need, I recommend using the latest Ubuntu image. It is part of the Free Tier and you can find a ton of documentation about Ubuntu. The role of the data {} block is to basically fetch the latest AMI version available on AWS. If interested, you can read more on how to use the Terraform Data Source.
The next block is a module {} block. To provision an EC2 instance, you need to use the module named ec2_instances available on the Terraform Registry. If interested, you can read more about Terraform Registry Modules.
Every module takes a bunch of arguments as input. At bare minimum, you need to set the values for the below properties:
- Name of the instance
- The AMI to be used (coming from the Terraform data source)
- The VPC Security Group Id. This will come from the security group resource.
- The name of the key to access the instance. We will get to it in a bit.
- The
user_datafile. This will point to the Nginx setup script
The above arguments are apart from the top-level arguments such as the source for the module, version and count (number of instances to be created).
Moving on, you need to specify the details of the VPC. Since we are going with the default VPC, you can directly point to aws_default_vpc.
Lastly, you need to setup the security group. This is done using the resource {} block for aws_security_group. For identification purpose, you can name it nginx_demo and assign it to the default VPC.
After this, it is a matter of defining the rules. Basically, you need to configure access to port 22 for SSH and port 80 for browsing from the web.
2.3 – Terraform Output Configuration
When Terraform runs, it generates some output. It is a good idea to display some basic stuff for our information. For this example, I recommend outputting the public IP of the newly created EC2 instance.
To make Terraform display this output, create a file outputs.tf with the below configuration.
output "ec2_instance_public_ips" {
  description = "Public IP addresses of EC2 instances"
  value       = module.ec2_instances[*].public_ip
}
2.4 – The EC2 User Data Script
Our EC2 instance is configured to expect a user data script.
Basically, the user data script will be executed when AWS instantiates the EC2 instance. It is good place to setup our Nginx webserver.
Create a file userdata.tpl and paste the below contents to setup a bare minimum Nginx installation on the newly created instance.
#!/bin/bash
sudo apt update -y &&
sudo apt install -y nginx
echo "Hello Nginx Demo" > /var/www/html/index.html
3 – Create an AWS Key Pair for EC2 Instance
Your EC2 instance also expects a key. This key allows us to SSH into our EC2 instance. If you have an existing key pair you can use it. If not, you can follow the below steps to create a new key pair.
Before going ahead with the steps, make sure you are in the same region where you want to provision the AWS resources. This is because key pairs are specific to regions.
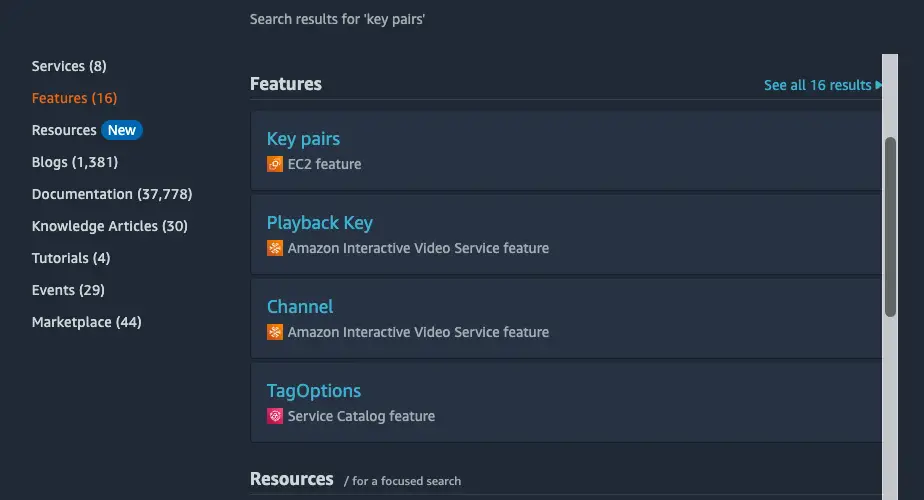
Step 1
Search for “key pairs” in the AWS console and check the first item in the Features section
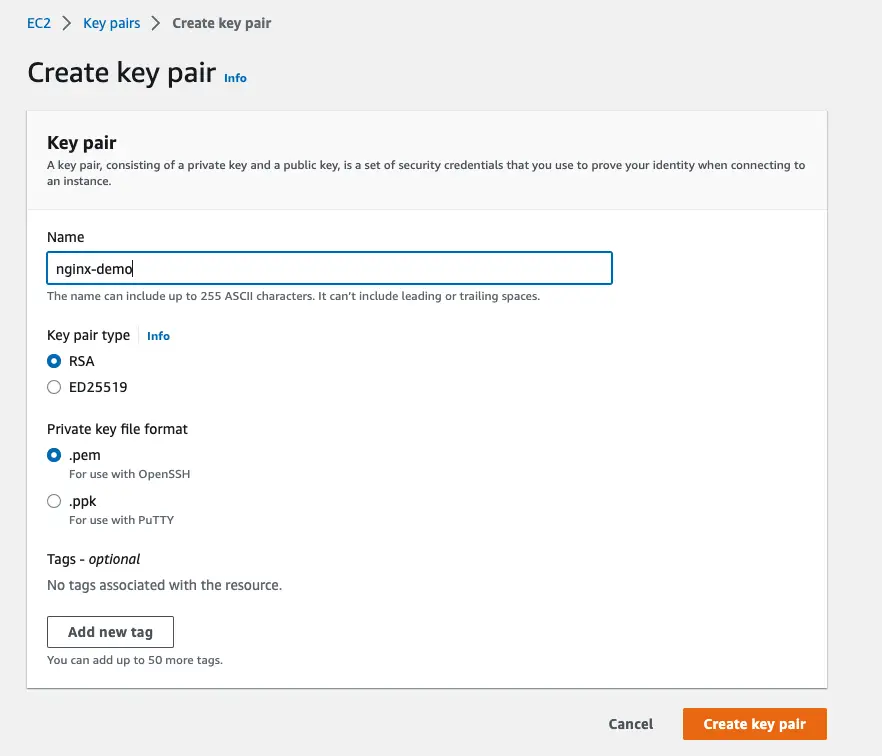
Step 2
Go to the Create Key Pair dialog box and enter the name of the key.
For this example, the name should be “nginx-demo”. Make sure to check RSA as the Key Pair Type and the Key Format to .pem. You can use the .pem keys to SSH to your EC2 instance using OpenSSH.
Once done, click on Create key pair button which will download the key to your local system.
Step 3
Next, you need to copy the downloaded key to the current working directory. This working directory is basically your project directory.
Also, don’t forget to set the appropriate permissions to the .pem file. Otherwise, you will get errors while trying to SSH into the EC2 instance.
cp ~/Downloads/nginx-demo.pem ./
chmod 400 nginx-demo.pem
Step 4
Lastly, you need to create another configuration file in your project. This is the Terraform variables file.
Check out the configuration for the variables.tf.
variable "key_name" {
    description = "Key to access the EC2 instance"
    type = string
    default = "nginx-demo"
}
The variable key_name is the same we have used while declaring the configuration for the EC2 instance.
module "ec2_instances" {
    source = "terraform-aws-modules/ec2-instance/aws"
    version = "3.5.0"
    count = 1

    name = "ec2-nginx-demo"

    ami = data.aws_ami.ubuntu.id
    instance_type = "t2.micro"
    vpc_security_group_ids = [aws_security_group.nginx_demo.id]
    key_name = var.key_name
    user_data = file("userdata.tpl")

    tags = {
        Name = "NginxDemo"
    }
}
You could have hard-coded the key_name directly in the main.tf, but I wanted to demonstrate the better practice of utilizing Terraform variables for setting values. In fact, it is possible to set even more values in our current configuration.
4 – Provisioning Nginx on Terraform EC2
Finally, we are done with preparing our Terraform configuration for Nginx on AWS EC2.
To do so, we need to run the terraform init command to initialize the workspace. Below is the output
Initializing modules...
Downloading registry.terraform.io/terraform-aws-modules/ec2-instance/aws 3.5.0 for ec2_instances...
- ec2_instances in .terraform/modules/ec2_instances

Initializing the backend...

Initializing provider plugins...
- Finding hashicorp/aws versions matching ">= 3.72.0, ~> 4.4.0"...
- Installing hashicorp/aws v4.4.0...
- Installed hashicorp/aws v4.4.0 (signed by HashiCorp)

Terraform has created a lock file .terraform.lock.hcl to record the provider
selections it made above. Include this file in your version control repository
so that Terraform can guarantee to make the same selections by default when
you run "terraform init" in the future.

Terraform has been successfully initialized!

You may now begin working with Terraform. Try running "terraform plan" to see
any changes that are required for your infrastructure. All Terraform commands
should now work.

If you ever set or change modules or backend configuration for Terraform,
rerun this command to reinitialize your working directory. If you forget, other
commands will detect it and remind you to do so if necessary.
Terraform downloads the modules and providers from the registry and creates a lock file to document the provider selections. The modules will be installed in the .terraform/modules directory.
Next, you can execute terraform plan command to check the various infrastructure pieces Terraform will create. This command does not actually provision the infrastructure. It just displays the plan.
Finally, you can execute terraform apply to provision the infrastructure. If everything was fine till this point, Terraform will create the infrastructure and print the specified output.
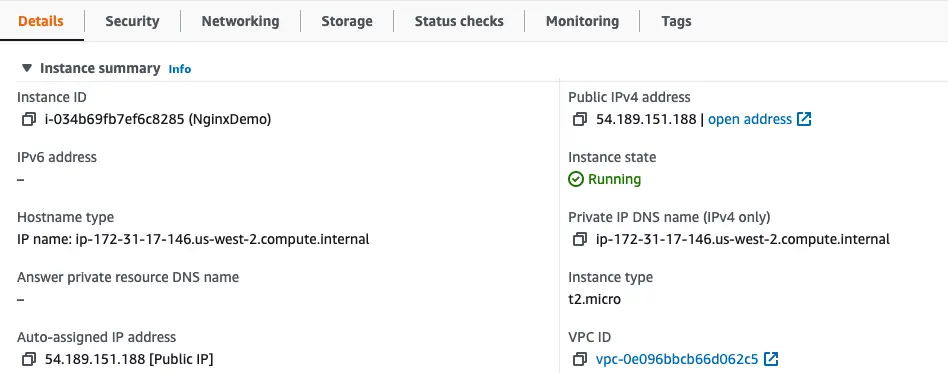
You can confirm the creation of the various infrastructure items in the AWS Console
Below is the Nginx EC2 instance created by Terraform within the default VPC of the AWS account.
Also, below is the security group named NginxDemo with the correct rules.
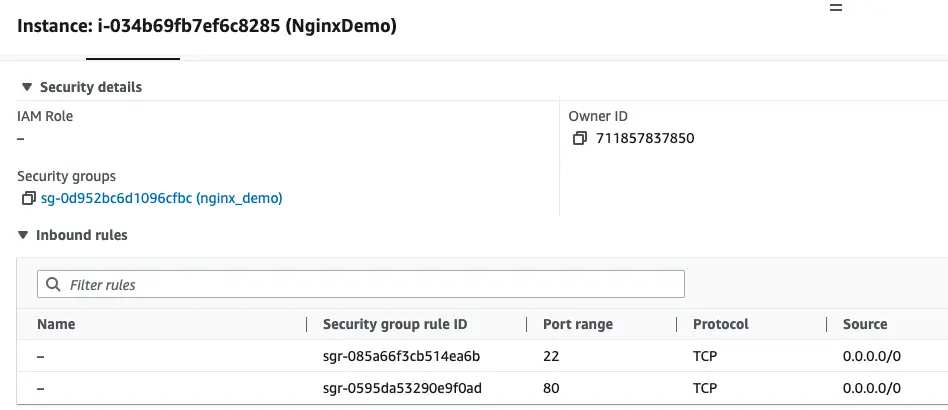
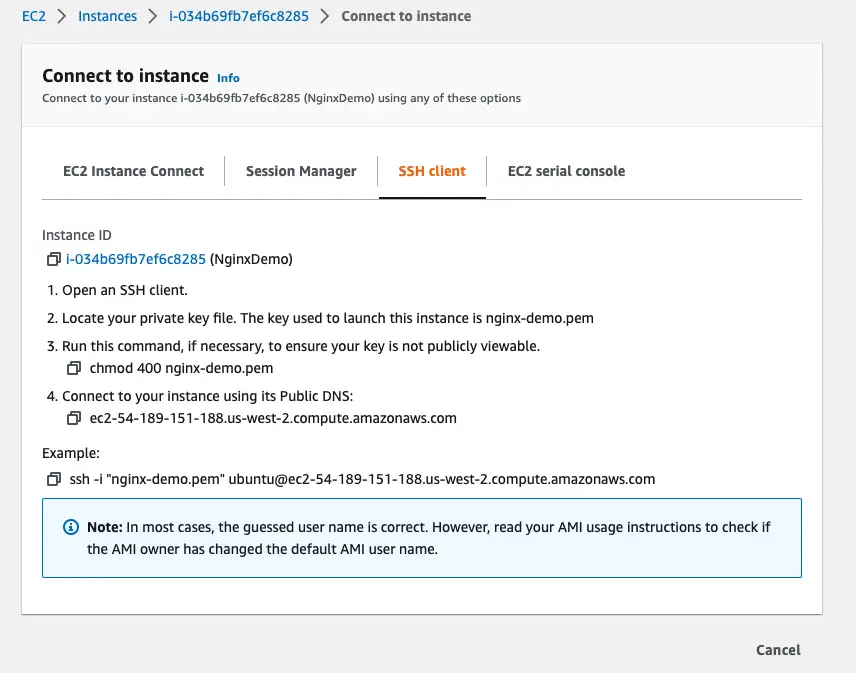
To confirm whether Nginx webserver is up and running, you can click the EC2 instance created using Terraform and toggle to the Connect to instance option. At the bottom, you will see the example command to SSH into your EC2 instance.
See below screenshot
Once you are logged in to the EC2 instance, you can check the status of Nginx by executing the command systemctl status nginx. Check the below output:
ubuntu@ip-172-31-17-146:~$ systemctl status nginx
● nginx.service - A high performance web server and a reverse proxy server
     Loaded: loaded (/lib/systemd/system/nginx.service; enabled; vendor preset: enabled)
     Active: active (running) since Mon 2023-01-02 04:18:36 UTC; 4min 32s ago
       Docs: man:nginx(8)
   Main PID: 1897 (nginx)
      Tasks: 2 (limit: 1143)
     Memory: 4.6M
     CGroup: /system.slice/nginx.service
             ├─1897 nginx: master process /usr/sbin/nginx -g daemon on; master_process on;
             └─1898 nginx: worker process

Jan 02 04:18:36 ip-172-31-17-146 systemd[1]: Starting A high performance web server and a reverse proxy server...
Jan 02 04:18:36 ip-172-31-17-146 systemd[1]: Started A high performance web server and a reverse proxy server.
You can also access the public IP of the EC2 instance in the browser to see the “Hello Nginx Demo” displayed in the window.
Once you are satisfied, you can destroy the infrastructure by executing the terraform destroy command. I advise you to do that so that there’s no chance you might incur cost on your running infrastructure.
Conclusion
Phew, that was a long post!
You might feel whether it makes sense to write so much Terraform configuration for creating a simple EC2 instance and run an Nginx webserver. However, the point of Terraform is repeatability.
Once you have created the configuration, you can simply create the entire infrastructure with a single command. You don’t have to worry about executing each step manually and taking the risk of missing out some crucial step. Also, you can clean up the infrastructure without worrying about leaving something running.
The code for this project is available on Github.
Want to deploy Nginx on another platform? Check out this post on deploying Nginx on Docker with Terraform.
If you found this post useful, consider sharing it with friends and colleagues. Also, in case of any queries, please write them in the comments section below.
You can also connect with me on other platforms:
0 Comments