Terraform is a deployment tool that you can use to provision and manage your infrastructure as code. Usually, the infrastructure is cloud-based but Terraform can manage anything that can be controlled through an API.
But why should you consider infrastructure as code (IaC) in the first place?
IaC helps avoid some common pitfalls in deployment. Managing your infrastructure using special code opens the door to automation. It also creates a strong release-oriented approach to infrastructure similar to normal application code.
In this tutorial, I will go through each step in using Terraform to provision an AWS EC2 instance.
1 – How Terraform Works?
If you have ever deployed software, you would know the importance of repeatability and consistency in your infrastructure setup. You don’t want to mess with environment changes when deploying software on a Friday evening.
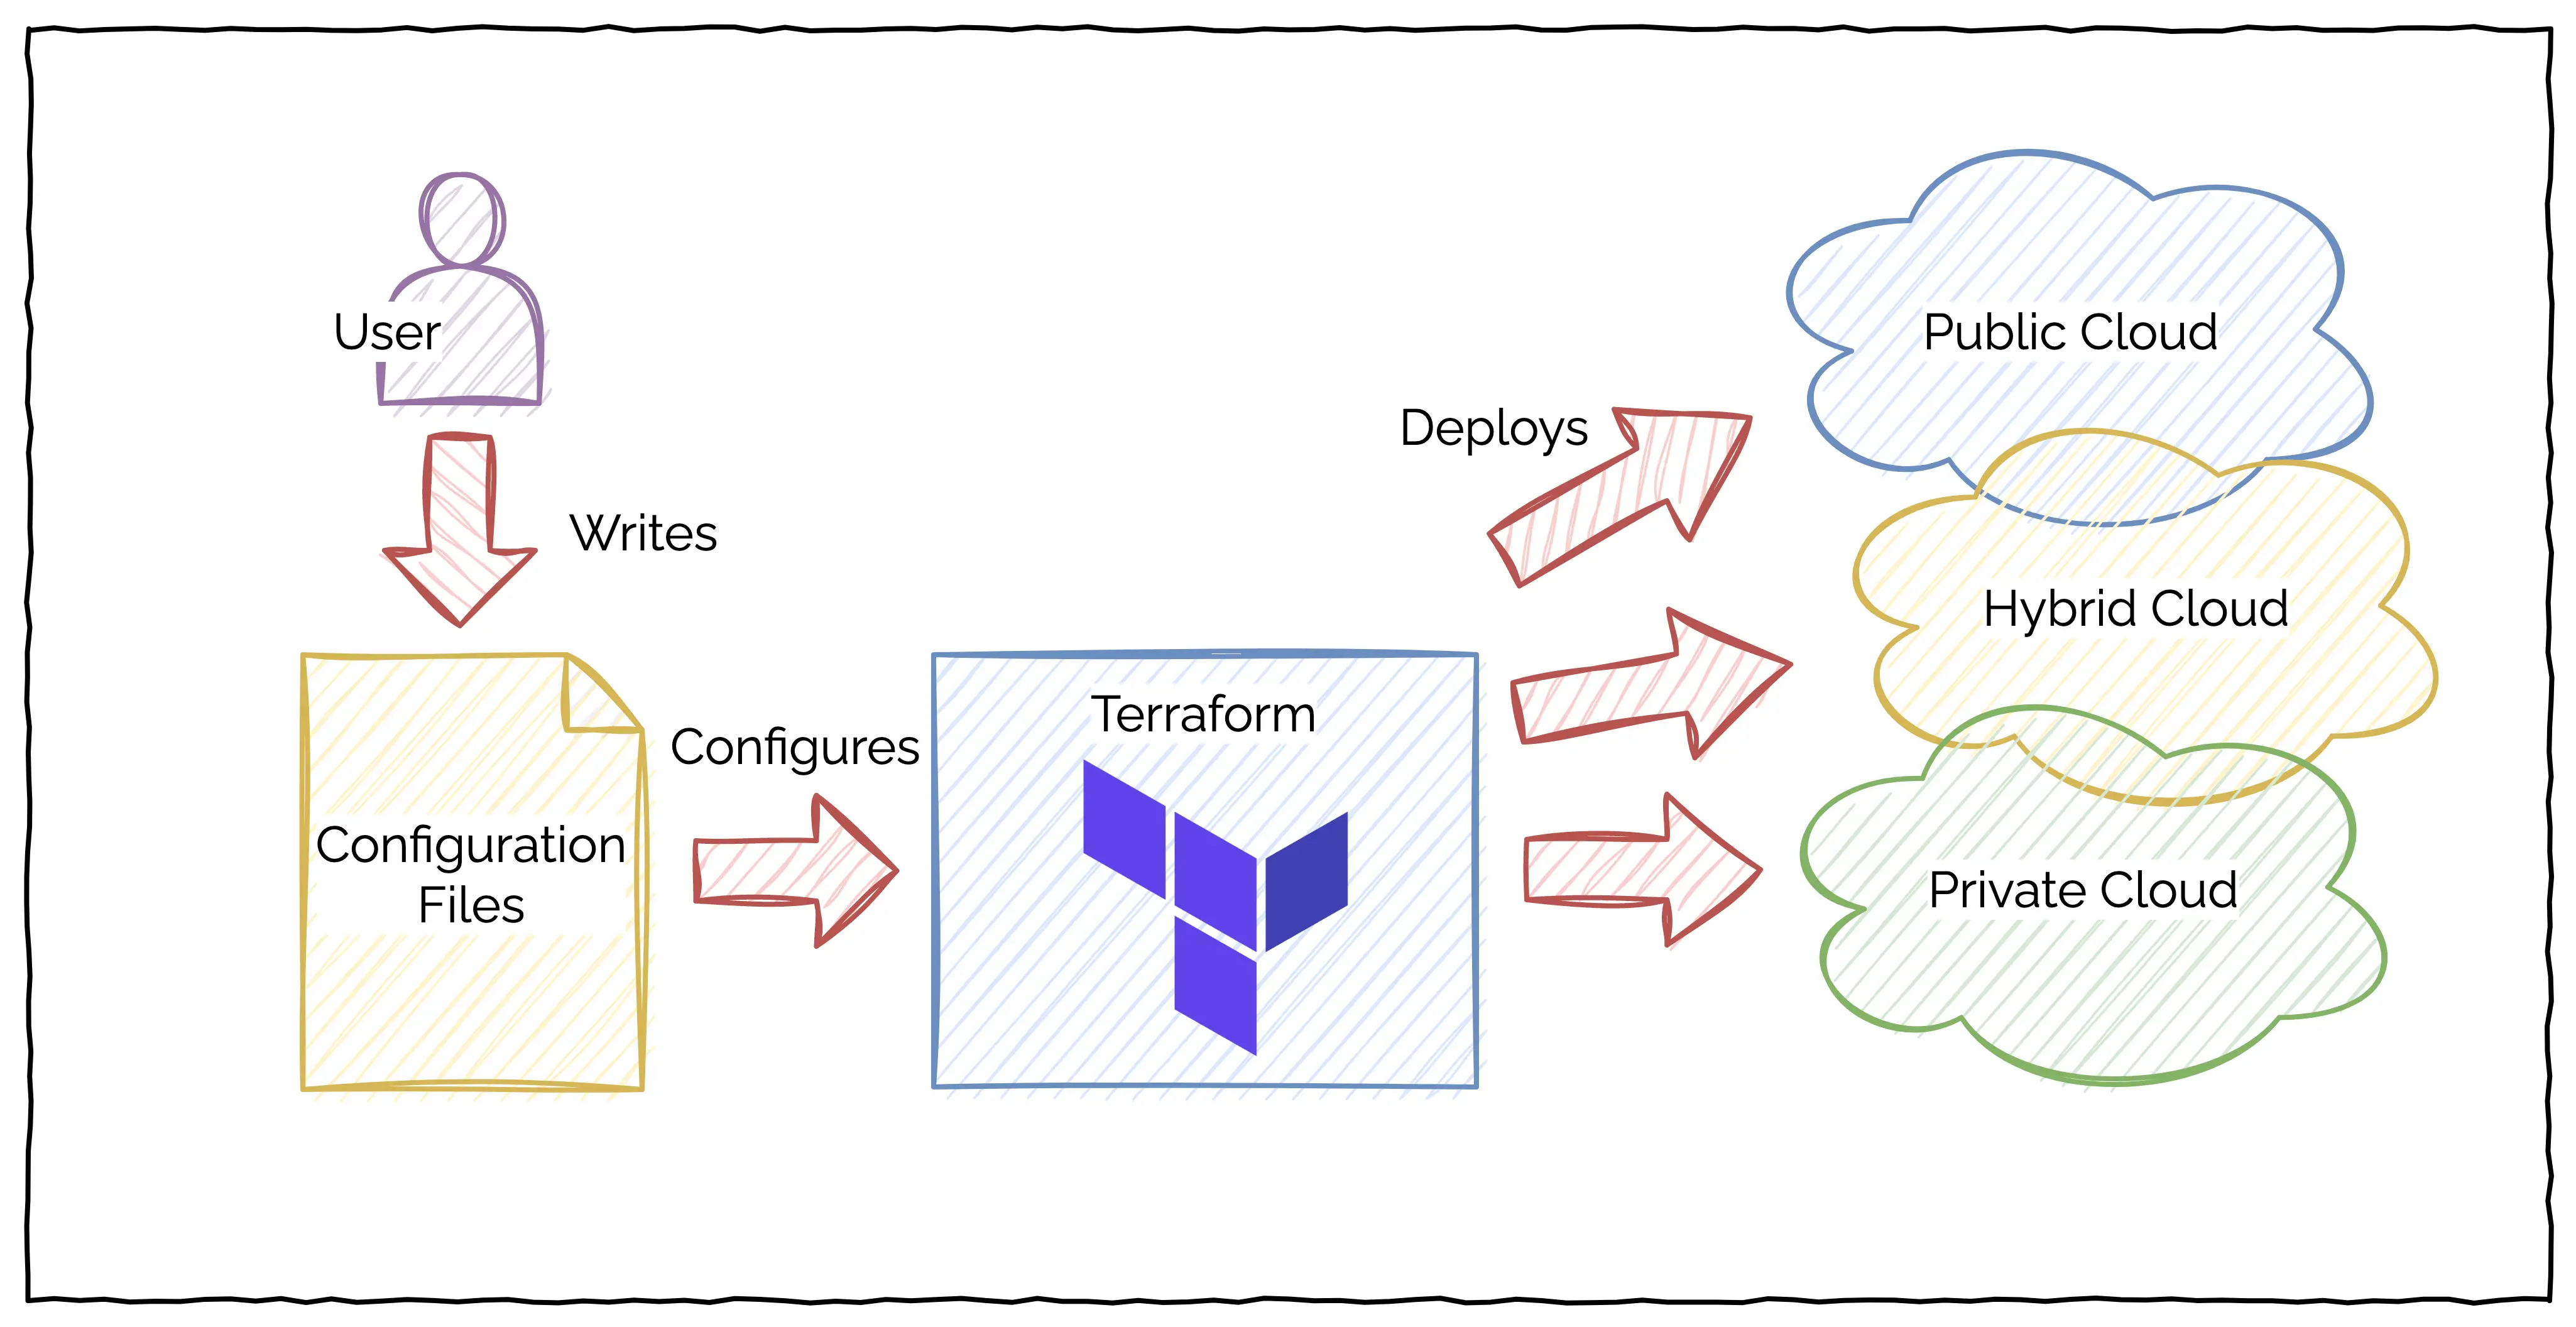
Terraform makes infrastructure provisioning repeatable and consistent across public, private and hybrid cloud platforms.
The basic principle of Terraform is that you write human-readable configuration code to define your infrastructure. Once you have the code, you ask Terraform to deploy the infrastructure using a single command.
The below illustration describes the working of Terraform on a high-level.
But how does Terraform support so many different platforms?
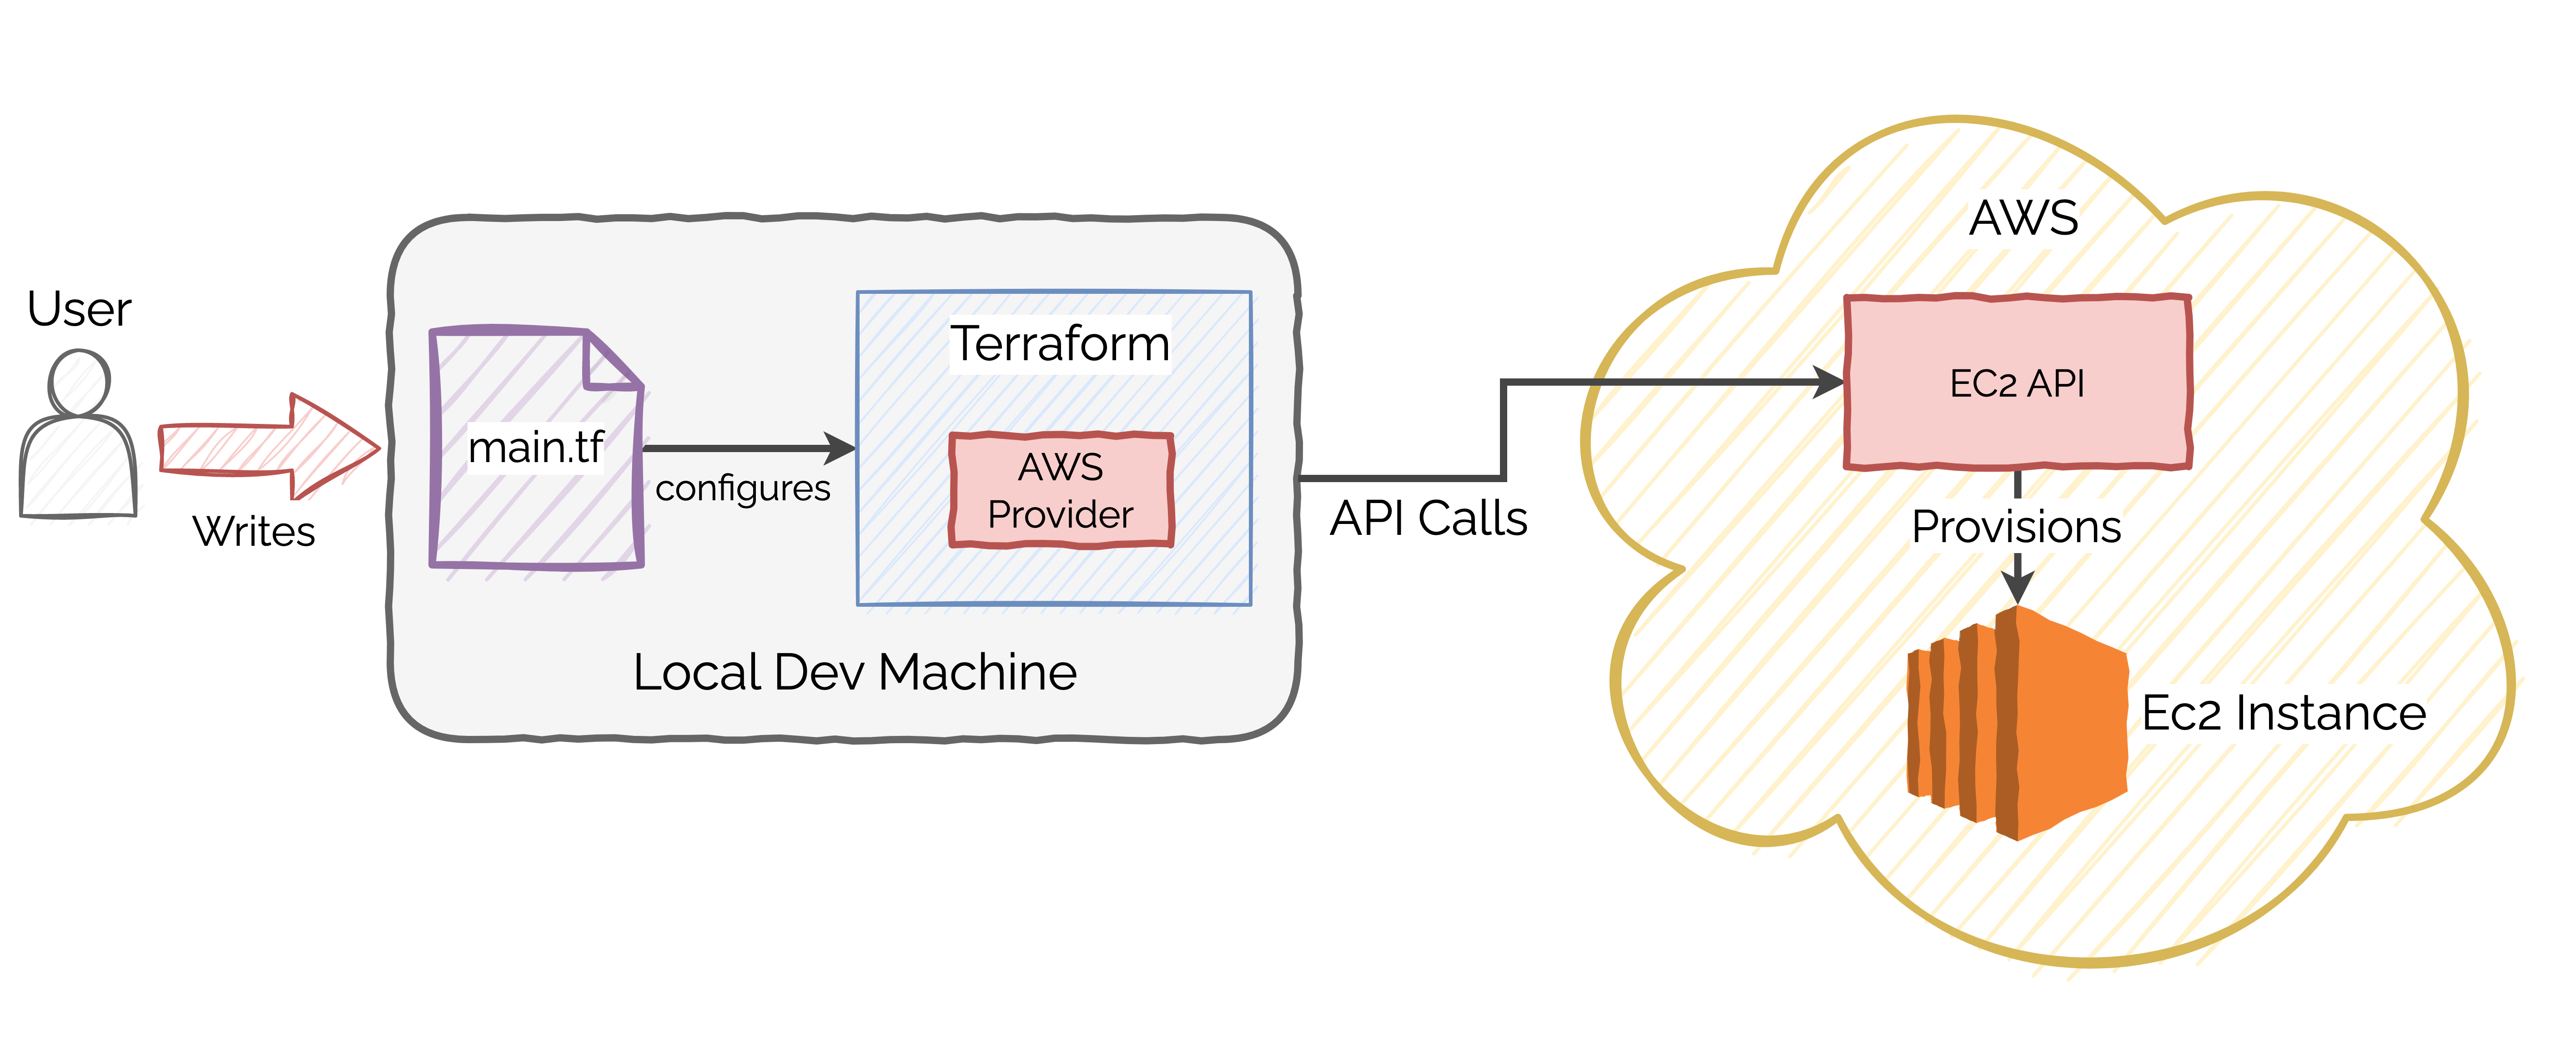
The answer is Terraform providers. Providers are basically plugins for Terraform that are made to talk with external APIs. They are written in golang and distributed through the Terraform registry.
A provider acts as the middleman between Terraform and the platform. It handles a bunch of different things such as:
- authentication logic
- making API requests
- managing timeouts and errors
Check out the below illustration.

Each cloud vendor maintains its own Terraform provider and at this point, there are hundreds of published providers available on the Terraform registry. You can also write your own Terraform provider.
2 – Terraform AWS EC2 Instance Configuration File
Let’s look at how to provision an AWS EC2 instance using Terraform.
The below illustration describes the overall process:
First, you need to create a directory for the project files
$ mkdir terraform-aws-ec2-demo
$ cd terraform-aws-ec2-demo
Within the directory, create the main.tf file to write the initial Terraform configuration.
See below.
provider "aws" {
    region = "us-west-2"
    profile = "terraform-user"
}

resource "aws_instance" "hello_aws" {
    ami = "ami-0ceecbb0f30a902a6"
    instance_type = "t2.micro"
    tags = {
        Name = "HelloAWS"
    }
}
In case you are wondering, the configuration is written using a language known as HCL or Hashicorp Configuration Language. The language is human-readable (even more than JSON) and forms the core of Terraform.
The code itself is simple enough to understand.
The Terraform AWS Provider Block
The first block configures the provider.
provider "aws" {
    region = "us-west-2"
    profile = "terraform-user"
}
Providers only have one label: Name. This should be the official name of the provider as published in the Terraform registry.
In our example, the value is “aws” for AWS Provider. The AWS Provider is responsible for understanding API interactions and making authenticated requests.
You need to configure a provider by passing some inputs to the provider block. As an example, set the region to us-west-2. Also, direct the provider to use the profile for terraform-user.
Since AWS APIs need authentication, you will have to create an IAM user, generate credentials from the AWS Console and set those credentials with your local system’s AWS CLI.
For this demo, terraform-user is the IAM user I’ve created to manage our Terraform resources. You can read more about setting the AWS credentials at this link.
The Terraform AWS Resource Block
The next block in the main.tf file describes the resource you want to provision i.e. the EC2 instance.
resource "aws_instance" "hello_aws" {
    ami = "ami-0ceecbb0f30a902a6"
    instance_type = "t2.micro"
    tags = {
        Name = "HelloAWS"
    }
}
This EC2 code block is an example of a Terraform resource.
Resources are undoubtedly the most important elements in Terraform as they are directly responsible for provisioning the infrastructure.
A resource block has two labels. The first label specifies the type of the resource and the second is the name of the resource.
For this example, the type of resource is aws_instance and the name is “hello_aws”. The name has no special significance and is only used to reference the resource within the module scope. Of course, the type and name together become a unique resource identifier.
Each resource takes some inputs. In this case, the inputs are:
- AMI ID – This is the AMI id that should be used to create the EC2 instance. In case you are wondering, this is the AMI for Amazon Linux.
- Instance Type – This is the instance type. I recommend using t2.micro instance that is available in Free Tier.
- Tags – These are special key value properties you may want to associate with the instance.
Resource also has some outputs that are generated after Terraform has provisioned the necessary infrastructure. In fact, the input arguments also end up as output attributes. However, Terraform also attaches new output attributes such as the id of the created resource.
3 – Initializing the Terraform Provider
Before Terraform can deploy our EC2 instance, you need to initialize the workspace.
What this means is that you have to download and install the AWS Provider binary from the Terraform registry. This is needed at least once for every workspace.
To initialize the workspace, run the command terraform init.
You should see output like this:
Initializing the backend...

Initializing provider plugins...
- Finding latest version of hashicorp/aws...
- Installing hashicorp/aws v4.48.0...
- Installed hashicorp/aws v4.48.0 (signed by HashiCorp)

Terraform has created a lock file .terraform.lock.hcl to record the provider
selections it made above. Include this file in your version control repository
so that Terraform can guarantee to make the same selections by default when
you run "terraform init" in the future.

Terraform has been successfully initialized!

You may now begin working with Terraform. Try running "terraform plan" to see
any changes that are required for your infrastructure. All Terraform commands
should now work.

If you ever set or change modules or backend configuration for Terraform,
rerun this command to reinitialize your working directory. If you forget, other
commands will detect it and remind you to do so if necessary.
Terraform fetches the latest version of the AWS provider and installs it in the workspace.
At this point, you will find an additional folder .terraform popup in your workspace. This contains the downloaded binary for the AWS provider.
Also, Terraform creates a lock file .terraform.lock.hcl to record the provider selections. It is good practice to include this file in the version control repository so that Terraform can make the same selections by default when you run terraform init in the future.
If interested, you can also learn how to generate a pictorial representation of the execution plan using Terraform graph command.
4 – Deploying the AWS EC2 Instance using Terraform
Once the initialization is successful, you are ready to deploy the EC2 instance using Terraform.
Execute the terraform apply command and answer “yes” to the confirmation prompt.
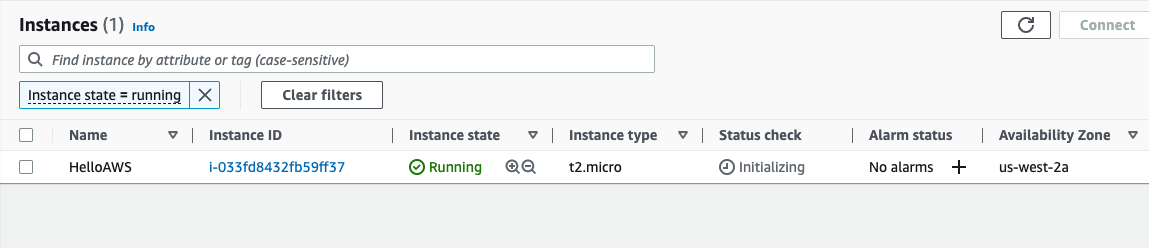
You should see similar output once the provisioning is complete.
aws_instance.hello_aws: Creating...
aws_instance.hello_aws: Still creating... [11s elapsed]
aws_instance.hello_aws: Still creating... [21s elapsed]
aws_instance.hello_aws: Still creating... [31s elapsed]
aws_instance.hello_aws: Creation complete after 37s [id=i-033fd8432fb59ff37]

Apply complete! Resources: 1 added, 0 changed, 0 destroyed.
Also, you can check the new instance in the AWS console.
The instance is created in the us-west-2a region as specified in the Terraform configuration file.
At this point, you will also find a file named terraform.tfstate created in your project directory.
It is basically a JSON file that describes the resources managed by Terraform. You can view the contents of the file in human-readable format by executing terraform show command. Basically, this file is used by Terraform to keep track of the infrastructure it is managing.
5 – Destroying the Terraform AWS EC2 Instance
Destroying the infrastructure managed by Terraform is as easy as executing the terraform destroy command.
This command also prompts for a confirmation and if you answer “yes”, Terraform goes ahead and destroys the EC2 instance created in the previous section.
I recommend doing this if you don’t need the infrastructure to continue running.
Conclusion
Terraform is a declarative IaC provisioning tool that helps deploy resources onto any public or private cloud.
In this post, you saw how easy it makes the process of deploying an EC2 instance to AWS. All you had to do was create a configuration file and pass it to Terraform using terraform apply command.
The code for this post is available on Github for reference.
There are other topics you might be interested in with regards to Terraform
- How to provision Nginx Docker Container using Terraform?
- How to customize Terraform EC2 Instance using Data Sources?
- How to use Terraform to import existing EC2 instances?
- How use Terraform Registry Modules to create an EC2 Cluster?
If you found this post useful, consider sharing it with friends and colleagues. Also, in case of any queries, please write them in the comments section below.
0 Comments