In the previous post, we exposed a repository as a RESTful interface using Spring Data REST. However, that’s not the conventional way of creating REST API for Spring Boot Microservices. That particular approach works best if your data model is exactly similar to your domain model. Usually, that’s not the case.
In this post, we will look at the right way of creating REST API using Spring Boot.
Data Transfer Objects
In a real production environment, it is often the case that our API model is drastically different to the actual database entity model.
To handle this situation, we create Data Transfer Objects. They are also commonly referred as DTOs.
First, we create a DTO for handling query APIs. Below is the VehicleQueryDTO.
1 2 3 4 5 6 7 8 9 10 11 12 13 14 15 16 17 18 19 20 21 22 23 24 25 26 27 28 29 30 31 32 33 34 35 36 37 38 39 40 41 42 43 | public class VehicleQueryDTO { private UUID id; private String vehicleIdentityNumber; private String make; private String model; public VehicleQueryDTO(UUID id, String vehicleIdentityNumber, String make, String model) { this.id = id; this.vehicleIdentityNumber = vehicleIdentityNumber; this.make = make; this.model = model; } public UUID getId() { return id; } public String getVehicleIdentityNumber() { return vehicleIdentityNumber; } public String getMake() { return make; } public String getModel() { return model; } @Override public String toString() { return "VehicleQueryDTO{" + "id=" + id + ", vehicleIdentityNumber='" + vehicleIdentityNumber + '\'' + ", make='" + make + '\'' + ", model='" + model + '\'' + '}'; } } |
Just for comparison sake, below is the actual Vehicle entity.
1 2 3 4 5 6 7 8 9 10 11 12 13 14 15 16 17 18 19 20 21 22 23 24 25 26 27 28 29 30 31 32 33 34 35 36 37 38 39 40 41 42 43 44 45 46 47 48 49 50 51 52 53 54 55 56 57 58 59 60 61 62 63 64 65 66 67 68 69 | @Entity @Table(name = "vehicle") public class Vehicle { @Id private UUID id; private String vehicleIdentityNumber; private String make; private String model; private String status; public Vehicle() { } public UUID getId() { return id; } public void setId(UUID id) { this.id = id; } public String getVehicleIdentityNumber() { return vehicleIdentityNumber; } public void setVehicleIdentityNumber(String vehicleIdentityNumber) { this.vehicleIdentityNumber = vehicleIdentityNumber; } public String getMake() { return make; } public void setMake(String make) { this.make = make; } public String getModel() { return model; } public void setModel(String model) { this.model = model; } public String getStatus() { return status; } public void setStatus(String status) { this.status = status; } @Override public String toString() { return "Vehicle{" + "id=" + id + ", vehicleIdentityNumber='" + vehicleIdentityNumber + '\'' + ", make='" + make + '\'' + ", model='" + model + '\'' + ", status='" + status + '\'' + '}'; } } |
Notice that the Vehicle class has an extra field called Status. However, we don’t want to expose it. Therefore, we didn’t include it in the VehicleQueryDTO.
Services
Now that we have created a DTO for queries, we need to create a service. This service is required to map the actual entity model to the query API model.
First, we create an interface for the query service as below:
1 2 3 4 5 | public interface VehicleQueryService { public VehicleQueryDTO getVehicle(UUID id); public List<VehicleQueryDTO> listAllVehicles(); } |
Then, we implement the service as below:
1 2 3 4 5 6 7 8 9 10 11 12 13 14 15 16 17 18 19 20 21 22 23 24 25 26 27 | @Service public class VehicleQueryServiceImpl implements VehicleQueryService { @Autowired private VehicleRepository vehicleRepository; @Override public VehicleQueryDTO getVehicle(UUID id) { if (vehicleRepository.findById(id).isPresent()){ Vehicle fetchedVehicle = vehicleRepository.findById(id).get(); return new VehicleQueryDTO(fetchedVehicle.getId(), fetchedVehicle.getVehicleIdentityNumber(), fetchedVehicle.getMake(), fetchedVehicle.getModel()); }else{ return null; } } @Override public List<VehicleQueryDTO> listAllVehicles() { List<VehicleQueryDTO> vehicleList = new ArrayList<>(); vehicleRepository.findAll().forEach(vehicle -> { vehicleList.add(new VehicleQueryDTO(vehicle.getId(), vehicle.getVehicleIdentityNumber(), vehicle.getMake(), vehicle.getModel())); }); return vehicleList; } } |
Basically, we have implemented the two methods we defined in the service interface. One is for fetching an individual record from the database. The other is for fetching all records.
Notice that we have annotated this class with @Service. This allows Spring to discover the class for dependency injection when the Spring context is created during application start-up.
To interact with the actual table, we use Spring Data JPA’s repository. For the Vehicle entity, this is the VehicleRepository we defined earlier.
1 2 3 4 | public interface VehicleRepository extends CrudRepository<Vehicle, UUID> { List<Vehicle> findByMake(@Param("make") String make); } |
We are using the default methods findById() and findAll(). These methods are part of the CrudRepository interface that is extended by our VehicleRepository.
In the latest Spring Data JPA spec, the findById() method returns an Optional. Basically, Optional wraps the actual object. In order to fetch the actual object, we can use the get() method.
REST Controllers
The last important part to create REST API is the Controller. It is simply a class annotated with @RestController annotation and appropriate methods to handle the HTTP calls.
Below is how it looks.
1 2 3 4 5 6 7 8 9 10 11 12 13 14 15 16 17 18 19 | @RestController @RequestMapping(value = "/api/vehicles") public class VehicleQueryController { @Autowired private VehicleQueryService vehicleQueryService; @GetMapping @ResponseStatus(HttpStatus.OK) public ResponseEntity<List<VehicleQueryDTO>> listAllVehicles(){ return new ResponseEntity<>(vehicleQueryService.listAllVehicles(), HttpStatus.OK); } @GetMapping(value = "/{id}", produces = MediaType.APPLICATION_JSON_VALUE) @ResponseStatus(HttpStatus.OK) public ResponseEntity<VehicleQueryDTO> getVehicle(@PathVariable(value = "id") UUID id){ return new ResponseEntity<>(vehicleQueryService.getVehicle(id), HttpStatus.OK); } } |
Here we have wired the VehicleQueryService using @Autowired annotation. When the application starts up, Spring will discover the VehicleQueryServiceImpl and inject an instance of the class into the Controller class.
Let’s check out some of the important things in this class:
- Annotation @RequestMapping is used to define the high-level path for our APIs. We declare it as /api/vehicles.
- There are two methods. Both are annotated with @GetMapping. This means that these methods will be called at the time of HTTP GET request.
- Annotation @ResponseStatus defines the response status code. In this case, we have specified it as HttpStatus.OK or 200.
- Both the methods use the VehicleQueryService to fetch the result. Then, we wrap the result in a ResponseEntity and return it as output.
- The method getVehicle() accepts an id property. We supply it as a path variable and access it using @PathVariable annotation. Then, we pass it to the getVehicle() method of the service.
Testing the REST API
While there are many sophisticated tools out there to test REST APIs, we can test simple GET methods directly from our browser.
However, before we test, we start the application using the below command clean package spring-boot:run.
Once the application has started up successfully, we can visit the browser and fire a request to the URL http://localhost:8080/api/vehicles
Since we are already inserting couple of records at startup time, you should see the below output:
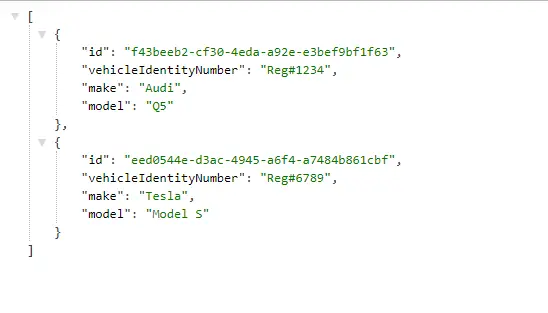
If we want to access a particular vehicle, we can fire a request to the URL http://localhost:8080/api/vehicles/{UUID}. Then, we should see something like below:

Conclusion
With the above testing completed, we have successfully created REST API using Spring Boot. In other words, we have exposed two REST API endpoints to our Vehicle entity. The code for this post is available on Github.
However, we are still far from a really robust implementation. For instance, we don’t have API end-points to create or update data in our system. Also, we don’t have exception handling and validations. We also don’t have proper documentation of our API end-points.
However, nothing to worry. We will be looking at those aspects in upcoming posts.
Happy Learning!
0 Comments