In the previous post, we explored the concept behind CQRS. We also discussed how a classic implementation of Event Sourcing and CQRS can look like. We will be using Axon framework for doing some of the heavy-lifting. In other words, to make our life easier.
So let’s dive in.
The POM Dependencies
We will use Maven for dependency management in our project. The major dependencies we have used are as follows:
- Spring Boot Starter Web – This brings in support for web application capabilities and Spring Dispatcher Servlet. It also brings in Tomcat dependencies to run your application.
- Spring Boot Starter Data JPA – This brings in support for JPA and Hibernate. Basically, we need these two dependencies to connect to a database.
- H2 Database – This is for bringing in H2 in-memory database support.
- Spring Boot Starter Actuator – This enables Spring Boot actuator endpoints. Basically, these endpoints allow us to ask questions to our application. Also, you can get other run-time statistics.
- Axon Spring Boot Starter – This is a very important dependency for our example. It basically brings in support for Axon Framework along with all the annotations.
- Springfox Swagger2 and Springfox Swagger UI – We will be using Swagger for documenting our API end-points. Also, Swagger will provide a neat user interface for to test our APIs. These dependencies will help us enable Swagger for our Spring Boot application.
NOTE – We will be using Axon 4.0.3 in this post. This is the latest version of the framework. However, the dependencies for Axon Spring Boot Starter 4.0.3 requires us to also use Axon Server. Basically, if we don’t start an instance of the Axon Server, we would be getting some connection errors when we start our own application
While Axon Server is a great tool to build production-ready microservices, we will not be using it to build our sample application. Hence, we would exclude Axon Server Connector from the Axon Spring Boot Starter package. Below is how we can do it using Maven. We are only excluding the Axon-Server Connector
<dependency>
			<groupId>org.axonframework</groupId>
			<artifactId>axon-spring-boot-starter</artifactId>
			<version>4.0.3</version>
			<exclusions>
				<exclusion>
					<groupId>org.axonframework</groupId>
					<artifactId>axon-server-connector</artifactId>
				</exclusion>
			</exclusions>
</dependency>
In case, you want to use Axon Server, refer to building microservices with Axon Server and Spring Boot.
Implementing Event Sourcing
We have already implemented Event Sourcing in our application. If you want to see a step-by-step guide about how to implement it, start with this post.
Since the event sourcing example was written using Axon version 3.2, you might find few different import statements. The source code is anyways available on Github so you can compare and see.
Implementing CQRS
We will break down the approach for the CQRS part into steps:
Defining the Query Entity
To show an example of CQRS, we will create a separate entity for handling the query view. We will call it AccountQueryEntity.
@Entity
public class AccountQueryEntity {

    @Id
    private String id;

    private double accountBalance;

    private String currency;

    private String status;

    public AccountQueryEntity() {
    }

    public String getId() {
        return id;
    }

    public void setId(String id) {
        this.id = id;
    }

    public double getAccountBalance() {
        return accountBalance;
    }

    public void setAccountBalance(double accountBalance) {
        this.accountBalance = accountBalance;
    }

    public String getCurrency() {
        return currency;
    }

    public void setCurrency(String currency) {
        this.currency = currency;
    }

    public String getStatus() {
        return status;
    }

    public void setStatus(String status) {
        this.status = status;
    }

    @Override
    public String toString() {
        return "AccountQueryEntity{" +
                "id='" + id + '\'' +
                ", accountBalance=" + accountBalance +
                ", currency='" + currency + '\'' +
                ", status='" + status + '\'' +
                '}';
    }
}
As you can see, there is nothing special about this entity. It is basically just a JPA entity containing the fields we want in the query view.
We also declare a JPA repository interface for this entity.
import com.progressivecoder.es.eventsourcingcqrsaxonspringboot.entities.AccountQueryEntity;
import org.springframework.data.repository.CrudRepository;

public interface AccountRepository extends CrudRepository<AccountQueryEntity, String> {
}
Query Entity Manager
Now, we want a way to populate the query entity. The idea behind this is that whenever there is a domain event on a particular aggregate, we should store the event data in the event store. On the other hand, the latest data for that particular instance of the aggregate should be stored in the query entity. All the query requests will then be served from the query entity.
Basically, we need a handler that can hook into the aggregate events and populate the query view. Below is the code for the same:
@Component
public class AccountQueryEntityManager {

    @Autowired
    private AccountRepository accountRepository;

    @Autowired
    @Qualifier("accountAggregateEventSourcingRepository")
    private EventSourcingRepository<AccountAggregate> accountAggregateEventSourcingRepository;

    @EventSourcingHandler
    void on(BaseEvent event){
        persistAccount(buildQueryAccount(getAccountFromEvent(event)));
    }


    private AccountAggregate getAccountFromEvent(BaseEvent event){
        return accountAggregateEventSourcingRepository.load(event.id.toString()).getWrappedAggregate().getAggregateRoot();
    }

    private AccountQueryEntity findExistingOrCreateQueryAccount(String id){
        return accountRepository.findById(id).isPresent() ? accountRepository.findById(id).get() : new AccountQueryEntity();
    }

    private AccountQueryEntity buildQueryAccount(AccountAggregate accountAggregate){
        AccountQueryEntity accountQueryEntity = findExistingOrCreateQueryAccount(accountAggregate.getId());

        accountQueryEntity.setId(accountAggregate.getId());
        accountQueryEntity.setAccountBalance(accountAggregate.getAccountBalance());
        accountQueryEntity.setCurrency(accountAggregate.getCurrency());
        accountQueryEntity.setStatus(accountAggregate.getStatus());

        return accountQueryEntity;
    }

    private void persistAccount(AccountQueryEntity accountQueryEntity){
        accountRepository.save(accountQueryEntity);
    }
}
Let’s understand what we are doing here:
- First, we inject an instance of AccountRepository into the AccountQueryEntityManager.
- Inject an instance of EventSourcingRepository for AccountAggregate. The AccountAggregate is the aggregate class for the entity managed by Axon.
- A method is declared to handle the events occurring on the aggregate. This particular method is annotated with @EventSourcingHandler. All our events extend the BaseEvent class. Therefore, we just use the BaseEvent instance as the method input.
- Next, we simply use the instance of EventSourcingRepository to extract the correct AccountAggregate object from the event store.
- If found, we use the values from the AccountAggregate object to populate the AccountQueryEntity object. If not found, we create a new instance of the AccountQueryEntity.
- Finally, we use the AccountRepository to save the AccountQueryEntity instance to the query store.
In order to make this work, the EventSourcingRepository should be made available in the Spring context. We do it by writing a simple configuration class as below:
@Configuration
public class AxonConfig {

    @Bean
    EventSourcingRepository<AccountAggregate> accountAggregateEventSourcingRepository(EventStore eventStore){
        EventSourcingRepository<AccountAggregate> repository = EventSourcingRepository.builder(AccountAggregate.class).eventStore(eventStore).build();
        return repository;
    }
}
The Service Layer
At this point, we have done all the important stuff to handle Event Sourcing and CQRS in our app. The next step is to expose the queries using the AccountQueryEntity. For that, we will create a service class.
Here’s the interface for such a service:
public interface AccountQueryService {
    public List<Object> listEventsForAccount(String accountNumber);
    public AccountQueryEntity getAccount(String accountNumber);
}
Then, we have the actual implementation of the interface:
@Service
public class AccountQueryServiceImpl implements AccountQueryService {

    private final EventStore eventStore;

    private final AccountRepository accountRepository;

    public AccountQueryServiceImpl(EventStore eventStore, AccountRepository accountRepository) {
        this.eventStore = eventStore;
        this.accountRepository = accountRepository;
    }

    @Override
    public List<Object> listEventsForAccount(String accountNumber) {
        return eventStore.readEvents(accountNumber).asStream().map( s -> s.getPayload()).collect(Collectors.toList());
    }

    @Override
    public AccountQueryEntity getAccount(String accountNumber) {
        return accountRepository.findById(accountNumber).get();
    }
}
As can be seen in the getAccount() method, we just use the AccountRepository to fetch the account using the Id. In this case, the Id is AccountNumber.
The REST Controller
Now, the last piece of the puzzle is the REST Controller. Basically, this is the place where we will define the REST end-point that should be used by the consumers to fetch the Bank Account information from our application.
@RestController
@RequestMapping(value = "/bank-accounts")
@Api(value = "Account Queries", description = "Account Query Events Endpoint", tags = "Account Queries")
public class AccountQueryController {

    private final AccountQueryService accountQueryService;

    public AccountQueryController(AccountQueryService accountQueryService) {
        this.accountQueryService = accountQueryService;
    }

    @GetMapping("/{accountNumber}")
    public AccountQueryEntity getAccount(@PathVariable(value = "accountNumber") String accountNumber){
        return accountQueryService.getAccount(accountNumber);
    }

    @GetMapping("/{accountNumber}/events")
    public List<Object> listEventsForAccount(@PathVariable(value = "accountNumber") String accountNumber){
        return accountQueryService.listEventsForAccount(accountNumber);
    }

}
Here, note the first method annotated with @GetMapping. This method uses an instance of the service class we created in the last step to fetch the account information. The same is then returned to the caller. The other method annotated with @GetMapping simply gets a list of events for a particular account.
Testing the Application
We are almost done now. The last step is to test our application. To do so, we have already setup Swagger UI with our Spring Boot application. This provides us a nice interface to inspect the API documentation. Also, it allows you to test those APIs.
To access Swagger UI, we will build our application using the maven command clean package spring-boot:run.
Once the build process finishes and application starts up, we can visit http://localhost:8080/swagger-ui.html to access the Swagger UI.
We are mainly interested in testing the CQRS part. Therefore, we will quickly create a new Bank Account and also fire a few updates on that account. Basically, this is what we did:
- Create new account with initial balance of 10 USD.
- Credit 20 USD to the account.
- Withdraw 5 USD from the account.
Now, we can visit the database and see the situation. To access the H2 database embedded with this particular application, we will navigate to http://localhost:8080/h2-console.
After logging in to the testdb database, we can see the DOMAIN_EVENT_ENTRY table. This is basically our event store. As you can see, we have 4 events recorded here.
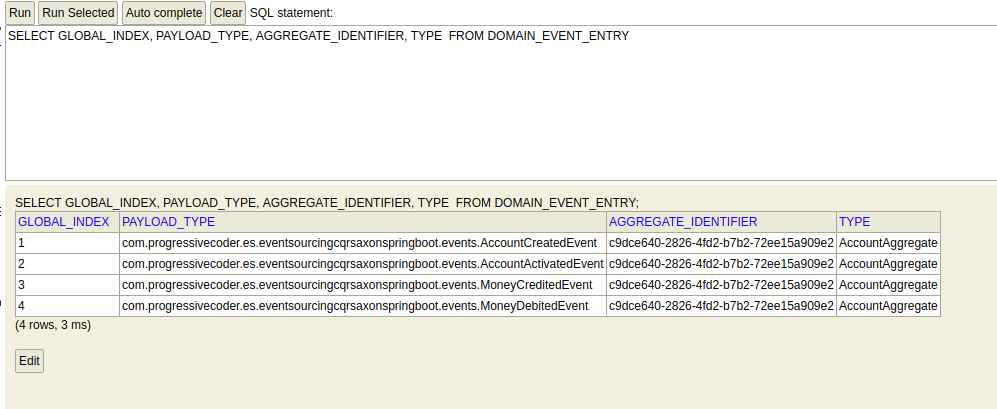
The query store is denoted by the table ACCOUNT_QUERY_ENTITY table
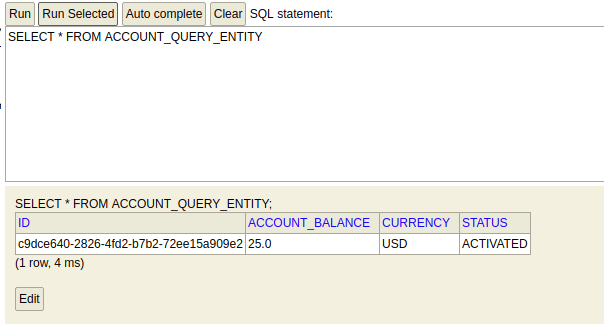
Basically, the event store shows all the events on a particular Account. However, the query store only shows the current state of the Account.
The query store is used to serve the read requests. We can test our read API through Swagger UI. We provide the Account Number as input. In the response, we can see the same information present in the query store.

Conclusion
With this, we have successfully completed our sample application. We have demonstrated how Event Sourcing and CQRS can be implemented within the same Spring Boot application. While this may not be the ideal implementation as we discussed earlier but it helps us understand the overall concept in a much better way. Also, this type of implementation could be enough for some small use case.
The code for this entire example (along with the Event Sourcing part) is available on Github.
In future, we will also be looking at the classic implementation of Event Sourcing and CQRS. If you don’t want to miss any post, don’t forget to Subscribe Now

28 Comments
Mohit Jain · March 15, 2019 at 4:44 pm
Nice article and very well explained. Just one ques -> how can we change the data source from in memory H2 to MySql/oracle. if you can expalin with an example that would be great.
Saurabh Dashora · March 16, 2019 at 8:20 am
Thanks for the compliment, Mohit!
Regarding the switch from H2 to MySQL or any other database, you just have to include the maven dependency for that particular database in POM.xml.
Next, in the application.properties file you have to provide the datasource url pointing to the MySQL or Oracle database. Just like how you would normally do it with Spring Boot.
Rishi Saraf · May 28, 2019 at 6:45 pm
Super article man. I was looking for simple example to understand the concept and you were bang on.
Saurabh Dashora · June 3, 2019 at 12:12 pm
Hi Rishi,
Thanks for your kind feedback.
Anonymous · June 12, 2019 at 7:39 am
Nice Article, really good
Saurabh Dashora · September 7, 2019 at 3:46 am
Thanks for the feedback
Abinaya M · July 7, 2019 at 5:29 pm
Hi, can you tell me how to integrate kafka in this
Saurabh Dashora · July 8, 2019 at 11:50 am
As such this application does not need Kafka. However, if you wish to use Kafka with Spring Boot, you can use Spring Cloud Stream.
Kjell Moens · September 6, 2019 at 1:02 pm
Hi,
It seems the table DOMAIN_EVENT_ENTRY is not created in the H2 database. Am I doing something wrong ?
Saurabh Dashora · September 7, 2019 at 3:45 am
Hi Kjell,
Are you logging into the testdb database in h2-console?
Anonymous · October 5, 2019 at 9:06 am
Hi
Very good and well explained your article.
Keep going this way.
Cheers
Saurabh Dashora · October 5, 2019 at 10:37 am
Thanks for the great feedback!
Noureddine · October 17, 2019 at 5:09 pm
Thanks, very helpful
Question: How can i make projection from eventsource, example RDBMS
Zak Hm · April 13, 2020 at 6:45 pm
Hi, Thanks for this great article, I’m just wondering if splitting this app to two microservices (one microservice for the request side and one for the controller side) would be a good idea?
Saurabh Dashora · April 28, 2020 at 3:12 am
Hi Zak,
Yes, you can do that and in fact that will make your app more scalable in the long run.
Winster · November 11, 2020 at 6:54 pm
Thank you for a fantastic series of Event sourcing and CQRS. I have one question. Is is the common practice to use only one underlying table for Event Store, here in this case DOMAIN_EVENT_ENTRY. Or is it just Axon way? Isn’t it risky to keep all events for all aggregationIds and types in a single table?
Saurabh Dashora · November 12, 2020 at 2:25 am
Hi Winster, thanks for your wonderful comment.
As to your question, I guess this is the Axon way of representing the Event Store. The idea behind this is that the services will be based on DDD principles and hence, each service will only deal with events related to a particular domain object.
Jan · November 12, 2020 at 5:09 pm
Hey there, great tutorial.
I’m having a hard time understanding how in the example, an Event is stored inside the EventStore. In AccountQueryServiceImpl, an EventStore is created and used to read the events from. But how is the EventStore populated exactly?
In regards to the JPA repository accountRepository, a new Account is persisted by using the save() method in AccountQueryEntityManager whenever a BaseEvent is fired, but I can’t find a line of code where something is being appended to the EventStore.
Saurabh Dashora · November 25, 2020 at 2:24 am
Hi Jan, Thanks for the great feedback!
With regards to your question, Aggregate Lifecycle Apply calls in the Aggregate class are responsible for adding the event to the Event Store.
See below calls in the AccountAggregate class
AggregateLifecycle.apply(new AccountActivatedEvent(this.id, Status.ACTIVATED));
AggregateLifecycle.apply(new MoneyDebitedEvent(debitMoneyCommand.id, debitMoneyCommand.debitAmount, debitMoneyCommand.currency));
Jan · November 14, 2020 at 3:56 pm
Hello, great tutorial!
I just wonder how the event store is being filled with events exactly, or in other words – in which line of code does an event get appended to the event store? Is it some kind of Axon magic?
Saurabh Dashora · November 25, 2020 at 2:25 am
Hi Jan, Thanks for the great feedback!
With regards to your question, Aggregate Lifecycle Apply calls in the Aggregate class are responsible for adding the event to the Event Store.
See below calls in the AccountAggregate class
AggregateLifecycle.apply(new AccountActivatedEvent(this.id, Status.ACTIVATED));
AggregateLifecycle.apply(new MoneyDebitedEvent(debitMoneyCommand.id, debitMoneyCommand.debitAmount, debitMoneyCommand.currency));
In a way, you could also call it Axon magic and this is the main advantage of using Axon.
Tom · November 20, 2020 at 9:06 am
Thank you for your amazing article! I appreciate it a lot.
May I have a question? I need to use MongoDB as Read Database and Oracle SQL as Write Database (Source of Truth), so it won’t use classical interpretation of Event Sourcing with Event Store.
Is it possible to adjust your code the way I want it? Can you give some advice how to do that? Thank you in advance Saurabh!
Saurabh Dashora · November 25, 2020 at 3:27 am
Hi Tom, Glad to know that my article helped!
What you are looking for is a perfectly valid scenario. Please refer to the below post.
https://progressivecoder.com/event-sourcing-cqrs-using-spring-boot-rabbitmq-and-axon-part-1/
It deals with a similar scenario where you would like to have a different database for serving queries. Though it is not complete but you can get an idea of what you can do.
Anonymous · December 9, 2020 at 4:10 pm
How events is published to other microservices
Through axon or axon only for storing event
Saurabh Dashora · December 9, 2020 at 4:13 pm
Hi,
Axon takes care of publishing the events to all the services registered with the Axon server. However, in that case, we need to use Axon server.
vikash kumar · April 7, 2021 at 4:37 pm
Very good article
Surajit Pradhan · April 3, 2023 at 2:03 pm
Hi Saurabh,
The article is Awesome and helpful.
Your content is too impressive.
Hope you must have some video channels as well. If available please send me the link.
Thanks and Regards
Surajit Pradhan
Saurabh Dashora · April 4, 2023 at 5:54 am
Hi Surajit, Thanks for the great feedback!
And yes I have a YouTube channel in the early stages. Here’s the link https://www.youtube.com/channel/UCcD92x9BQLvvm-8jtsg12kw
Also, I can see that you’ve subscribed to my newsletter. You should start receiving regular emails with my content 🙂