In the previous post, we looked at the process of setting up Swagger with Spring Boot. However, there are other configuration options available that we can take advantage of to improve our API documentation. Good Swagger Documentation is an essential ingredient of building good Spring Boot Microservices. In this post, we will look at advanced swagger configuration with Spring Boot.
So let’s dive right in.
Customizing the Docket Bean
Swagger provides some default values in its documentation. However, a lot of it can be customized by providing an ApiInfo object to the Docket bean. We can do it as below:
@Configuration
@EnableSwagger2
public class SwaggerConfig {
    @Bean
    public Docket api() {
        return new Docket(DocumentationType.SWAGGER_2)
                .select()
                .apis(RequestHandlerSelectors.basePackage("com.progressivecoder.demo.springbootstarter.controllers"))
                .paths(PathSelectors.any())
                .build()
                .apiInfo(getApiInformation());
    }

    private ApiInfo getApiInformation(){
        return new ApiInfo("Demo REST API",
                "This is a Demo API created using Spring Boot",
                "1.0",
                "API Terms of Service URL",
                new Contact("Progressive Coder", "www.progressivecoder.com", "coder.progressive@gmail.com"),
                "API License",
                "API License URL",
                Collections.emptyList()
                );
    }
}
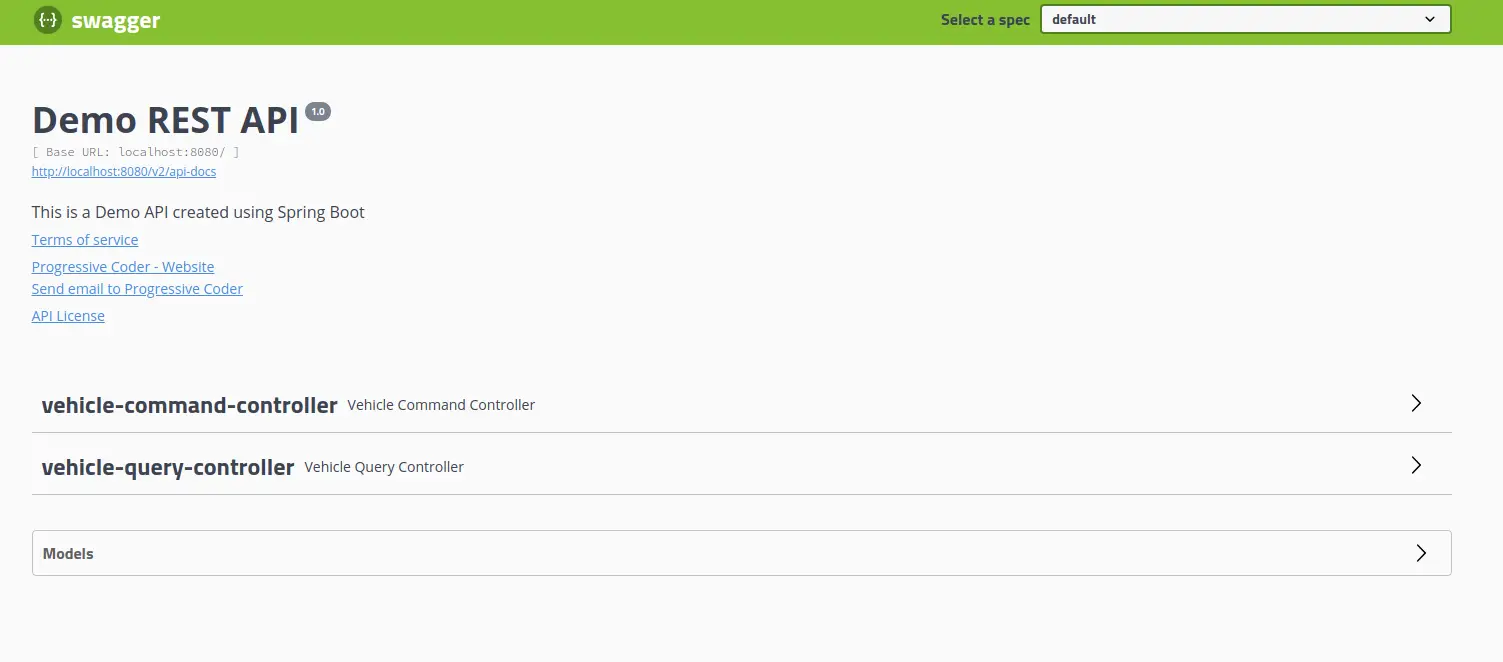
As you can see in the above code, we have added apiInfo() method that expects an object of ApiInfo class. The ApiInfo constructor takes various fields such as Name of the API, Description, Version, Terms of Service, Contact details, API License and so on.
If you star the application now and visit the URL http://localhost:8080/swagger-ui.html
Customizing Method Response Message
Swagger also allows you to override response messages of HTTP methods globally across the application. This is done using the globalResponseMessage() method available on the Docket.
Below is how you can do it by customizing the Docket bean even further.
@Configuration
@EnableSwagger2
public class SwaggerConfig {
    @Bean
    public Docket api() {
        return new Docket(DocumentationType.SWAGGER_2)
                .select()
                .apis(RequestHandlerSelectors.basePackage("com.progressivecoder.demo.springbootstarter.controllers"))
                .paths(PathSelectors.any())
                .build()
                .apiInfo(getApiInformation())
                .useDefaultResponseMessages(false)
                .globalResponseMessage(RequestMethod.GET, getCustomizedResponseMessages()
                        );
    }

    private ApiInfo getApiInformation(){
        return new ApiInfo("Demo REST API",
                "This is a Demo API created using Spring Boot",
                "1.0",
                "API Terms of Service URL",
                new Contact("Progressive Coder", "www.progressivecoder.com", "coder.progressive@gmail.com"),
                "API License",
                "API License URL",
                Collections.emptyList()
                );
    }

    private List<ResponseMessage> getCustomizedResponseMessages(){
        List<ResponseMessage> responseMessages = new ArrayList<>();
        responseMessages.add(new ResponseMessageBuilder().code(500).message("Server has crashed!!").responseModel(new ModelRef("Error")).build());
        responseMessages.add(new ResponseMessageBuilder().code(403).message("You shall not pass!!").build());
        return responseMessages;
    }
}
Let’s understand what is going on over here:
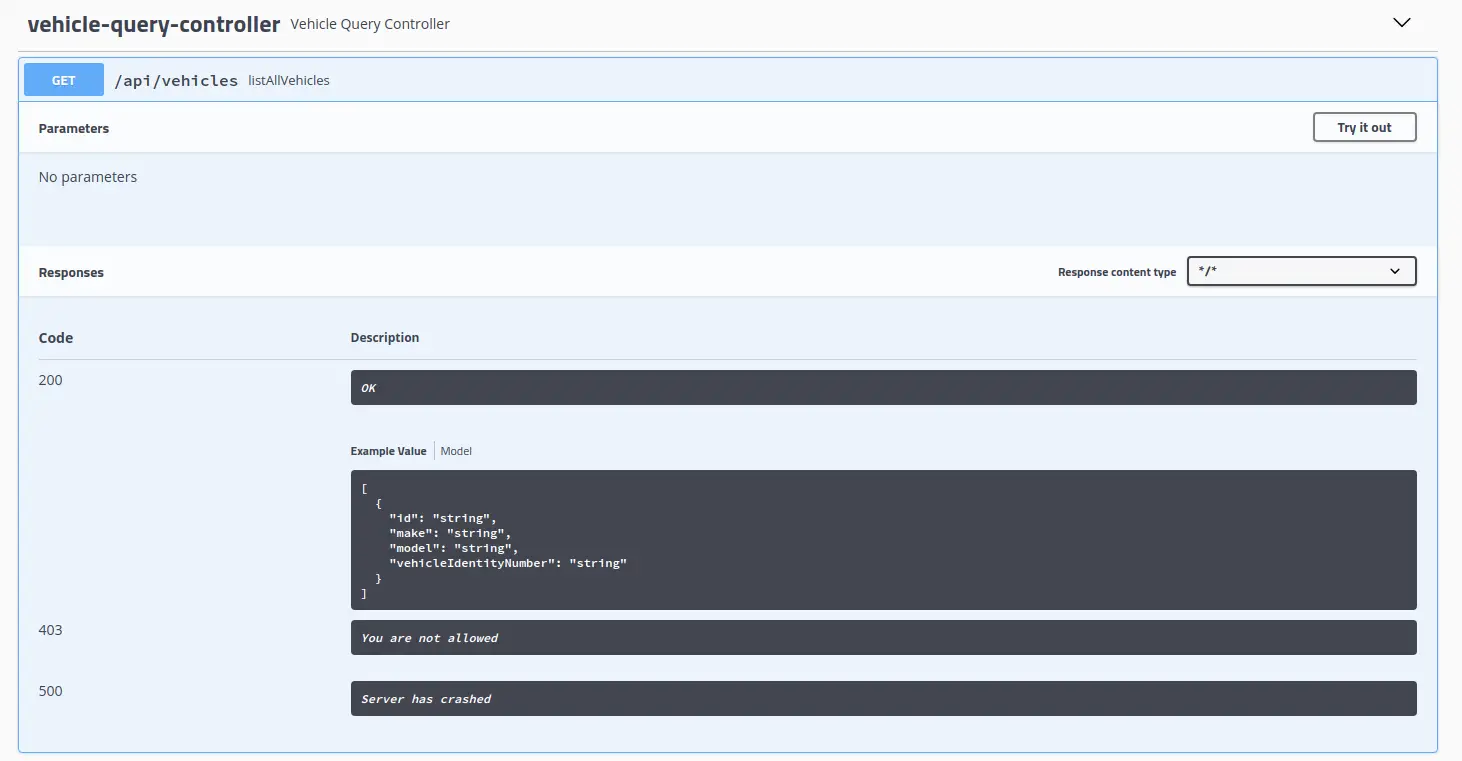
As a first step, we disable the default response messages using the useDefaultResponseMessages() method. This method accepts a boolean. We call it with false to disable the default messages. After this, we call the globalResponseMessage() method. Basically, this method is used to override the default message. We pass the RequestMethod and a list of ResponseMessage objects to this method. The ResponseMessage objects are created and added to an array list using the getCustomizedResponseMessages() method. We are basically overriding the default message for HTTP Response Code 500 and 403.
If you run the application now and visit http://localhost:8080/swagger-ui.html
Using Swagger 2 Annotations
Swagger also provides different annotations to better describe the API. For example, we can use @Api annotation to provide descriptions about a particular controller. You can also change the tag value of the controller in the Swagger UI view.
Below is how it looks like for both the query controller and the command controller in our starter application:
@RestController
@RequestMapping(value = "/api/vehicles")
@Api(tags = "Vehicle Queries", value = "VehicleQueries", description = "Controller for Vehicle Queries")
public class VehicleQueryController {

    @Autowired
    private VehicleQueryService vehicleQueryService;

    @GetMapping
    @ResponseStatus(HttpStatus.OK)
    public ResponseEntity<List<VehicleQueryDTO>> listAllVehicles(){
        return new ResponseEntity<>(vehicleQueryService.listAllVehicles(), HttpStatus.OK);
    }

    @GetMapping(value = "/{id}", produces = MediaType.APPLICATION_JSON_VALUE)
    @ResponseStatus(HttpStatus.OK)
    public ResponseEntity<VehicleQueryDTO> getVehicle(@PathVariable(value = "id") UUID id){
        return new ResponseEntity<>(vehicleQueryService.getVehicle(id), HttpStatus.OK);
    }
}
@RestController
@RequestMapping(value = "/api/vehicles")
@Api(tags = "Vehicle Commands", value = "VehicleCommands", description = "Controller for Vehicle Commands")
public class VehicleCommandController {

    @Autowired
    private VehicleCommandService vehicleCommandService;

    @PostMapping
    @ResponseStatus(HttpStatus.CREATED)
    public ResponseEntity<UUID> createVehicle(@Valid @RequestBody VehicleCreateDTO vehicleCreateDTO){
        return new ResponseEntity<>(vehicleCommandService.createVehicle(vehicleCreateDTO), HttpStatus.CREATED);
    }

    @PutMapping(value = "/{id}", produces = MediaType.APPLICATION_JSON_VALUE)
    @ResponseStatus(HttpStatus.OK)
    public ResponseEntity<VehicleQueryDTO> updateVehicle(@PathVariable(value = "id") UUID id,
                                                         @RequestBody VehicleUpdateDTO vehicleUpdateDTO){
        return new ResponseEntity<>(vehicleCommandService.updateVehicle(id, vehicleUpdateDTO), HttpStatus.OK);
    }
}
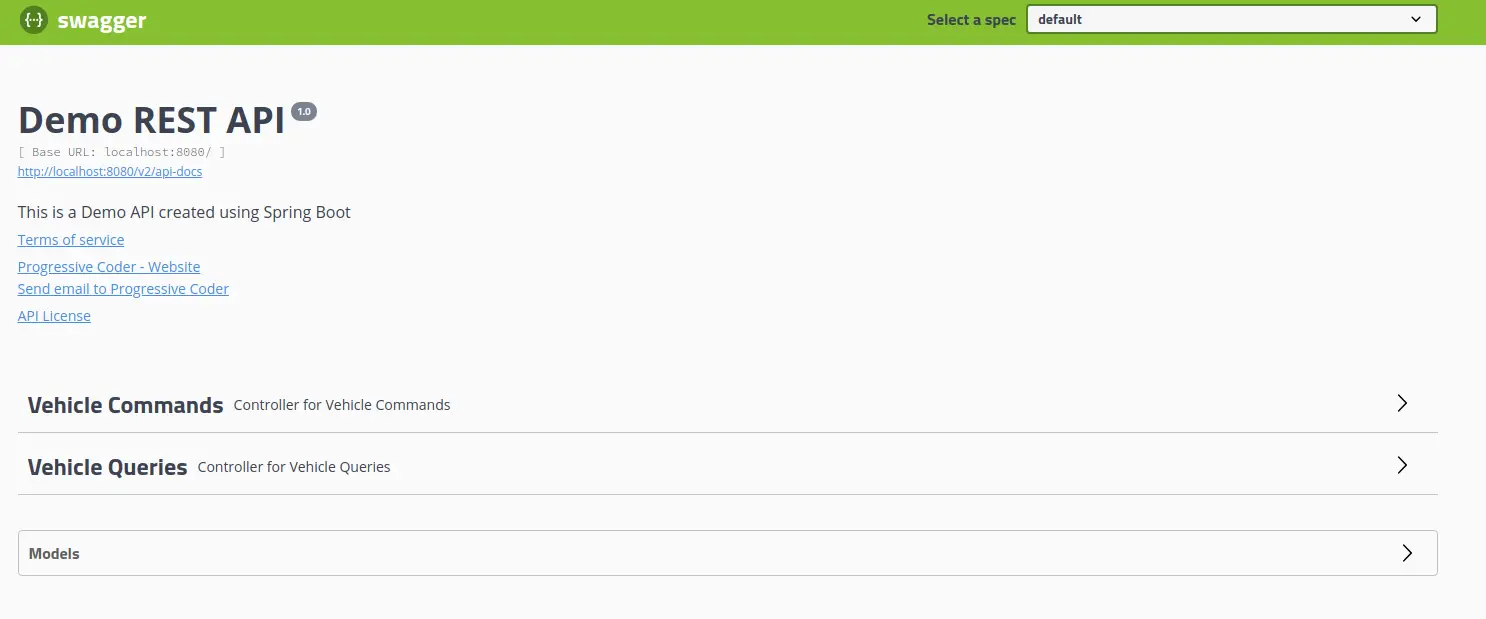
Notice the @Api annotation. We provide a tag value and the description for the controller. Now, if we run the application and visit http://localhost:8080/swagger-ui.html, we can see the description and the tag value.
You could further customize the description at an operation level by using @ApiOperation annotation. Below is how this annotation can be used at method level.
@RestController
@RequestMapping(value = "/api/vehicles")
@Api(tags = "Vehicle Commands", value = "VehicleCommands", description = "Controller for Vehicle Commands")
public class VehicleCommandController {

    @Autowired
    private VehicleCommandService vehicleCommandService;

    @PostMapping
    @ResponseStatus(HttpStatus.CREATED)
    @ApiOperation(value = "Create a new vehicle")
    public ResponseEntity<UUID> createVehicle(@Valid @RequestBody VehicleCreateDTO vehicleCreateDTO){
        return new ResponseEntity<>(vehicleCommandService.createVehicle(vehicleCreateDTO), HttpStatus.CREATED);
    }

    @PutMapping(value = "/{id}", produces = MediaType.APPLICATION_JSON_VALUE)
    @ResponseStatus(HttpStatus.OK)
    @ApiOperation(value = "Update an existing vehicle")
    public ResponseEntity<VehicleQueryDTO> updateVehicle(@PathVariable(value = "id") UUID id,
                                                         @RequestBody VehicleUpdateDTO vehicleUpdateDTO){
        return new ResponseEntity<>(vehicleCommandService.updateVehicle(id, vehicleUpdateDTO), HttpStatus.OK);
    }
}
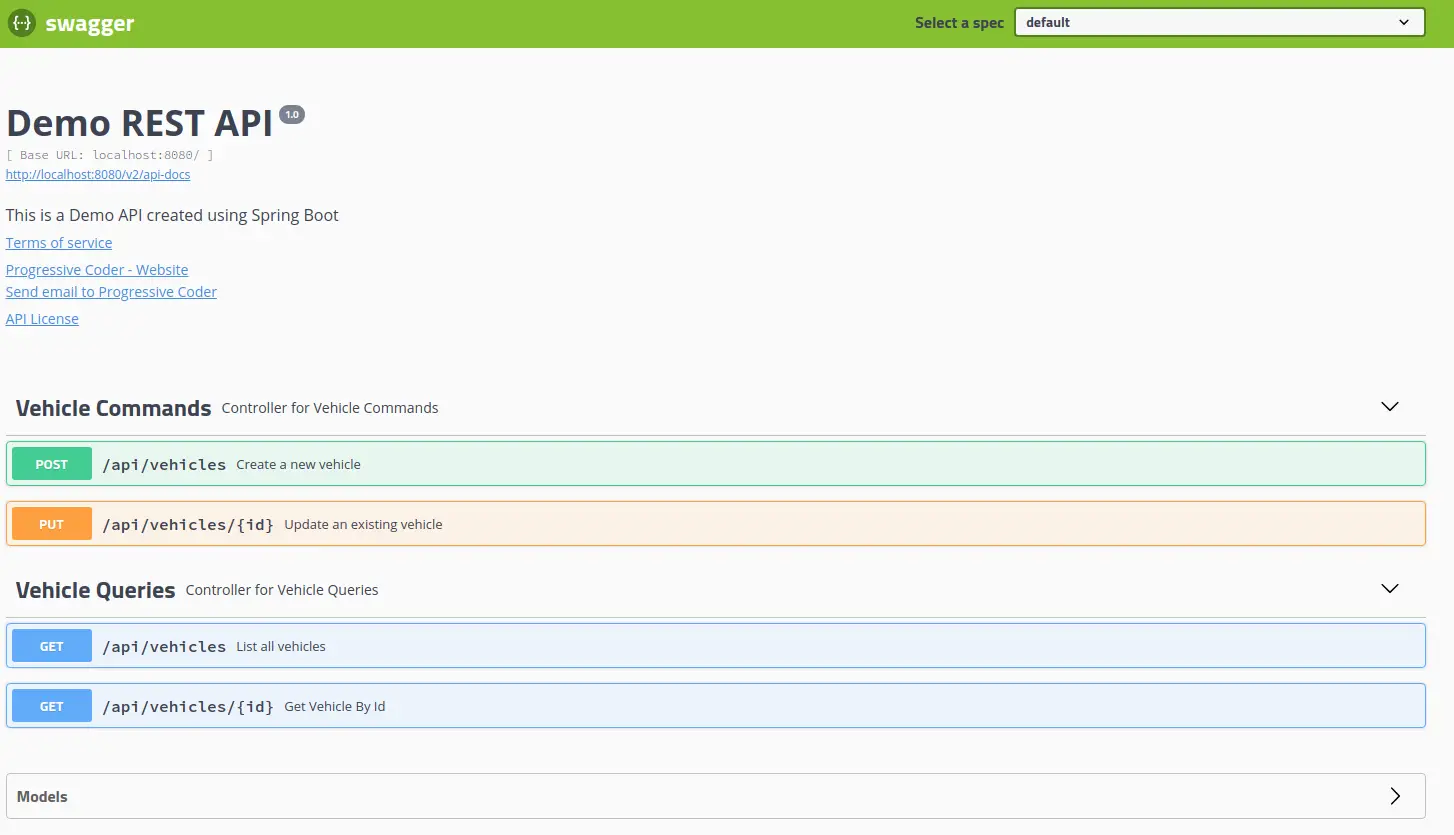
The same description now appears in the Swagger UI view for each method:
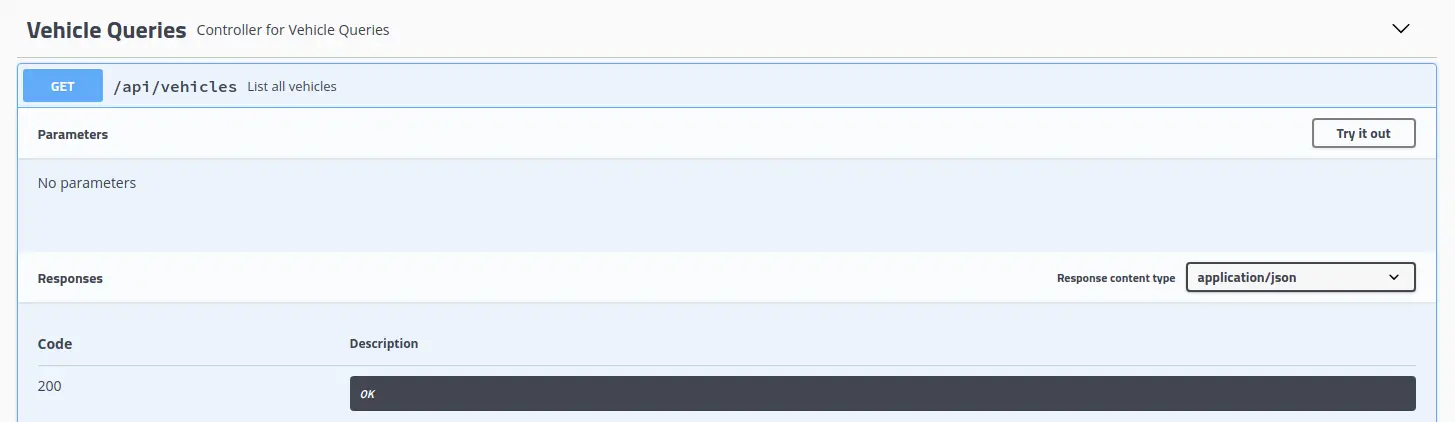
Another important thing to note is the ResponseType of a particular end-point in Swagger. We are sending the response back in JSON format. To specify the same in Swagger, we use the produces value in the mapping definition.
@RestController
@RequestMapping(value = "/api/vehicles")
@Api(tags = "Vehicle Queries", value = "VehicleQueries", description = "Controller for Vehicle Queries")
public class VehicleQueryController {

    @Autowired
    private VehicleQueryService vehicleQueryService;

    @GetMapping(produces = MediaType.APPLICATION_JSON_VALUE)
    @ResponseStatus(HttpStatus.OK)
    @ApiOperation(value = "List all vehicles")
    public ResponseEntity<List<VehicleQueryDTO>> listAllVehicles(){
        return new ResponseEntity<>(vehicleQueryService.listAllVehicles(), HttpStatus.OK);
    }

    @GetMapping(value = "/{id}", produces = MediaType.APPLICATION_JSON_VALUE)
    @ResponseStatus(HttpStatus.OK)
    @ApiOperation(value = "Get Vehicle By Id")
    public ResponseEntity<VehicleQueryDTO> getVehicle(@PathVariable(value = "id") UUID id){
        return new ResponseEntity<>(vehicleQueryService.getVehicle(id), HttpStatus.OK);
    }
}
Now, if we see the Swagger UI, we see the correct response type as below:
Customizing the Model Description
Using Swagger 2 annotations, we can also enhance the underlying resource model description. We can use @ApiModel for the entire model class and @ApiModelProperty for individual attributes of the model class. See below code snippet on how to use these annotations:
@ApiModel(description = "Model to create a new Vehicle")
public class VehicleCreateDTO {

    @NotNull
    @Size(min = 8, message = "Vehicle Registration Number should have at least 8 characters")
    @ApiModelProperty(notes = "Unique registration number for a vehicle", example = "MK1345")
    private String vehicleIdentityNumber;

    @NotNull
    @Size(max = 10, message = "Make of Vehicle cannot have more than 10 characters")
    @ApiModelProperty(notes = "Make of the vehicle", example = "Tesla")
    private String make;

    @NotNull
    @Size(max = 10, message = "Model of Vehicle cannot have more than 10 characters")
    @ApiModelProperty(notes = "Model of the vehicle", example = "Model S")
    private String model;
The Swagger UI should now show the model documentation as below:
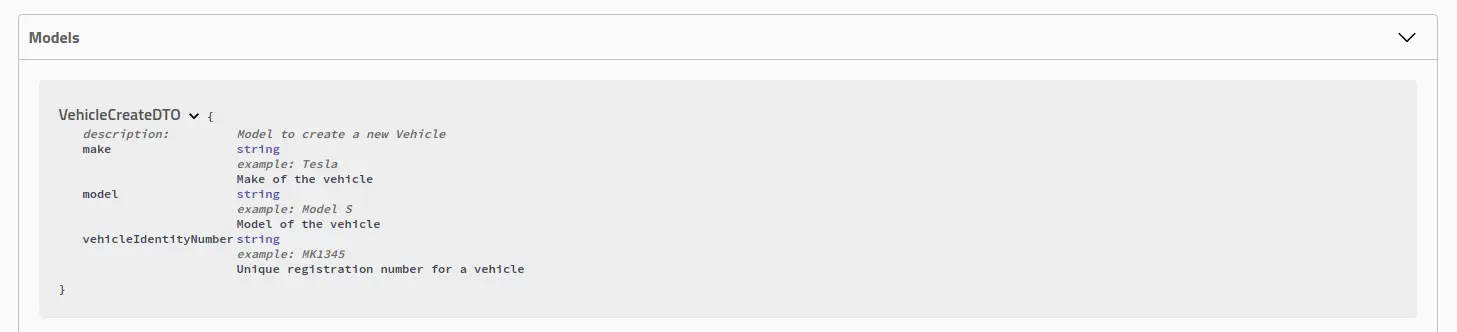
We can see the description or notes along with example values we provided in the class definition.
Testing the Application using Swagger UI
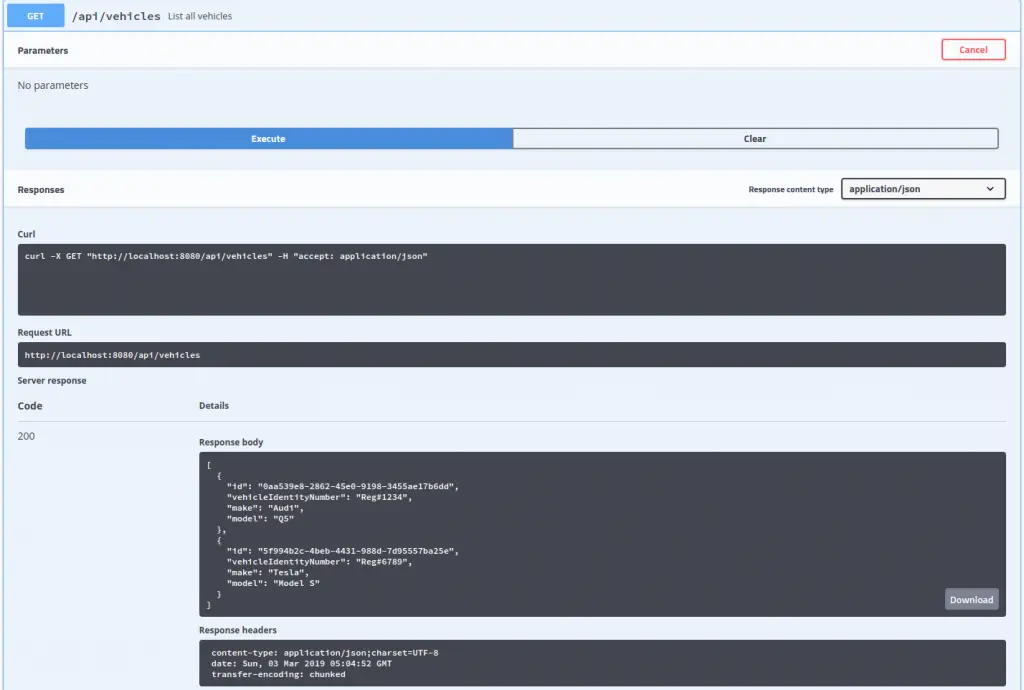
Swagger UI also provides us facility to test our application.
For example, to test the ListVehicles end-point, we can trigger it using Try It Out button and then clicking Execute.
The server response is shown below with the status code and the JSON payload showing the list of vehicles.
If we want to fetch a single vehicle, we can use the Get Vehicle By Id end-point:
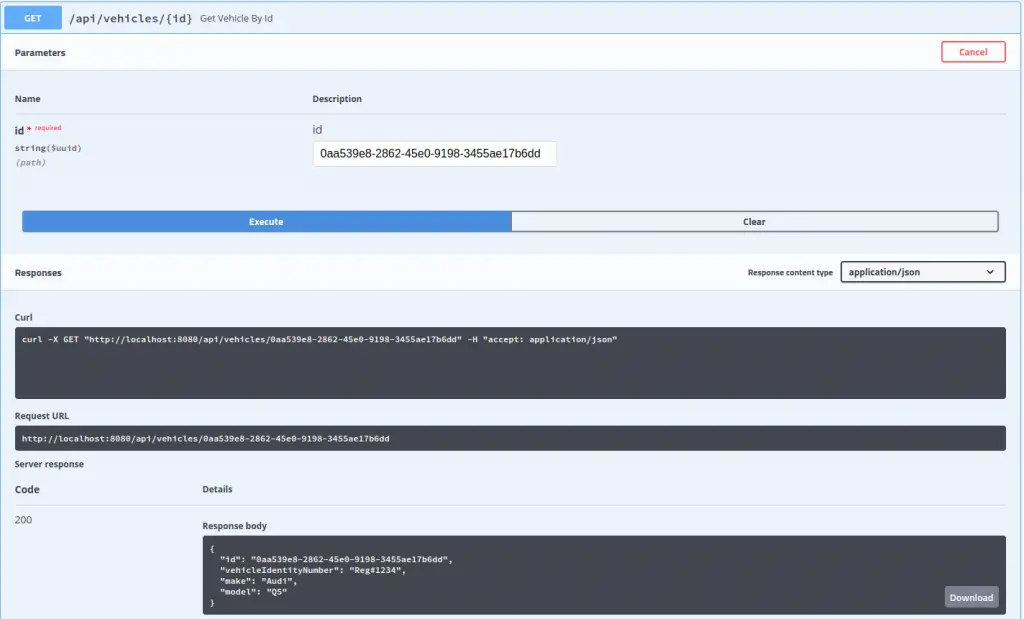
Here, we provided the id of the vehicle we wanted to fetch in the id field provided by the Swagger UI. Swagger basically hooks into our controller’s definition and generates the necessary view. The server response is shown below as expected.
Conclusion
Swagger is a great way for documenting APIs. It has now become a sort of industry standard. Also, its seamless integration with Spring and Spring Boot makes it one of the most obvious choices for documenting APIs created using Spring Boot.
In this post, we have looked at advanced Swagger configuration with Spring Boot. We have also tested our application through the Swagger UI. The code is available on Github.
So what do you generally use of documenting APIs? Do you use Swagger or something else? Sound off your views in the comments section below.
4 Comments
Stefan · June 14, 2022 at 8:06 pm
Hi,
Wanted to say nice article and very correct. Personally I use in present 06/2022 the swagger-ui tool at my company but I’m thinking to go deep in Springdoc as everybody tells me it’s much better. But I want first to check for myself if it’s true and what’s the costs & benefits of this migration.
Thanks,
Stefan
Saurabh Dashora · June 18, 2022 at 6:21 am
Thanks for the great feedback, Stefan!
Ravi · July 14, 2022 at 11:01 am
Hey. Great article!
Could you please let me know if there is any way we can disable try it out option for specific end point. i am aware that we can do by HTTP methods (post,get .. ) but looking for specific endpoint.
Thank you !!!
Saurabh Dashora · July 21, 2022 at 1:55 am
Hi Ravi, thanks for the feedback!
With regards to your question, I am aware that we can hide a particular endpoint using @ApiIgnore annotation. However, disabling try it out has not straightforward approach as far as i know.