Fastify is a Node-based HTTP Framework. As per the official claim, Fastify is one of the fastest web frameworks out there. It is also highly extensible. In this post, we are going to learn how to create a Fastify REST API all the CRUD operations.
In the process of creating a REST API using Fastify, we will also learn few very important things.
- Bootstrapping a new Fastify project using the Fastify CLI
- Creating and using Fastify plugins
- Building self-documenting API using the Fastify Swagger plugin
- Finally, connecting our Fastify application to a Postgres database.
If you are totally new to Fastify, you can also refer to this post on setting up a very basic Fastify application.
- 1 – Fastify CLI in Action
- 2 – Walkthrough of Fastify CLI Generated App
- 3 – Understanding Fastify Plugins
- 4 – Creating a basic Healthcheck REST endpoint
- 5 – Fastify Swagger Setup
- 6 – Fastify Postgres Integration using pg-promise
- 7 – Creating a Data Access Service in Fastify
- 8 – Creating Fastify REST API CRUD Endpoints
- Conclusion
1 – Fastify CLI in Action
Fastify CLI makes it easy to bootstrap a Fastify application with some boilerplate code. To use the CLI, we have to first install it:
$ npm install -g fastify-cliNotice that we are installing it globally. Hence the -g flag.
We can use the CLI to generate a brand new project and then, run npm install to install the packages.
$ fastify generate fastify-postgres-api
$ cd fastify-postgres-api
$ npm install
Once the command execution completes, we can look at the project files in detail.
2 – Walkthrough of Fastify CLI Generated App
Right out of the gate, we can see that the CLI has generated a complete project structure for us.
There is a plugins folder with a couple of files. One of them is probably support.js with a small Fastify plugin.
'use strict'

const fp = require('fastify-plugin')

// the use of fastify-plugin is required to be able
// to export the decorators to the outer scope

module.exports = fp(async function (fastify, opts) {
  fastify.decorate('someSupport', function () {
    return 'hugs'
  })
})
Also, we have a routes folder. The file named root.js will have a pre-defined REST API endpoint.
'use strict'

module.exports = async function (fastify, opts) {
  fastify.get('/', async function (request, reply) {
    return { greeting: "Hello, World" }
  })
}
However, the most important file is the app.js file within the root directory of the project.
'use strict'

const path = require('path')
const AutoLoad = require('fastify-autoload')

module.exports = async function (fastify, opts) {
  // Place here your custom code!

  // Do not touch the following lines

  // This loads all plugins defined in plugins
  // those should be support plugins that are reused
  // through your application
  fastify.register(AutoLoad, {
    dir: path.join(__dirname, 'plugins'),
    options: Object.assign({}, opts)
  })

  // This loads all plugins defined in routes
  // define your routes in one of these
  fastify.register(AutoLoad, {
    dir: path.join(__dirname, 'routes'),
    options: Object.assign({}, opts)
  })
}
Basically, this is the core file of our Fastify application. If you notice closely, the file uses a core Fastify plugin known as fastify-autoload. Basically, fastify-autoload takes the folder path to your plugins as input and loads them and passes them to the register() method. In the above file, fastify-autoload takes care of registering both the plugins folder and routes folder.
Also, we have a package.json file with a couple of important scripts.
"scripts": {
    "test": "tap \"test/**/*.test.js\"",
    "start": "fastify start -l info app.js",
    "dev": "fastify start -w -l info -P app.js"
},
The dev script starts a development server in watch mode. Every time we any file within our project while the server is running, it rebuilds the project and starts a new version. This is specially useful for development mode.
3 – Understanding Fastify Plugins
Fastify plugins form the backbone of any Fastify application. You could think of a Fastify application as a collection of plugins that are tied together to perform a specific task.
The basic syntax of a Fastify plugin is as follows:
module.exports = function (fastify, options, done) {}As you can see, a Fastify plugin is basically a function. If you are building a new plugin, it should expose a single function with the above signature. Here, fastify is the fastify application instance, options is an object and done is the function we should call after the plugin is ready. Inside the plugin, we can do a bunch of things such as registering routes, creating utilities and so on. We can even have nested registers as long as take care to call the done() function at the correct place.
But how do we use a plugin in our Fastify application?
Once we have a plugin, we have to register it. To do so, Fastify provides a special API known as register().
The register() API creates a new Fastify context. Basically, this means that any changes to the Fastify instance within the context will not be reflected on the parent context. This is the basis of encapsulation in Fastify plugin system.
But how do you make changes to the Fastify instance?
Fastify provides another API known as decorate(). The decorate() API allows us to customize the Fastify instance. We can use this API to attach any type of property to the Fastify instance.
The syntax for decorating a Fastify instance is as follows:
fastify.decorate('sum', function (a, b) { //logic for the sum utility function })We can access the utility function within the same Fastify context.
fastify.sum(10, 5)4 – Creating a basic Healthcheck REST endpoint
Armed with the basic understanding of plugins and its important APIs, let’s start by creating a simple endpoint for healthcheck.
If you are deploying on any cloud platform or Kubernetes cluster, healthcheck endpoints are pretty useful for liveness and readiness probes for your application. Therefore, it is always a good practice to create a special endpoint for healthcheck.
Within the routes folder, we will create another folder health with a file named index.js. Since route handlers are also plugins in Fastify, we will export a function with the same signature as a plugin. Within the function, we attach a route to the Fastify instance.
'use strict'

module.exports = async function (fastify, opts) {
    fastify.get('/', {
        schema: {
            description: 'This is an endpoint for application health check',
            tags: ['health'],
            response: {
                200: {
                    description: 'Success Response',
                    type: 'object',
                    properties: {
                        msg: { type: 'string' }
                    }
                }
            }
        }
    }, (request, reply) => {
        reply.send({ msg: "The Application is Up and Running" })
    })
}
Notice that we use the root path. However, since we have placed this file within the health folder, Fastify will automatically route any request to /health to this particular handler.
Within the route handler options, we provide a schema definition. Fastify follows a schema-based approach and recommends the use of JSON Schema to describe the schema of your endpoint. In the next section, we will see how Swagger picks up on this schema to build documentation of our endpoint.
With the health endpoint ready, the fastify-autoload configured in the app.js will make sure that the endpoint is loaded as part of the plugin.
We can now start the application using npm run dev and visit http://localhost:3000/health to view the success message.
5 – Fastify Swagger Setup
Going further, we will now configure Swagger for our application.
If you don’t know about Swagger, it is a tool for documenting your APIs according to the Open API specifications. With the way Swagger configuration works, our documentation will be automatically kept in sync with the REST API changes. So there is no additional overhead in maintaining the document. It is always in sync with the current state of your code.
To set up Swagger, we first need to install a special package provided by Fastify.
$ npm install fastify-swagger --saveThe fastify-swagger is basically a Fastify plugin for generating REST API documentation. It also creates a Swagger UI page to view the documentation in a user-friendly way.
Since the package is a plugin, we need to register it. And the best place to do so within our project is the plugins folder. Inside this folder, we will create a new file swagger.js.
const fp = require('fastify-plugin')

module.exports = fp(async function(fastify, opts) {
    fastify.register(require('fastify-swagger'), {
        routePrefix: '/swagger',
        swagger: {
          info: {
            title: 'Fastify API Demo App',
            description: 'Fastify API Demo with Postgres',
            version: '0.1.0'
          },
          host: 'localhost:3000',
          schemes: ['http'],
          consumes: ['application/json'],
          produces: ['application/json'],
        },
        exposeRoute: true
      })
})
If you look closely, this file also exports a plugin. Within the plugin, we register the fastify-swagger plugin. This plugin takes some options as input to customize how the Swagger UI is generated.
- The
routePrefixis used to configure the path for the Swagger UI. For this configuration, the UI will be available onhttp://localhost:3000/swagger. - Similarly, we provide the
infoobject to configure the page title, description and version. - The
hostproperty provides the host details of the application server. - Next, we have a list of supported schemes as part of the
schemesproperty. - Lastly, we have
consumesandproducesset to application/json.
Notice that the plugin is wrapped within a function named fp from fastify-plugin. The fastify-plugin is a helper package that allows us to expose our plugins outside the context. When we build plugins for Fastify and we want that them to be accessible in the same context where we require them, we have to use fastify-plugin. Without this setup, Swagger won’t be able to read our REST API endpoints and build documentation for them.
6 – Fastify Postgres Integration using pg-promise
Next step is to setup Fastify Postgres integration for our REST API. First, we will install a couple of packages.
$ npm install pg-promise dotenv --saveTo handle the connection with a Postgres database, we will be using the pg-promise package. This package is built on top of the node-postgres package and provides lots of features.
Also, we will the dotenv package to configure the environment variables in our application.
Once the packages are installed, we will create a .env file in the root directory of our project.
DB_URI=postgres://postgres:password@localhost:5432/products_dbWe have only environment property DB_URI containing the connection string for our Postgres database. In a real-world application, we need to make sure not to commit the .env file to any code repository such as Github.
Next, we would create a Fastify plugin for connecting to the database. As with all plugins, we would create a file named db.js within the plugins folder.
const fp = require('fastify-plugin');
const pgp = require('pg-promise')();

const configuration = require('../config/configuration')

module.exports = fp(function (fastify, opts, done) {
    const db = pgp(configuration.databaseUri);
    fastify.decorate('db', db);
    done()
})
Here, we obtain a database object using the pg-promise library. Then, we add to the Fastify context using the decorate() API. To make it available to the rest of the application, we expose it using fastify-plugin.
Lastly, we load the configuration via config/configuration file. This is a good practice to keep the configurations in a single place rather than accessing process.env from every place in our application code.
function loadEnvironmentVariable(keyname) {
    const envVar = process.env[keyname];
    console.log(envVar)

    if (!envVar) {
        throw new Error(`Configuration must include ${keyname}`)
    }

    return envVar;
}

module.exports = {
    databaseUri: loadEnvironmentVariable('DB_URI'),
}
The good part in this approach is that we can also make sure that if a certain indispensable environment variable is not present, we can throw an error and stop the application from even starting.
7 – Creating a Data Access Service in Fastify
With the database configuration steps complete, we now need to create a service to interact with our database. Basically, this service will act as the bridge between our REST API endpoints and the actual database.
We create a folder named services in the root directory and within that folder, we create a file named productsDAO.js.
const fp = require('fastify-plugin');

const ProductsDAO = (db) => {
    const createProduct = async (category, title, price) => {
        const { id } =  await db.one('INSERT INTO products (category, title, price) VALUES ($1, $2, $3) RETURNING id',
            [category, title, price]
        )

        return { id, category, title, price };
    }

    const getAllProducts = () => {
        const products = db.any('SELECT id, category, title, price FROM products')

        return products;
    }

    const getProductById = (id) => {
        const product = db.one('SELECT id, category, title, price FROM products WHERE id = $1',
         [id]
        )

        return product;
    }

    const updateProduct = (id, category, title, price) => {
        db.one(
            'UPDATE products SET category = $1, title = $2, price = $3 WHERE id = $4 RETURNING id',
            [category, title, price, id]
        );

        return { id, category, title, price }
    }

    const deleteProduct = async (id) => {
        await db.query(
            'DELETE FROM products WHERE id = $1',
            [id]
        );
    }

    return { createProduct, getAllProducts, getProductById, updateProduct, deleteProduct }
}

module.exports = fp((fastify, options, next) => {

    fastify.decorate('productsDAO', ProductsDAO(fastify.db))
    next()
})
The ProductsDAO uses the db object from the previous section. Using this object, we can execute queries on the products table within the products_db database.
We have created specific method for various DB operations such as create, read, update and delete. Lastly, we create a plugin within which we decorate the fastify instance with the ProductsDAO and expose it using the fastify-plugin. This is pretty much similar to how we did with the database plugin and swagger plugin.
8 – Creating Fastify REST API CRUD Endpoints
With all the ground-work laid out, we can now turn our attention to create the actual Fastify REST API endpoints.
Within the routes folder, we will create a products folder. Inside the products folder, we will create index.js file. Basically, with this setup, we can access all the routes within this file using http://localhost:3000/products.
const productsDAOPlugin = require('../../services/productsDAO');

module.exports = async function (fastify, opts) {

    fastify.register(productsDAOPlugin);

    fastify.get('/', {
        schema: {
            description: 'This is an endpoint for fetching all products',
            tags: ['products'],
            response: {
                200: {
                    description: 'Success Response',
                    type: 'array',
                    items: {
                        type: 'object',
                        properties: {
                            id: { type: 'number' },
                            category: { type: 'string' },
                            title: { type: 'string' },
                            price: { type: 'number' }
                        }
                    }
                }
            }
        }
    }, async (request, reply) => {
        const products = await fastify.productsDAO.getAllProducts();
        return products;
    })

    fastify.get('/:id', {
        schema: {
            description: 'This is an endpoint for fetching a product by id',
            tags: ['products'],
            params: {
                description: 'Product Id',
                type: 'object',
                properties: {
                    id: { type: 'number' }
                }
            },
            response: {
                200: {
                    description: 'Success Response',
                    type: 'object',
                    properties: {
                        id: { type: 'number' },
                        category: { type: 'string' },
                        title: { type: 'string' },
                        price: { type: 'number' }
                    }
                }
            }
        }
    }, async (request, reply) => {
        const { id } = request.params;
        const product = await fastify.productsDAO.getProductById(id);
        return product;
    })

    fastify.post('/', {
        schema: {
            description: 'This is an endpoint for creating a new product',
            tags: ['products'],
            body: {
                description: 'Payload for creating a new Product',
                type: 'object',
                properties: {
                    category: { type: 'string' },
                    title: { type: 'string' },
                    price: { type: 'number' }
                }
            },
            response: {
                201: {
                    description: 'Success Response',
                    type: 'object',
                    properties: {
                        id: { type: 'number' },
                        category: { type: 'string' },
                        title: { type: 'string' },
                        price: { type: 'number' }
                    }
                }
            }
        }
    }, async (request, reply) => {
        const { category, title, price } = request.body;
        const newProduct = await fastify.productsDAO.createProduct(category, title, price)
        reply.code(201).send(newProduct)
    })

    fastify.put('/:id', {
        schema: {
            description: 'This is an endpoint for updating an existing product',
            tags: ['products'],
            params: {
                description: 'Product Id',
                type: 'object',
                properties: {
                    id: { type: 'number' }
                }
            },
            body: {
                description: 'Payload for updating a new Product',
                type: 'object',
                properties: {
                    category: { type: 'string' },
                    title: { type: 'string' },
                    price: { type: 'number' }
                }
            },
            response: {
                200: {
                    description: 'Success Response',
                    type: 'object',
                    properties: {
                        id: { type: 'number' },
                        category: { type: 'string' },
                        title: { type: 'string' },
                        price: { type: 'number' }
                    }
                }
            }
        }
    }, async (request, reply) => {
        const { id } = request.params
        const { category, title, price } = request.body;

        const updatedProduct = await fastify.productsDAO.updateProduct(id, category, title, price)

        return updatedProduct
    })

    fastify.delete('/:id', {
        schema: {
            description: 'This is an endpoint for PERMANENTLY DELETING an existing product.',
            tags: ['products'],
            params: {
                description: 'Product Id',
                type: 'object',
                properties: {
                    id: { type: 'number' }
                }
            },
            response: {
                204: {
                    type: 'string',
                    default: 'No Content'
                }
            }
        }
    }, async (request, reply) => {
        const { id } = request.params;
        await fastify.productsDAO.deleteProduct(id)

        reply.status(204)
    })
}
Basically, we have request handlers for every HTTP method – GET, POST, PUT and DELETE. Within each of the handlers, we use methods from the productsDAO plugin. Within each of the routes, we also provide a schema object. This will help generate appropriate documentation for the Swagger UI.
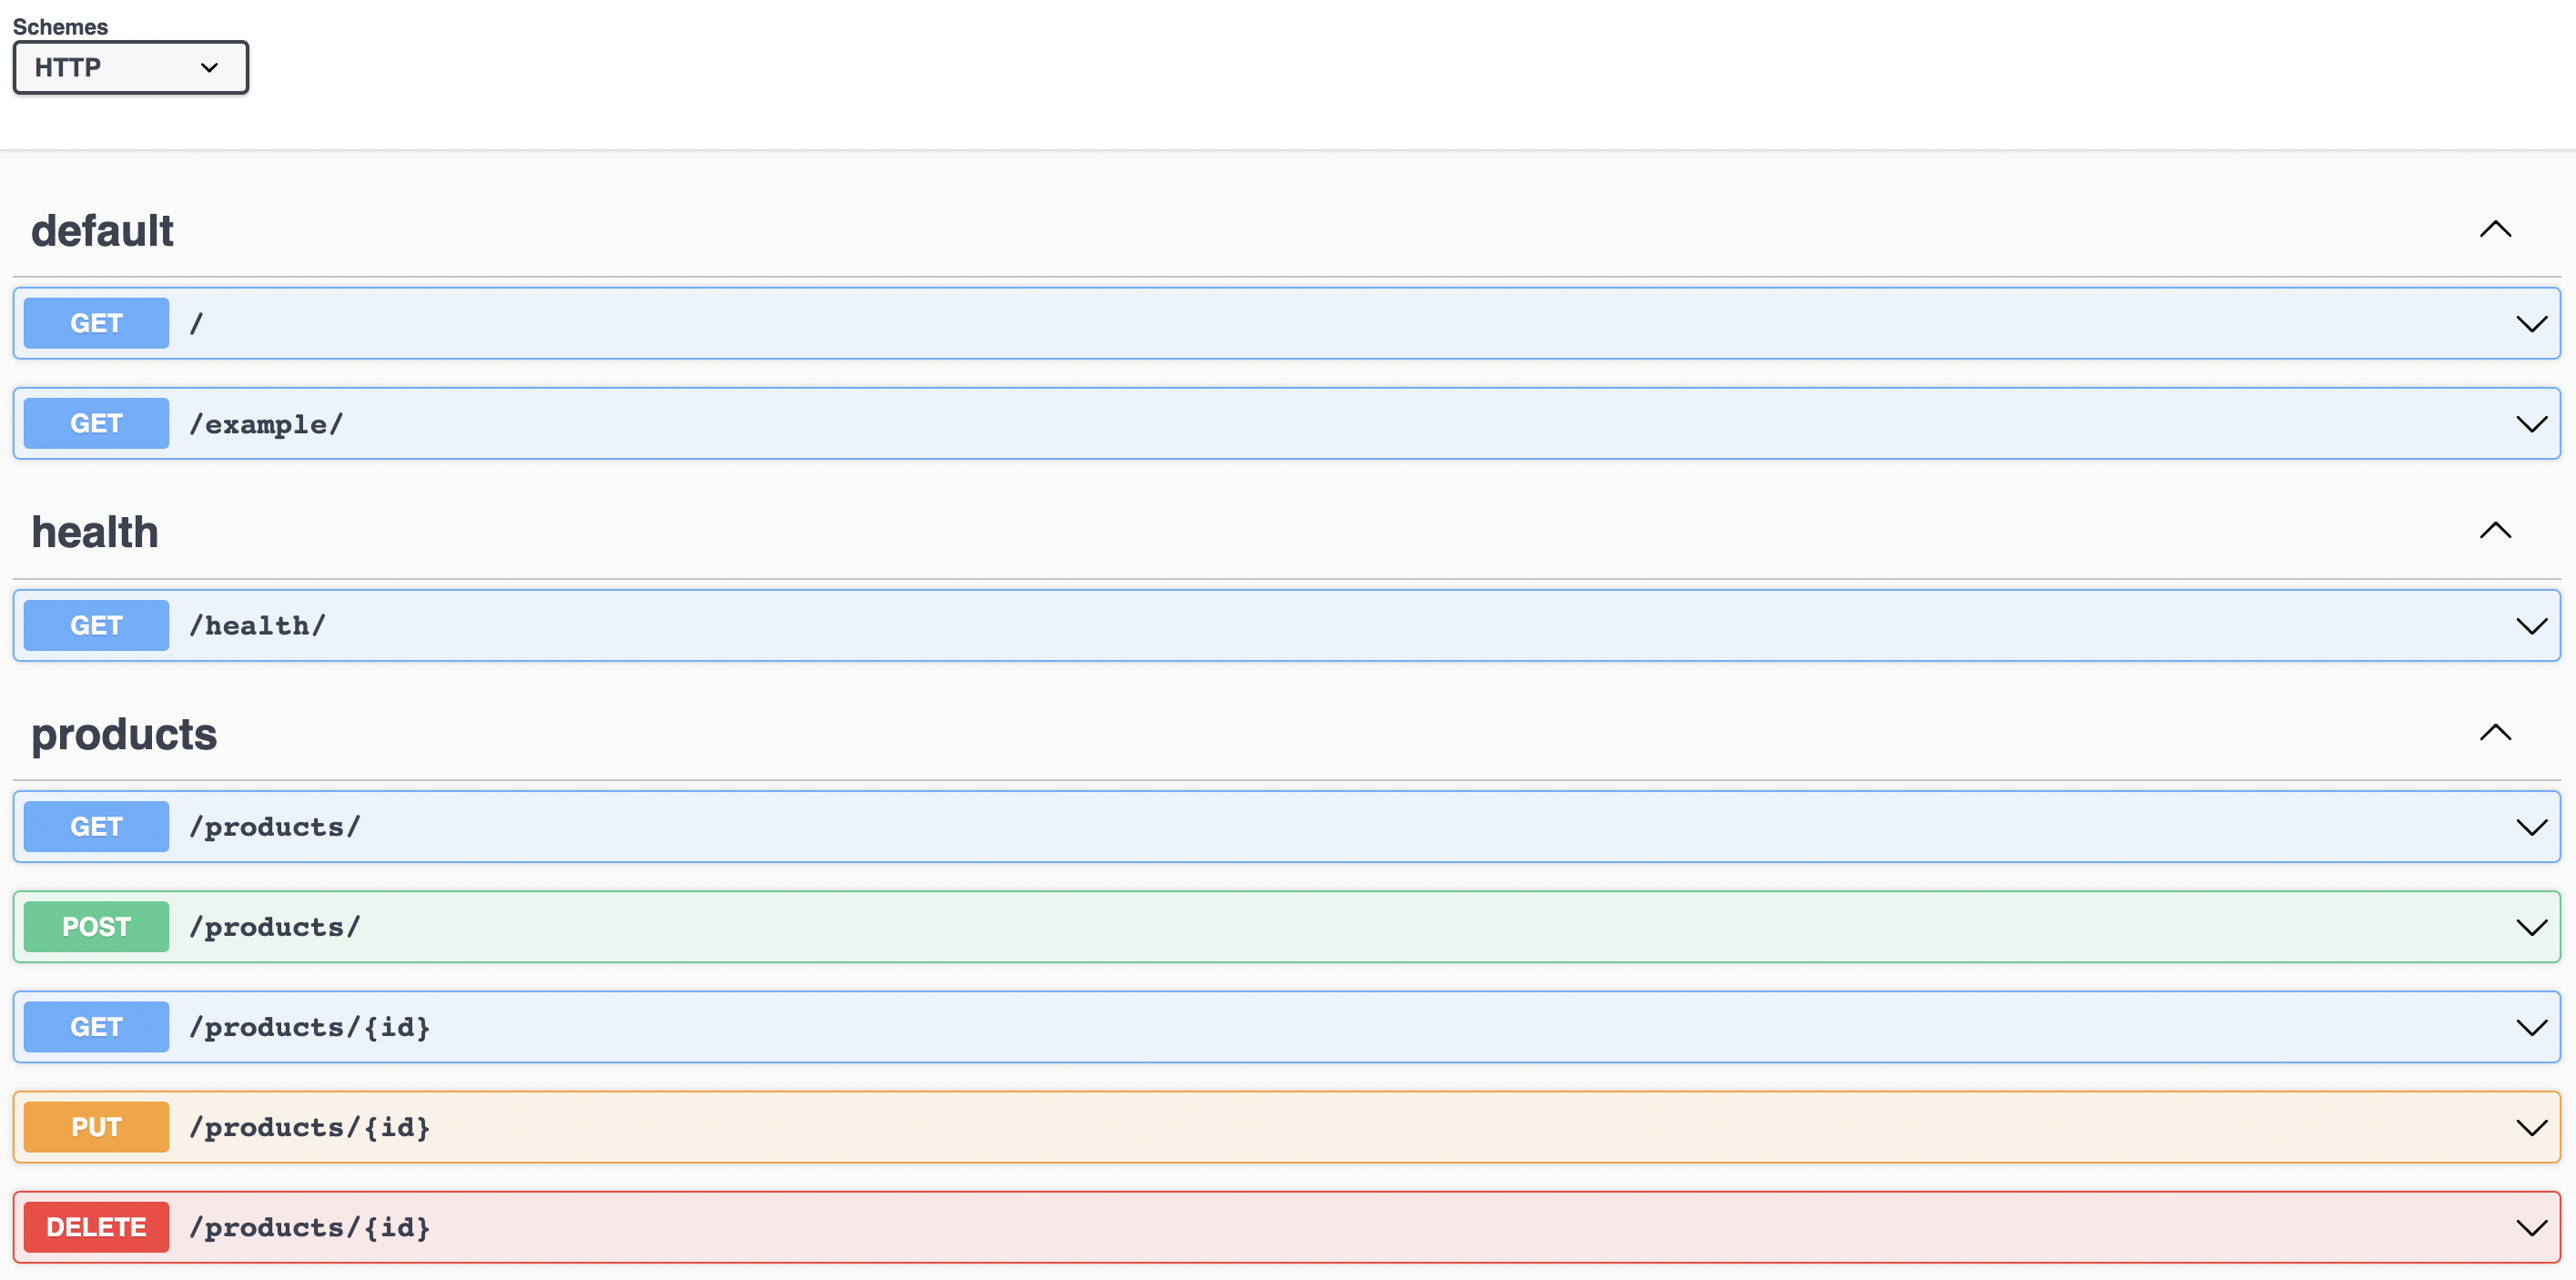
All the endpoints are grouped based on the value of tags described in the schema.
Conclusion
We successfully completed our Fastify REST API using Postgres as the database solution. We also configured API documentation via Swagger by using the fastify-swagger package.
The code for this post is available on Github.
If you have any queries or comments about this post, please feel free to mention them in the comments section below.
4 Comments
nitin · December 16, 2022 at 8:37 am
Hi Saurabh,
Thanks for writing such a helpful article. I am new to node/ fastify stuff.
Just wanted to know that the in the above code where we have defined the PORT Number for the server we are using on localhost? Please reply.
Thanks in Advance
Saurabh Dashora · December 20, 2022 at 4:16 am
Hi Nitin,
Thanks for the feedback!
Default Port of 3000 is automatically set when we use Fastify-CLI. We can override the default settings by using –config flag.
rdlightcraft · January 3, 2023 at 7:02 am
Hi This was very helpfull, just want to ask how are we able to save the logs into a file, been searching for a while but still trying to figure it out
Saurabh Dashora · January 4, 2023 at 2:32 am
Glad that the article helped you! For the logging part, I guess you could look into standard Node.js logging.