In this post, we will look at how to create an Event-Based NestJS Microservice.
Over the years, microservices architecture has become quite popular. Technically, there are various ways of realizing microservices. However, an event-based approach provides a lot of benefits if implemented correctly.
In the previous post, we learnt how to create a NestJS Microservice using Request Response style. In this post, we will focus on the event-based approach.
1 – Installation
First step is to install the @nestjs/microservices package using the below command:
$ npm i --save @nestjs/microservicesThis package facilitates the building of microservices using NestJS.
2 – Initialize a Microservice
In the next step, we initialize the microservice. Basically, this means that we configure our service to act like a microservice by adhering to specific transport protocols.
The createMicroservice() method from NestFactory class helps us achieve the same. See below code:
import { NestFactory } from '@nestjs/core';
import { MicroserviceOptions, Transport } from '@nestjs/microservices';
import { AppModule } from './app.module';

async function bootstrap() {
  const app = await NestFactory.createMicroservice<MicroserviceOptions>(
    AppModule,
    {
      transport: Transport.TCP,
      options: {
        host: '127.0.0.1',
        port: 8080,
      }
    }
  )
  await app.listen();
}
bootstrap();
Let’s breakdown what exactly we are doing here.
The createMicroservice() method basically takes two arguments. First argument is the AppModule itself. The second argument is an object. This object also has two parts. We have the transport protocol (in this case, Transport.TCP). Also, we have another object known as options. In this object, we set other attributes such as the host and port.
There are also some other properties available in the options as below:
| retryAttempts | Number of times to retry the message |
| retryDelay | Delay while retrying |
Note that these properties can also vary based on the chosen transport protocol.
3 – Event-Based Pattern
Request Response pattern can create overhead on the overall application. Often, it is more suitable to have an event-based approach. Basically, this method is suitable when we just want to publish the events without waiting for response.
In other words, a particular service simply notifies that a particular event has occurred. It is up to the other services in the application to decide whether some action needs to be taken or not.
See below illustration.
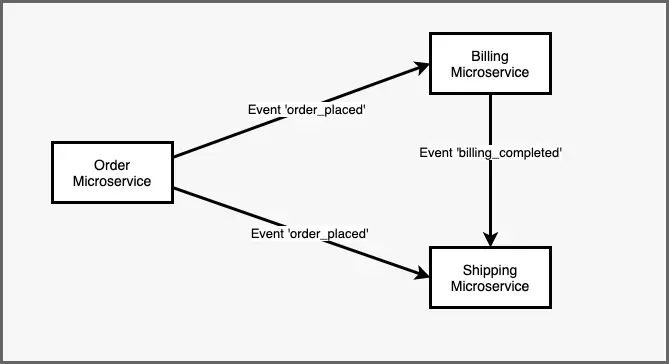
Here, all events of type ‘order_placed’ are received by the billing service as well as the shipping service. However, the order microservice that publishes the event does not care about the response. Its job is to simply notify the event that has happened. The event ‘billing_completed’ is only received by the shipping microservice.
Note here that this is just an example. The actual rules of which message is processed by which service depends on the business logic.
4 – Creating an Event Handler
We can now create an event handler for handling a particular event. Considering that our service is interested when a new book is created in the system. Below is the event handler for such a scenario. We need to put in the controller class since that is the entry point to our application. You can learn more about controllers in this post.
@EventPattern('book-created')
async handleGreetingEvent(data: Record<string, unknown>) {
    console.log(data);
}
The decorator @EventPattern is part of the @nestjs/microservices package. This decorator takes as input the event name (in this case ‘book_created’). The data is received in the format Record and we simply display the same to the console.
Note that we can also create multiple handlers for the same event. Basically, NestJS triggers all handlers simultaneously when it receives an event of the same type.
5 – Publishing an Event
To publish an event, we use the emit() method of the ClientProxy class.
See below example:
import { Inject, Injectable } from '@nestjs/common';
import { ClientProxy } from '@nestjs/microservices';

@Injectable()
export class AppService {

  constructor(@Inject('GREETING_SERVICE') private client: ClientProxy){}

  async publishEvent() {
    this.client.emit('book-created', {'bookName': 'The Way Of Kings', 'author': 'Brandon Sanderson'});
  }
}
The ClientProxy is part of the @nestjs/microservices package. We inject the greeting service using the token GREETING_SERVICE as part of the @Inject() decorator.
Finally, we call the emit() method. This method takes the event pattern (in this case ‘book_created’) and the actual event payload as input. The method itself returns a hot observable. Therefore, we don’t need to subscribe to it to publish the event.
To configure the connection based on the token GREETING_SERVICE, we have to tell the publishing microservice about the greeting service using the app module.
import { Module } from '@nestjs/common';
import { ClientsModule, Transport } from '@nestjs/microservices';
import { AppController } from './app.controller';
import { AppService } from './app.service';

@Module({
  imports: [
    ClientsModule.register([
      {name: 'GREETING_SERVICE',transport: Transport.TCP,
      options : {
        host: '127.0.0.1',
        port: 8080
      }
    }
    ])
  ],
  controllers: [AppController],
  providers: [AppService],
})
export class AppModule {}
Conclusion
With this, we have successfully learnt how to create an Event-Based NestJS Microservice. We looked at the event-based approach along with an illustration. Then, we implemented an event handler and a publisher method.
The code for this post is available on Github.
If you have any comments or queries, please mention in the comments section below.
0 Comments