In this post, we will look at the step-by-step process for Kafka Installation on Windows. Kafka is an open-source stream processing software platform and comes under the Apache software foundation.
Over the last few years, Kafka’s growth has exploded. More and more fortune-500 companies are adopting Kafka. On a practical level, Kafka is used for managing real-time streams of data, collecting big data and support real-time processing of data.
Use cases of Kafka include website activity tracking, metrics collection, log aggregation and real time analytics, ingesting data into Hadoop. It is used by companies such as Netflix, Uber, Spotify, Paypal and many more across sectors.
The aim of this post is to provide an easy-to-use walk-through of installing Kafka on a Windows machine. The process is not so intuitive and has more than a couple of moving parts thereby making it confusing for developers to start experimenting with this amazing technology. In this post, we will try to make things easier in that regard.
So, without wasting more time, let’s start with the step-by-step process for Kafka Installation on Windows.
STEP 1 – Download and Install Java
Kafka requires Java 8 for running. And hence, this is the first step that we should do to install Kafka.
To install Java, there are a couple of options. We can go for the Oracle JDK version 8 from the official Oracle website.
Alternatively, we can also go for the OpenJDK version 8 from the AdoptOpenJDK initiative website.
If you haven’t heard about it, Oracle now has a licensing structure in place for Java. If you would like to avoid all that, I suggest you to go for OpenJDK. I personally prefer and use OpenJDK. It is also being adopted heavily by enterprises.
The installation steps for either option is pretty clear. Once done, we can verify our installation. To do so, we can simply issue the below command from the command prompt or powershell.
java -versionIf Java was properly installed, we will see some message as below:
openjdk version "1.8.0_252"
OpenJDK Runtime Environment (AdoptOpenJDK)(build 1.8.0_252-b09)
OpenJDK 64-Bit Server VM (AdoptOpenJDK)(build 25.252-b09, mixed mode)
The messages can vary based on the choice of Java (Oracle or OpenJDK).
STEP 2 – Download Kafka
The next step in the process is to download Apache Kafka binaries. To do that, you have to visit the official Kafka website.
From here, we can simply download the appropriate version of Scala. In this case, the recommended version is Scala 2.12.
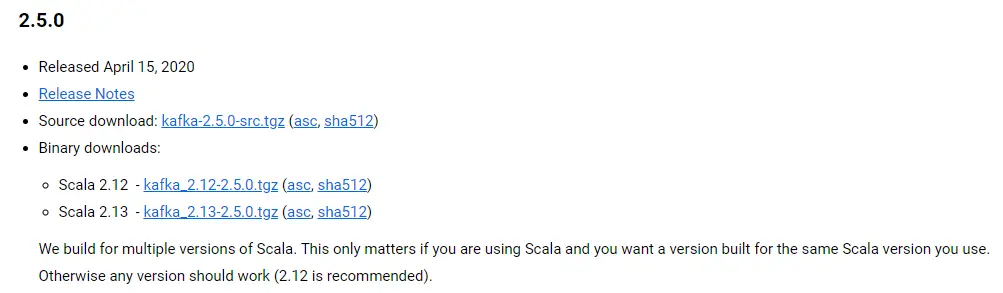
Note that this is the recommended version at the time of writing this article and is subject to change in the future.
STEP 3 – Extract Kafka
The previous step will basically download Kafka in a ZIP format. We have to now extract the contents of the same. We can use any tool such as WINRAR for this purpose.
Once the contents are unzipped, we can keep the folder in the C: drive on the system.
STEP 4 – Add Kafka to Environment Variables
The next step is to add Kafka to the system environment variables.
This can be easily done by copying the folder path of your Kafka binaries download in C: drive and adding the same to the PATH parameter in the environment variables.
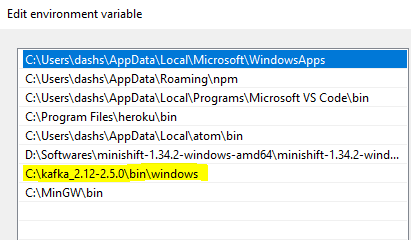
Note that we have to provide the complete path including /bin/windows. This will enable us to execute all the commands present in the /bin/windows folder.
Do not forget to press OK while closing the environment variables dialog box otherwise the change to the PATH variable will not be applied.
STEP 5 – Edit Kafka Configuration Files
This is arguably one of the most important steps in the entire process.
Firstly, we have to open our Kafka download folder in the C: drive and create a folder named data. Inside that data folder, we have to create two more folders – kafka and zookeeper. When we first extract the contents, these folders won’t be present.
After creating the folders, we have to come back to the root directory of the Kafka folder and open the config folder. Inside the config folder, there will be a bunch of files. The files important to us are the server.properties and zookeeper.properties. Basically, we have to make some modifications in these two files.
We can open the zookeeper.properties files and make the below changes in that file.
# Unless required by applicable law or agreed to in writing, software
# distributed under the License is distributed on an "AS IS" BASIS,
# WITHOUT WARRANTIES OR CONDITIONS OF ANY KIND, either express or implied.
# See the License for the specific language governing permissions and
# limitations under the License.
# the directory where the snapshot is stored.
dataDir=C:/kafka_2.12-2.5.0/data/zookeeper
Basically, we have to point the dataDir property to the path of newly created /data/zookeeper format. Take special note of the slash (/) over here.
Next, we have to modify the server.properties file. Below is the change:
############################# Log Basics #############################

# A comma separated list of directories under which to store log files
log.dirs=C:/kafka_2.12-2.5.0/data/kafka
Basically, we are pointing the log.dirs to the new folder /data/kafka.
I will recommend using Notepad++ to make these changes. Once the changes are done, our configuration settings are complete.
STEP 6 – Start Zookeeper
Kafka requires Zookeeper to run. Basically, Kafka uses Zookeeper to manage the entire cluster and various brokers. Therefore, a running instance of Zookeeper is prerequisite to Kafka.
To start Zookeeper, we can open a powershell prompt and execute the below command:
zookeeper-server-start config/zookeeper.propertiesNotice here that we are pointing to the zookeeper configuration file while executing the start command.
If the command is successful, Zookeeper will start on port 2181.
STEP 7 – Start Kafka
After all the above steps are done, we reach the final piece of the puzzle. We can now start Kafka.
To do so, open another instance of the powershell prompt and execute the below command:
kafka-server-start config/server.propertiesNotice that here we are pointing to the server.properties file in the config folder.
This command will start an instance of Kafka on your system. A lot of messages will be printed. But you can check the message saying [KafkaServer id=0] started for confirmation that the server is actually running successfully.
Now, we can use this server to play around with Kafka and learn this exciting technology.
Conclusion
So with this, we have successfully completed Kafka Installation on Windows. With Kafka running on our system, we can now start creating brokers and using Kafka CLI or we can also choose to work with Kafka using our application code.
We will be looking at those things in future posts.
0 Comments