Replication is usually a matter for production applications. However, many times, we want to test replication during development phase as well. In this post, we will learn how to setup a local MongoDB Replica Set Configuration.
If you are new to MongoDB and would like to learn about this amazing database, you can check out this post about creating a MongoDB database.
1 – What is Replication?
The main objective of replication is to achieve data redundancy and high-availability.
But how do we achieve these objectives?
We do so by keeping multiple copies of the data. These copies are also known as replicas.
In a real world situation, these replicas reside on physically isolated servers. This ensures redundancy. Even if one server goes down, we don’t lose the data. The application using the data can stay online in case of database server failure. As you can see, replication also helps provide disaster recovery and durability of data.
2 – Replication in MongoDB
In MongoDB, we achieve replication by creating a replica set.
But what is a MongoDB replica set?
A replica set in MongoDB is a group of servers. One of these servers is known as the primary server. The other servers are known as secondary servers. The primary server processes the write operations. It also applies the operations across the secondary servers. In other words, the primary server replicates the data.
See below illustration of a typical MongoDB Replica Set Architecture.
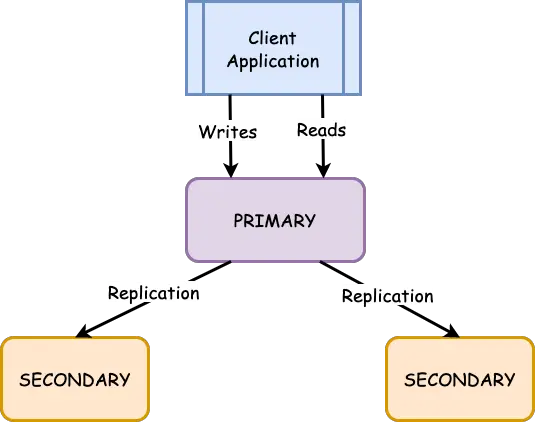
In the above example, if the primary server fails, one of the secondary servers takes over the place of primary server. This process is known as election. Once the original primary server comes back online, it assumes the role of the secondary server.
While all of this switching happens, the client application does not face any issue. In other words, the replication process ensures that data is always available for the clients.
3 – MongoDB Replica Set Configuration Process
While replication is a common requirement in a typical production setup, we might also need it during local development.
But how do we enable replication in MongoDB locally?
As you might recollect from previous section, we achieve replication by duplicating data across multiple physical servers. However, this is not something we want to do locally. It will be a hassle to maintain multiple servers while doing development activities.
Instead, we can setup a MongoDB Replica Set on the same server. In this section, we will look at MongoDB Replication in a step-by-step manner on our local development machine.
3.1 – Start Multiple MongoDB Instances
As a first step, we have to start multiple MongoDB instances in our dev machine.
Let us start the first instance using the below command.
$ mongod --port 27017 --dbpath data/db --replSet rs0Here, we specify port as 27017. Also, we set the dbpath to data/db. The –replSet rs0 specifies that we are trying to create a replica set and the name of the set is rs0.
Now, we can start another instance. Since we are using the same server, we need to specify a different port as well as data path for this instance.
See below commands:
$ mkdir data/db2/
$ mongod --port 27018 --dbpath data/db2 --replSet rs0
As you can notice, we use the same replSet as the first instance. This indicates that the second instance also belongs to the same replica set.
3.2 – Start MongoDB Replication
While we can create as many instances as we want in our replica set (depending on the resources available), two instances is the minimum requirement.
We can now start the replication.
To do so, start a Mongo shell environment and issue the below command:
> rs.initiate()
{
    "info2" : "no configuration specified. Using a default configuration for the set",
    "me" : "localhost:27017",
    "ok" : 1
}
The mongo shell prompt will also change to rs0:PRIMARY.
3.3 – Add MongoDB Instance to Replica Set
Currently, we have only one instance in our set. We can now add the second instance to the replica set.
See below command.
rs0:PRIMARY> rs.add("localhost:27018")
{ "ok": 1 }
The response { “ok”: 1 } means the operation was successful.
3.4 – Confirm the Replication Status
We can now execute the status command to check the status of our replica set.
rs0:PRIMARY> rs.status()
"members" : [
		{
			"_id" : 0,
			"name" : "localhost:27017",
			"health" : 1,
			"state" : 1,
			"stateStr" : "PRIMARY",
			"uptime" : 250,
			"optime" : {
				"ts" : Timestamp(1644291366, 1),
				"t" : NumberLong(15)
			},
			"optimeDate" : ISODate("2022-02-08T03:36:06Z"),
			"syncSourceHost" : "",
			"syncSourceId" : -1,
			"infoMessage" : "",
			"electionTime" : Timestamp(1644291176, 1),
			"electionDate" : ISODate("2022-02-08T03:32:56Z"),
			"configVersion" : 3,
			"configTerm" : 15,
			"self" : true,
			"lastHeartbeatMessage" : ""
		},
		{
			"_id" : 1,
			"name" : "localhost:27018",
			"health" : 1,
			"state" : 2,
			"stateStr" : "SECONDARY",
			"uptime" : 199,
			"optime" : {
				"ts" : Timestamp(1644291366, 1),
				"t" : NumberLong(15)
			},
			"optimeDurable" : {
				"ts" : Timestamp(1644291366, 1),
				"t" : NumberLong(15)
			},
			"optimeDate" : ISODate("2022-02-08T03:36:06Z"),
			"optimeDurableDate" : ISODate("2022-02-08T03:36:06Z"),
			"lastHeartbeat" : ISODate("2022-02-08T03:36:11.198Z"),
			"lastHeartbeatRecv" : ISODate("2022-02-08T03:36:10.260Z"),
			"pingMs" : NumberLong(0),
			"lastHeartbeatMessage" : "",
			"syncSourceHost" : "localhost:27017",
			"syncSourceId" : 0,
			"infoMessage" : "",
			"configVersion" : 3,
			"configTerm" : 15
		}
	],
As you can see, this command shows that currently there are two members in the replica set. The instance on port 27017 is the primary instance while the one on 27018 is secondary. In other words, our replica set is up and running.
Conclusion
With this, we have completed our MongoDB Replica Set Configuration on the same server. This is a very useful setup while testing replication capabilities during development phase.
If you have any comments or queries about this post, please feel free to mention them in the comments section below.
2 Comments
Julio Cesar Santiesteban · April 4, 2022 at 3:52 am
Hey, thanks for all man. I was having a headache because It happens than Prisma.io works only with a replica set. Thanks man.
Saurabh Dashora · April 4, 2022 at 6:32 am
Hi Julio…glad that the post helped!