By now, almost everyone knows that NodeJS uses an event loop. However, knowing how this event loop actually works is another story. The fact that NodeJS uses something known as the Reactor Pattern usually creates more questions than answers.
When learning about the inner workings of NodeJS, confusion often beats clarity.
Not anymore.
In this post, we will chop our way through the thickets of confusion and learn about the NodeJS Reactor Pattern and how it makes the Event Loop possible.
1 – JavaScript is Single Threaded
NodeJS uses JavaScript.
Since JavaScript is single-threaded, NodeJS is also single-threaded (at least on a high-level).
But JavaScript and by extension, NodeJS can still handle concurrency. The secret to this concurrent behaviour is the event loop.
Like most other programming languages, JavaScript also relies heavily on functions.
In fact, in JavaScript, functions are first-class citizens. Basically, you can do a lot with functions in JavaScript such as:
- assign functions to variables
- pass functions as arguments
- return a function from another function’s invocation
- store functions in other data structures
Predictably, functions can also call other functions.
When one function calls another function, it adds frames to the call stack. Basically, with every call, this stack keeps getting taller. Recursive functions can make this stack extremely tall leading to an eventual collapse depending on the maximum call stack size.
Nevertheless, JavaScript has one major difference from other programming languages when it comes to the call stack.
Multiple Stacks in JavaScript
In many languages, the entire request cycle correlates to a single stack. This stack grows as the request is received, reaches a particular height, shrinks as the stack unwinds and ultimately disappears when the request is finished.
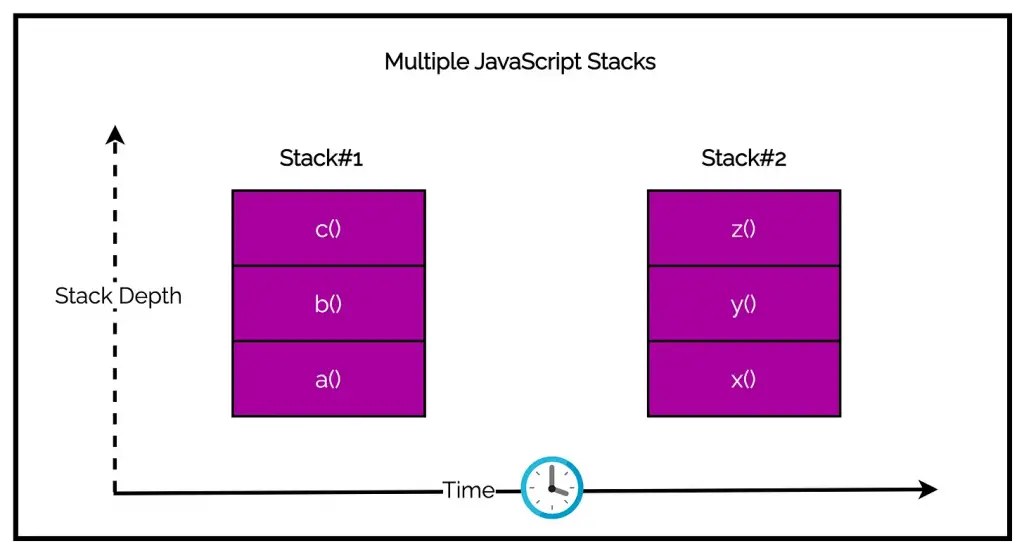
On the other hand, JavaScript does not constrain itself to run within a single call stack throughout this lifetime. However, since JavaScript is single-threaded, only one stack can run at a given time.
Check out the below example:
function a() {
    console.log("A");
    b();
}
function b() {
    console.log("B");
    c();
}
function c() {
    console.log("C");
}

function x() {
    console.log("X");
    y();
}
function y() {
    console.log("Y");
    z();
}
function z() {
    console.log("Z");
}
setTimeout(x, 0);
a();
Running the above program will result in the below output:
A
B
C
X
Y
Z
The below figure visualizes how the above program manages the call stack. Notice there are two separate stacks but neither of them overlaps each other during the same time.
The a() call stack is the first to run whereas the x() function is added to the queue.
Even though the setTimeout() function specifies that x() function should run 0ms from now, the execution does not start immediately.
Due to the single-threaded nature of JavaScript, the event loop checks for new work only when the current stack is complete. If a() was a long-running process, the wait time for x() would increase further.
A function that takes a long time to run blocks the event loop. The application will be stuck processing slow synchronous code and the event loop will not be able to process further tasks.
Therefore, it is easy to conclude that in order to achieve concurrency we need to avoid slow synchronous code. However, this is easier said than done.
2 – Slow and Blocking I/O Operations
I/O or Input Output is one of the fundamental operations of a computer system. Also, it happens to be the slowest.
Accessing the RAM is in the order of nanoseconds. Accessing a disk is even slower (in the order of milliseconds).
The bandwidth shares the same story.
RAM has a transfer rate in the order of GB/second while disk and network can vary from MB/s to GB/s.
Moreover, I/O also involves the human factor. The biggest delay in an application often comes from waiting for user input (for example, mouse clicks and key strokes). These delays can be many orders of magnitude slower than disk access or even the network.
While I/O is not computational heavy, it adds a delay between the moment of request and the moment the operation completes.
And this is the reason it is so difficult to avoid slow synchronous code while dealing with slow and blocking I/O operations.
Concurrency with Multi-Threading
So, how do programming languages achieve concurrency?
Many use multi-threading.
In traditional blocking I/O programming, the function call corresponding to an I/O request will block the execution until the operation completes. This can go from a few milliseconds for disk access to even minutes in case the data is generated from a real user pressing some key.
It goes without saying that a web-server that uses blocking I/O will not be able to handle multiple connections within the same thread. Each I/O operation will block the processing of any other connection.
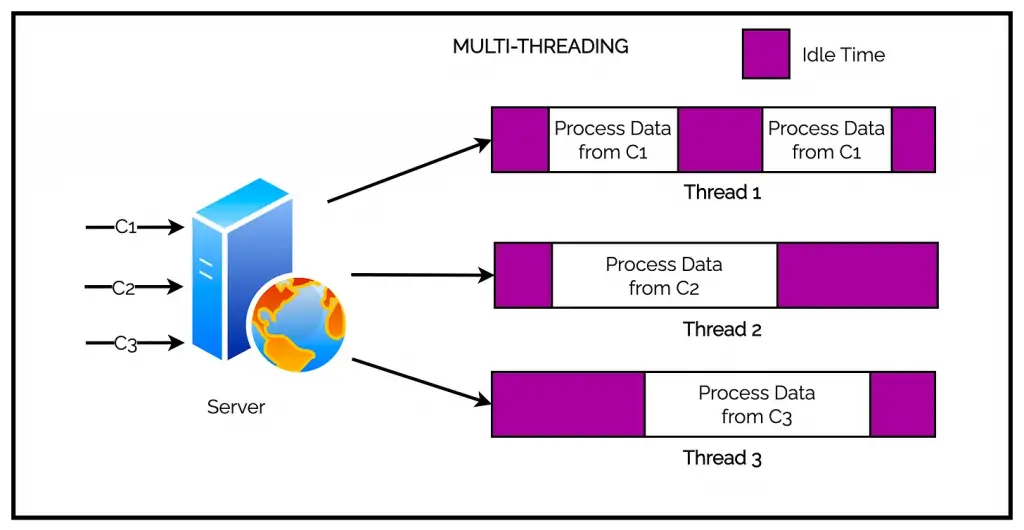
Therefore, to achieve concurrency, web servers start off a new thread for each concurrent connection.
When a particular thread blocks for an I/O operation, other requests will not be impacted as those requests have their own separate threads.
Hence, the name multi-threading.
Check out the below illustration that explains it at a glance.
Multi-threading is a great concept.
But unfortunately, a thread is not cheap in terms of system resources. It consumes memory and leads to context-switches. Also, many times, a thread ends up in idle mode while waiting for the result of an I/O operation. This is quite wasteful in terms of resource utilization.
It is quite obvious that having a long running thread for each connection is not the best approach to improve efficiency.
3 – Non-Blocking I/O with Busy-Wait Approach
Most modern operating systems support a mechanism known as non-blocking I/O.
As the name suggests, this type of I/O does not block the execution. The system call to access a resource always returns immediately without waiting for the data to be read or written. If no results are available when the call is made, the function simply returns a predefined constant.
So how is the data actually accessed using non-blocking I/O?
We use busy-waiting. Essentially, busy-waiting is nothing but actively polling the resource in a loop till it returns some actual data.
While busy-waiting makes it possible to handle different resources in the same thread, it is still significantly inefficient.
Polling algorithms usually waste a lot of CPU time. Most likely, the loop will end up consuming precious CPU only for iterating over resources that are unavailable most of the time.
4 – Introduction to Event Demultiplexer
Busy-waiting is not an ideal technique for handling non-blocking resources. However, most modern operating systems provide another mechanism to support concurrent and non-blocking resources.
It’s called the event demultiplexer. You can also call it the event notification interface.
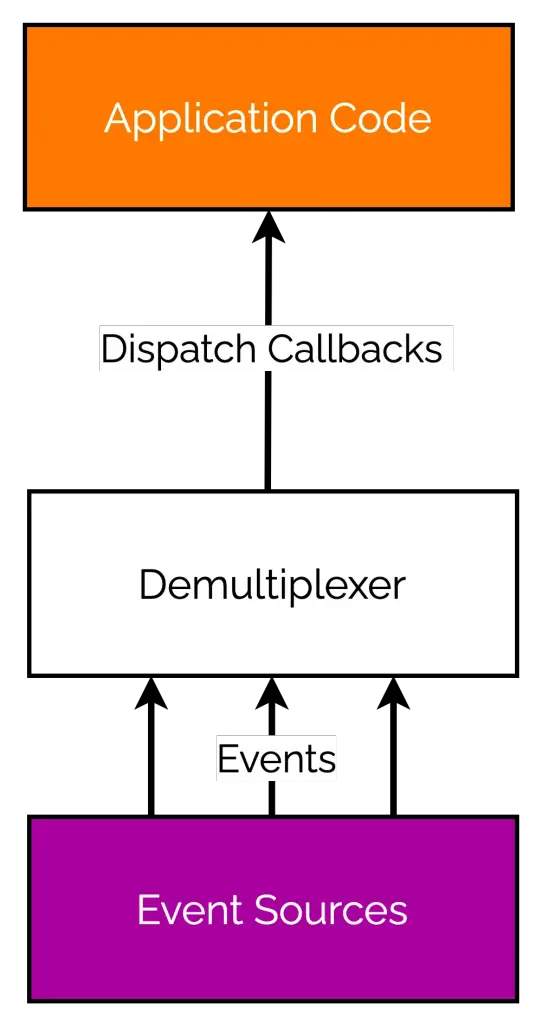
Check out the below illustration.
There are three important steps that drive the event demultiplexing process:
- First, the resources are added to a watchlist. Each resource has a specific associated operation such as read or write.
- The event demultiplexer is assigned this watchlist of resources along with the callbacks. It makes a synchronous and blocking call for any events generated from the watched resources. When the demultiplexer eventually returns from the blocking call, it has a new set of events available for processing.
- Each event returned by the event demultiplexer is processed by the application callback methods. At this point, the resource is guaranteed to be ready to read and not block during the operation. When all the events are processed, the demultiplexer will again make a blocking request for the next set of events.
This process is also known as the event loop and forms the basis of concurrency in NodeJS.
As you might have noticed, the event demultiplexer makes it possible for a single thread to handle multiple requests.
No need for busy-wait. No need for multiple threads. A single thread is enough with very little idle time.
Check the below illustration.
The tasks are spread over time, instead of being spread across multiple threads.
5 – NodeJS Reactor Pattern with Event Demultiplexer
Having trudged our way through all the explanation, we are now in a great position to understand the NodeJS Reactor Pattern. Essentially, the reactor pattern is simply a specialization of the event demultiplexer.
Check out the NodeJS reactor pattern example in all its glory.
Based on the above illustration, we can now understand the inner workings of the NodeJS reactor pattern in 6 easy steps:
- STEP 1 – The application generates a new I/O operation by submitting a request to the Event Demultiplexer. Along with the request, the application also provides a handler or a callback. This is like telling the demultiplexer whom to contact once the job is done. The call to the demultiplexer is non-blocking and the control returns back to the application immediately.
- STEP 2 – In the next step, the Event Demultiplexer does its whole watchlist thing and waits for events from the I/O resources. When a set of I/O operations are completed, the Event Demultiplexer pushes the corresponding events into the Event Queue.
- STEP 3 – At this point, the Event Loop iterates over the items in the Event Queue. Important point to note here is that the Event Queue is not just one queue but multiple queues that are processed in different phases. You can read more about it in this post
- STEP 4 – The Event Loop triggers the handler for each event. It was told about this handler by the Event Demultiplexer in Step 2.
- STEP 5 – The handlers are part of the application code. Once a handler runs, a couple of things can happen. The handler may give back the control to the Event Loop. Check the path 5a. However, the handler might request for new asynchronous operations (path 5b). The 5b path will result in new operations being inserted to the Event Demultiplexer.
- STEP 6 – When the Event Queue is empty, the loop will block again on the Event Demultiplexer which will start another cycle.
If we had to be absolutely brief, the Reactor Pattern handles I/O by blocking until new events are available from a set of watched resources. When events becomes available, it dispatches each event to its associated handler using the Event Queue.
At some point, the Event Demultiplexer will not have any pending operations and there would be no events left in the Event Queue. When this happens, the NodeJS application automatically exits.
6 – NodeJS I/O Engine – libuv
Today, libuv is the low-level I/O engine of NodeJS. The magic of NodeJS Reactor Pattern is implemented by libuv.
Behind the scenes, libuv performs a number of important things:
- Provides an API for creating event loops
- Manages event queues
- Runs async I/O operations
- Queues other types of tasks
But what was the need for libuv?
Each operating system has its own interface for the Event Demultiplexer such as epoll on Linux, kqueue on Mac OS and IOCP on Windows
To make matters more complicated, each I/O operation behaves quite differently depending on the type of the resource and the operating system. For example, in Unix, regular filesystem files do not support non-blocking operations and it is required to use a separate thread to simulate a non-blocking behaviour.
Since a NodeJS application can run on any platform or operating system, a higher-level abstraction was needed to iron out these platform-specific differences.
This is the reason why the NodeJS core team created a C library known as libuv. The objective of libuv was to make NodeJS compatible with all major platforms and normalize the non-blocking behaviour of different types of resources.
If you are interested, you can read more about libuv over here.
7 – The Layers of NodeJS
While the reactor pattern and libuv are definitely the beating heart of NodeJS, there are still a few more components needed to power the complete platform in the way we see it.
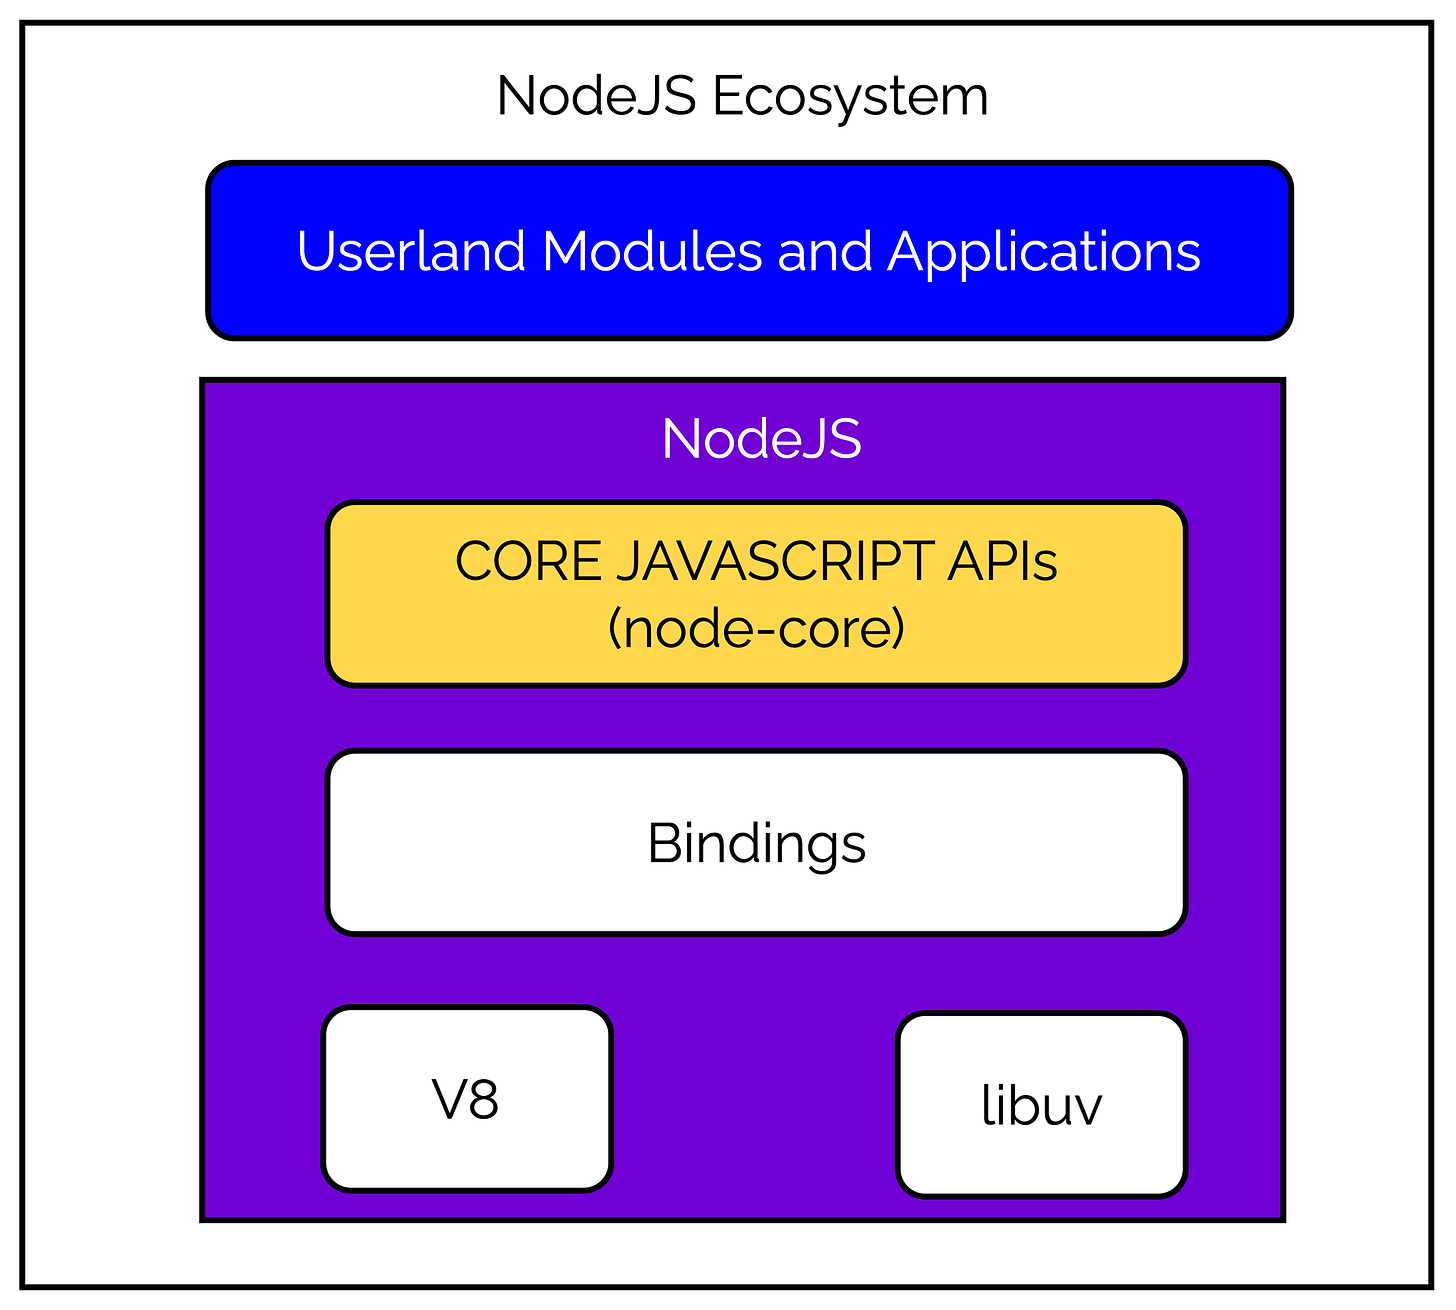
Check the below illustration:
As you can see, we have a few more important components other than libuv:
- A set of bindings for wrapping and exposing
libuvand other low-level functionality to JavaScript. Remember –libuvwas written using C programming language. - V8, the JavaScript engine developed by Google for the Chrome browser.
- A core JavaScript library (
node-core) that implements the high-level NodeJS API.
Together, all these components form the core architecture of NodeJS. On top of all this, we have the userland modules and applications that we build using NodeJS.
Conclusions
The Reactor Pattern forms the core of NodeJS and yet, developers don’t know much about it.
Of course, it is so nicely abstracted that developers can still build useful applications using NodeJS even if they haven’t even heard about the reactor pattern. However, knowing about the pattern is good in the long run as you can make better choices about your application if you understand how NodeJS will handle it internally.
Nevertheless, there is a lot to unpack here and we can’t know about everything in one go.
In the next post, we will look at NodeJS Event Loop Phases with a code example.
In case you want to build a web-server using NodeJS, check out this post.


2 Comments
Suyash · June 20, 2023 at 8:05 pm
Nice article. I see it is very much inspired from the book – Nodejs Design Pattern
Saurabh Dashora · June 22, 2023 at 4:38 am
Thanks for the feedback!