If you are planning to start with Kubernetes, chances are that Pods are the first things you’ll encounter.
However, there is an inherent confusion about the role of Pods when compared to plain-old Docker containers.
Why do you need Kubernetes Pods? And how to create a Pod anyway?
These are just some of the questions that spring to mind.
In this post, I’m going to explain the need for Pods in Kubernetes and how they are different from containers. Also, I will show you an example of creating a brand-new Pod using a YAML file.
1 – The Advent of Containerization
Containers have taken over the world. From shipping lanes to software deployments, containers are everywhere.
Whether we use containers to transport goods or software artifacts, their core USP remains the same – isolation of things.
Just like you don’t want your clothes getting mixed up with someone else’s kitchen items while being transported from one place to another, software developers hate when dependencies belonging to some other process mess with their application during runtime.
But containers in software deployments also create a problem. Since I’m no shipping expert, I don’t know if similar problems can occur in transportation industry.
The specific container-related problem in software deployment stems from the need to have a large number of containers.
2 – Why the need for multiple containers?
Unless your application is small and individually managed, you’d most likely be splitting the various parts of your application into multiple containers.
However, multiple containers can feel like overkill.
If your app happens to consist of multiple processes communicating through IPC (Inter-Process Communication) or using local file storage, you might be tempted to run multiple processes in a single container. After all, each container is like an isolated machine.
But you must avoid this temptation at all costs.
Containers are designed to run only a single process per container. If we run multiple unrelated processes in a single container, we need to take responsibility of keeping those processes running. Also, we run into other maintenance issues, handling crashes of individual processes, managing multiple logs and so on.
Running each process in its own container is the only way to leverage the true potential of Docker containers.
But what about requirements where two or more applications or processes need to share resources such as the filesystem?
This is where Kubernetes Pods come into the picture
3 – What are Kubernetes Pods?
Kubernetes groups multiple containers into a single atomic unit known as a Pod.
In the animal kingdom, pods are meant to signify a group of whales. This gels nicely with the whole whale theme associated with Docker containers.
A Pod represents a collection of application containers and volumes running in the same execution environment.
The same execution environment is important over here. It means you can use pods to run closely related processes that need to share some resources. At the same time, you can keep these processes isolated from each other. Best of both worlds!
At this point, you might be looking for such an example.
Think of an application that pulls HTML files from a Git repository and serves them using a web server. Such an application has two distinct functionalities or processes – one for pulling HTML files from a Git repository and the other for actually serving the files.
You can handle the first part using a shell script that periodically checks the Git repository, pulls in the latest version of the HTML file and stores it in the filesystem. To take care of the second part, you can use a server like nginx that serves the HTML file stored in the filesystem.
The shell script and the nginx server share the same resources i.e. the filesystem.
A Kubernetes Pod is an ideal approach to deploy such an application. Check the below illustration.
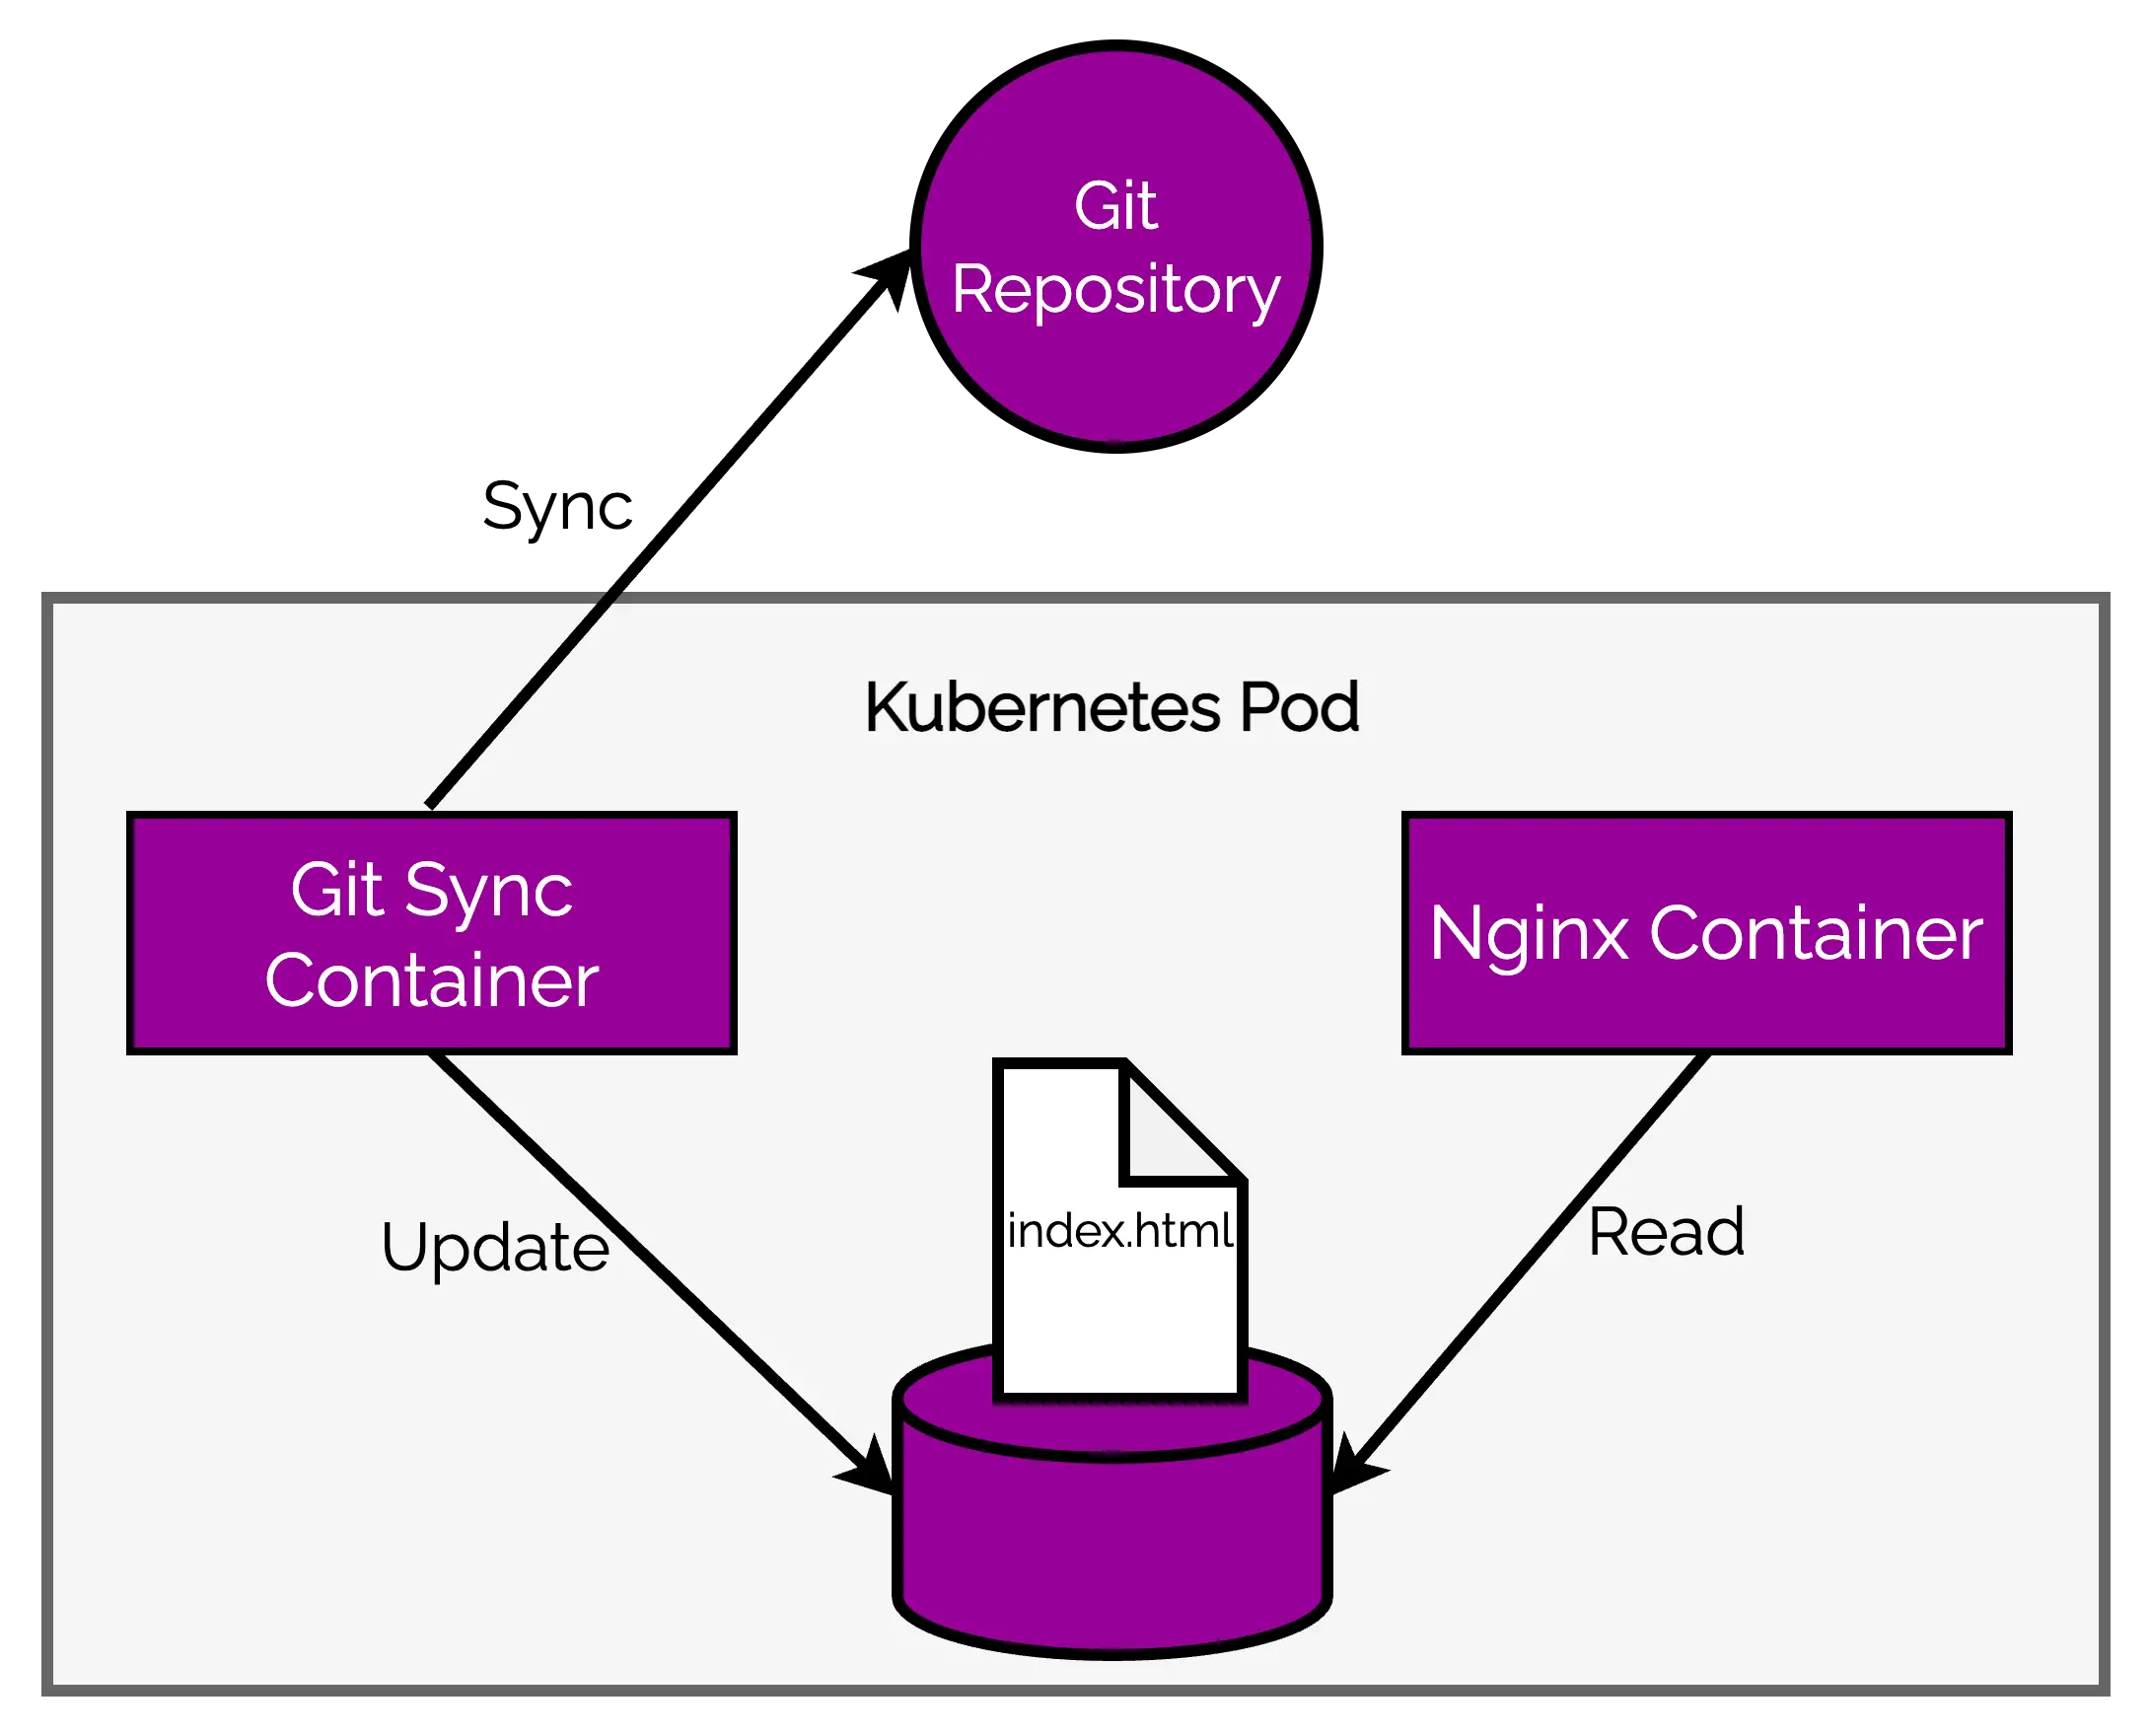
There are two containers – the Git synchronization container and the nginx container running in a single Kubernetes Pod. Both utilize the same file system.
This sort of design is also known as the sidecar pattern. If you want to see it in action, check out this detailed post about implementing a sidecar pattern in Kubernetes.
4 – Deploy Everything as Multi-Container Pods!
At this point, you might be excited. If a Kubernetes Pod can host multiple containers, then we can simply stuff all applications in a pod and be done with things.
These are dystopian thoughts and should be kept in check as much as possible.
If anything, multi-container pods are a rarity. Just like with containers, Kubernetes Pods are meant to host a single process or a service.
But isn’t that counter-productive? Well, not really!
Think about a typical web application like WordPress. Everyone knows that WordPress uses MySQL as the database. From the point of view of tiered applications, we can divide WordPress into a WordPress container running the web part and a MySQL database container handling the data. Both of these containers can be placed on the same Kubernetes Pod.
Sounds like a good idea!
Incidentally, this is an anti-pattern.
You should not stuff containers into a Pod just for the sake of it. It can create more issues than solutions in the long run.
The Issue with Multi-Container Pods
In our WordPress example, imagine the scalability issues you can run into with a single-pod approach.
Pods and not containers are the smallest deployable artifact in a Kubernetes cluster. In the case of our WordPress website flying to the sky in terms of popularity, you might need to scale out the web part. In Kubernetes, horizontal scaling means spawning multiple pods. If you create multiple pods for our WordPress site, we end up inadvertently scaling out the MySQL database as well.
Now, database scaling is not the same as scaling a web application and this can create unnecessary issues if not handled correctly. Moreover, it was not even needed in the first part. You just wanted to handle the extra traffic on our WordPress site. The database was just fine.
So, how do you decide whether to use multi-container Pods or not?
Ask yourself these couple of questions:
- Will these containers work correctly if they land on different machines?
- Do these applications need to scale up independently of each other?
If the answer to these questions is a YES, you should avoid multi-container pods at all costs.
5 – Kubernetes Pod Manifest
We understand pods now. At least, much better than when we started.
But how do you actually create them?
Kubernetes Pods are described using a Pod manifest. It is simply a text file representation of the underlying object.
The philosophy of Kubernetes banks heavily on declarative configuration. This means that you write down the desired state of the world in a configuration file and submit that file to a service. It is then the job of the service to take appropriate actions to ensure the desired state becomes the actual state.
When you create a manifest and supply it to Kubernetes, the below steps take place:
- The Kubernetes API server accepts and processes Pod manifests before storing them in persistent storage (
etcd). - Next, the scheduler steps into action. It uses the Kubernetes API to find pods that have not been scheduled to a node.
- The scheduler then creates the pods and places them onto nodes. Choosing a node depends on the resource availability and other constraints specified in the pod manifests. The scheduler tries to ensure that pods from the same application are distributed onto different nodes to increase reliability in the case of node-failure.
This approach is drastically different to the usual imperative configuration in which an operator issues a sequence of commands to bring the system to the desired state. If the operator forgets a command, the system can fail.
6 – Writing a Kubernetes Pod Manifest
You can write pod manifests using YAML or JSON. YAML is generally preferred because it is slightly more human-editable and also supports comments.
Kubernetes Pod manifest (and also other Kubernetes API objects) should be treated in the same way as source code. Proper comments can help explain the behaviour of a pod to new team members who may be looking at them for the first time. Moreover, these manifest files should go through a proper version control process just like your application’s source code.
Let us now go about creating our first pod manifest and deploying an application using it.
Step 1 – Building a NodeJS App
As a first step, you create a small NodeJS application that exposes a REST endpoint on port 3000.
Check out the below code from the app.js file. Nothing fancy over here. Just a simple Node Express app.
const express = require('express');

const app = express();

app.get('/', (req, res) => {
    res.send("Hello World from our Kubernetes Pod Demo")
})

app.listen(3000, () => {
    console.log("Listening to requests on Port 3000")
})
Below is the package.json file for our application. The important thing to note here is the start script in the scripts section. We will use it later to start our application.
{
  "name": "basic-pod-demo",
  "version": "1.0.0",
  "description": "",
  "main": "index.js",
  "scripts": {
    "test": "echo \\"Error: no test specified\\" && exit 1",
    "start": "node app.js"
  },
  "keywords": [],
  "author": "",
  "license": "ISC",
  "dependencies": {
    "express": "^4.18.2"
  }
}
Step 2 – Dockerize the NodeJS App
Next, you need to create a Docker image for the application.
Below is the Dockerfile.
#Specify a base image
FROM node:alpine

#Specify a working directory
WORKDIR /usr/app

#Copy the project
COPY ./ ./

#Install dependencies
RUN npm install

#Default command
CMD ["npm","start"]- In the first line, you specify the base image. The
node:alpineis a pretty good base image for our simple purpose.
- Second step, you specify the working directory
/usr/appwithin our container. All subsequent actions will be executed from this working directory.
- Next, you copy our project files (
app.jsandpackage.json) to this directory.
- In the fourth step, you install the dependencies by executing
npm install. - At the end, you specify the application’s start command. This is where you use the
startscript from thepackage.jsonfile of the application.
You can use this Dockerfile to build the image using the below command.
$ docker build -t progressivecoder/nodejs-demo .The image name is progressivecoder/nodejs-demo.
Step 3 – Creating the Kubernetes Pod Manifest YAML
Time to create the pod manifest YAML file.
Within our project directory, we create a file named basic-pod-demo.yaml.
apiVersion: v1
kind: Pod
metadata:
  name: basic-pod-demo
spec:
  containers:
  - image: progressivecoder/nodejs-demo
    imagePullPolicy: Never
    name: hello-service
Pod manifests include a couple of key fields and attributes:
- A metadata section for describing the pod and its labels. Here, we have the
nameattribute. - A spec section for describing the list of containers that will run in the pod. When we describe the container, we point to the image we just build. Also, we give it a name
hello-service. TheimagePullPolicy: Neveris specifically there for local system. You don’t need to mess with this option in a production cluster with a proper image registry such as the Docker Hub.
Apart from the metadata and spec, the manifest contains the apiVersion pointing to the Kubernetes API that we should use. Also, you need to specify the kind of Kubernetes resource we want to create (in this example, pod).
Step 4 – Applying the Kubernetes Pod Manifest
After writing the manifest, you need to apply it to our Kubernetes cluster so that the scheduler can create the pods.
You can use kubectl create command to create the pod as below:
$ kubectl create -f basic-pod-demo.yamlHere, -f stands for filename, directory or URL to the file that describes the resource.
However, you should use kubectl apply instead of create. The apply command works more like a HTTP PUT operation. It creates the resource if it is not present and updates the existing resource if already present. However, you get an error if you try to use apply command after you generate the resource using create.
Warning: resource pods/basic-pod-demo is missing the
kubectl.kubernetes.io/last-applied-configuration annotation which is
required by kubectl apply. kubectl apply should only be used on resources
created declaratively by either kubectl create --save-config or kubectl apply.
The missing annotation will be patched automatically.
To use apply, you simply have to tweak the command as below:
$ kubectl apply -f basic-pod-demo.yamlStep 5 – Checking the running Pods
We can now check the status of running pods in our cluster by using kubectl get pods.
NAME                     READY   STATUS    RESTARTS      AGE
basic-pod-demo           1/1     Running   4 (43s ago)   88s
Similarly, we can also see a detailed description of pods by issuing kubectl describe pods basic-pod-demo. As you can see, you get lots of information about the pod, its containers and the various events that may have occurred during the lifecycle of the pod.
Name:         basic-pod-demo
Namespace:    default
Priority:     0
Node:         docker-desktop/192.168.65.4
Start Time:   Mon, 31 Oct 2022 08:47:57 +0530
Labels:       <none>
Annotations:  <none>
Status:       Running
IP:           10.1.0.18
IPs:
  IP:  10.1.0.18
Containers:
  hello-service:
    Container ID:   docker://c3701a7b4b7b5e187c34a6970be195708251be7ff1ee8493c763001868859098
    Image:          progressivecoder/nodejs-demo
    Image ID:       docker://sha256:d976f381ae483f11417df746c217aa6253cfa1e38fa7d1d9ef3c2b541b7290e0
    Port:           <none>
    Host Port:      <none>
    State:          Running
      Started:      Mon, 31 Oct 2022 08:49:23 +0530
    Ready:          True
    Restart Count:  4
    Environment:    <none>
    Mounts:
      /var/run/secrets/kubernetes.io/serviceaccount from kube-api-access-9gmqr (ro)
Conditions:
  Type              Status
  Initialized       True
  Ready             True
  ContainersReady   True
  PodScheduled      True
Volumes:
  kube-api-access-9gmqr:
    Type:                    Projected (a volume that contains injected data from multiple sources)
    TokenExpirationSeconds:  3607
    ConfigMapName:           kube-root-ca.crt
    ConfigMapOptional:       <nil>
    DownwardAPI:             true
QoS Class:                   BestEffort
Node-Selectors:              <none>
Tolerations:                 node.kubernetes.io/not-ready:NoExecute op=Exists for 300s
                             node.kubernetes.io/unreachable:NoExecute op=Exists for 300s
Events:                      <none>
In case we want to check the entire definition of the pod, we can use the below commands. The yaml and json flags are to specify the format.
$ kubectl get po basic-pod-demo -o yaml
$ kubectl get po basic-pod-demo -o json
Step 6 – Testing the running Pods
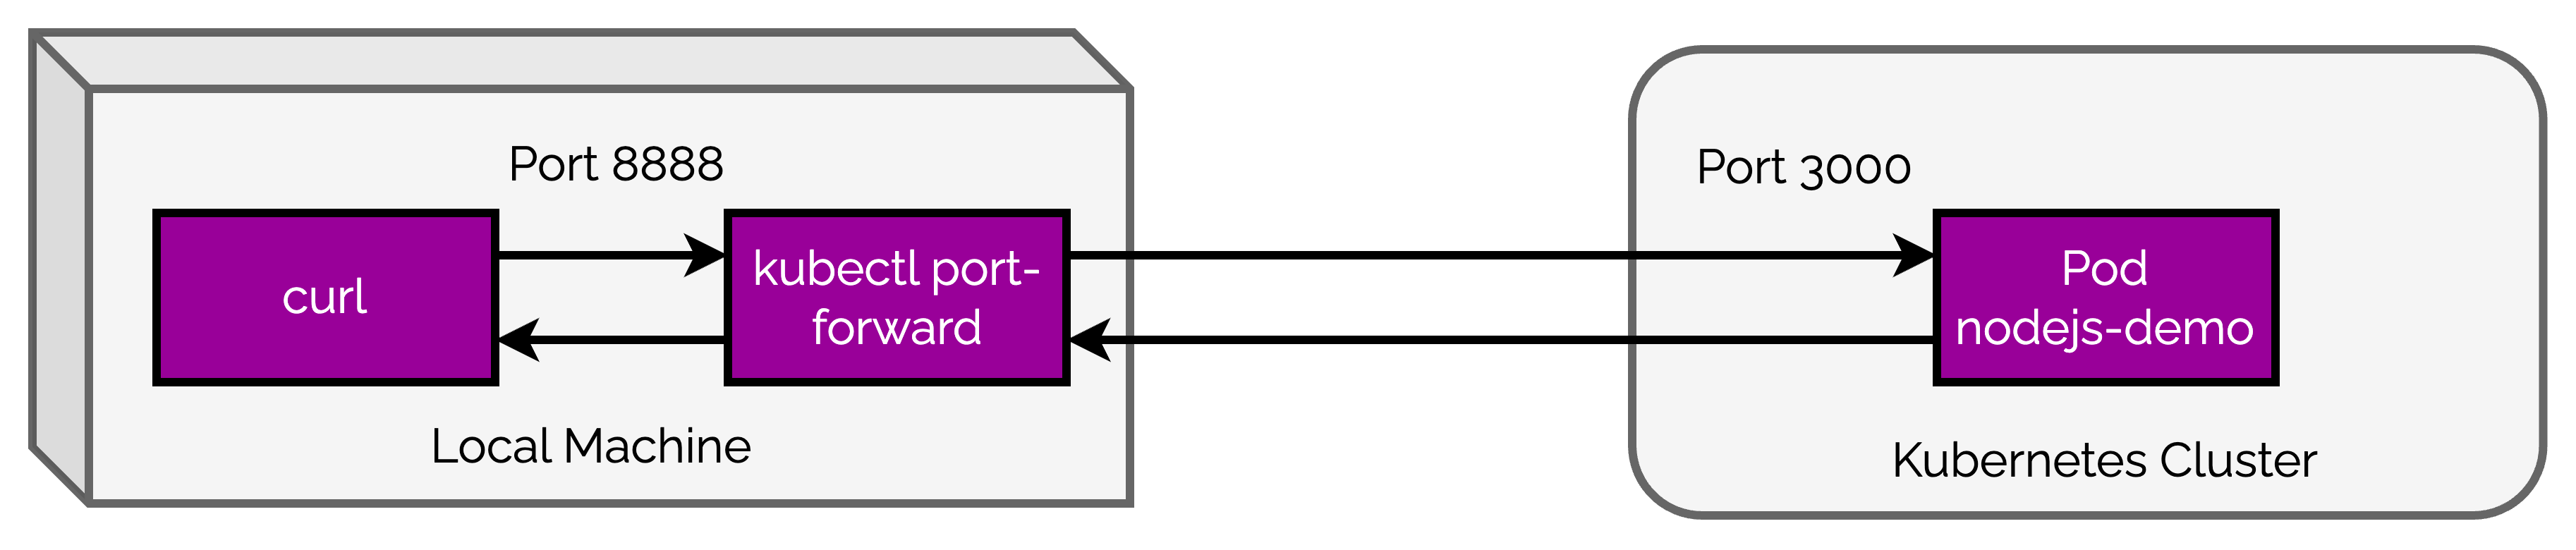
To test whether the pods are functioning as expected, you can use port-forwarding. To enable port-forwarding, issue the below command.
$ kubectl port-forward basic-pod-demo 8888:3000
Forwarding from 127.0.0.1:8888 -> 3000
Forwarding from [::1]:8888 -> 3000
Basically, this command will expose the port 3000 of the application to port 8888 of our local system. We can access our NodeJS application by making a request to http://localhost:8888.
Port-forwarding creates a secure tunnel from our local machine, through the Kubernetes master to the instance of the pod that is running on one of the worker nodes. The below illustration shows what happens behind the scenes.
Step 7 – Checking the Pod Logs
Developers can’t possibly survive without having access to logs. After all, logs are where most of the application issues are discovered.
You can access the logs of the pod by using the below command:
$ kubectl logs basic-pod-demo

> basic-pod-demo@1.0.0 start
> node app.js

Listening to requests on Port 3000
In case our pod hosts multiple containers, you can also get access to container-specific logs by providing the container name with the kubectl logs command.
kubectl logs basic-pod-demo -c hello-service

> basic-pod-demo@1.0.0 start
> node app.js

Listening to requests on Port 8080
The -c flag is used to specify the name of the container hello-service. This is the same name you used in the pod manifest YAML file.
Sometimes, Kubernetes may restart our pods for various reason. The kubectl logs command always tries to get logs from the currently running container.
However, in case of continuous restarts during the container startup phase, you might want to dig deeper into the problem and check the logs of the previous container. To do so, you can add --previous flag to get the logs from the previous instance of the container.
Step 8 – Deleting the Pods
There are a couple of ways to delete the pods. Check out the below commands that both do the same thing.
$ kubectl delete pods basic-pod-demo
$ kubectl delete -f basic-pod-demo.yaml
When a pod is deleted, it is not immediately killed. Instead, if you run kubectl get pods right after issuing the delete command, you might be able to see the pod in Terminating state.
All pods have a termination grace period. By default, this is 30 seconds.
This grace period is actually quite important. When a pod transitions to Terminating, it no longer receives new requests. However, if it was already serving some requests, the presence of grace period allows the pod to finish any active requests.
Deleting a pod is more or less a permanent event. When you delete a pod, any data stored in the containers of that pod will also be deleted. If you want to persist data across multiple instances of a pod and across pod deletions, we need to use PersistentVolumes. But more on that in a later post.
Conclusion
Pods are arguably the first tangible entity you create when learning Kubernetes as an application developer (unless you are more on the infra side and manage the clusters and nodes). In fact, the Kubernetes Pod Manifest might be the most important resource you will write while working on Kubernetes. Being clear about the role of pods and how they are different from containers is essential to making the right choices about your application.
In my experience, there is usually a one-to-one mapping between the number of unique pods and the number of applications you are deploying in your cluster. The multi-container pods are quite rare and used for specific cases such as the one we saw in this post.
Despite seeming complex in terms of various options, pods are also the most basic resource in Kubernetes. As we go along, we will get a taste of far more impactful resources that are indispensable in building a complete system.
The next logical step would be to support your application with health checks. I will be covering that in the next about Kubernetes liveness probe.
You can also learn about how to streamline configuration for application pods using Kubernetes config map.
Also, in case you are looking to setup Kubernetes in a lightweight manner, check out this post on K3S with Multipass.

0 Comments