In this post, I introduce the concept of Persistent Volume Claim in Kubernetes.
This is an extremely important concept for managing the storage needs of your applications running on Kubernetes.
1 – Why the need for Persistent Storage in Kubernetes?
Let’s say you want to host a database on the Kubernetes cluster.
You create a pod to run the database server and store the data using a normal Kubernetes Volume.
However, this approach has a problem.
When the pod is deleted, the Kubernetes Volume also gets deleted in the process. This is because the lifecycle of a typical volume is tied to the lifecycle of the pod.
Of course, you can use something like the Kubernetes hostPath volume to store data on the node itself.
But in this case, the issue is that Kubernetes may reschedule a particular pod to run on a completely different node within the cluster.
Clearly, this won’t work for a database instance or any other application that needs to store data and access it across pod restarts.
This is where we need to have persistent storage in Kubernetes.
2 – Two Approaches for Kubernetes Persistent Storage
Typically, you have two approaches to setting up persistent storage in Kubernetes.
Let’s look at them both:
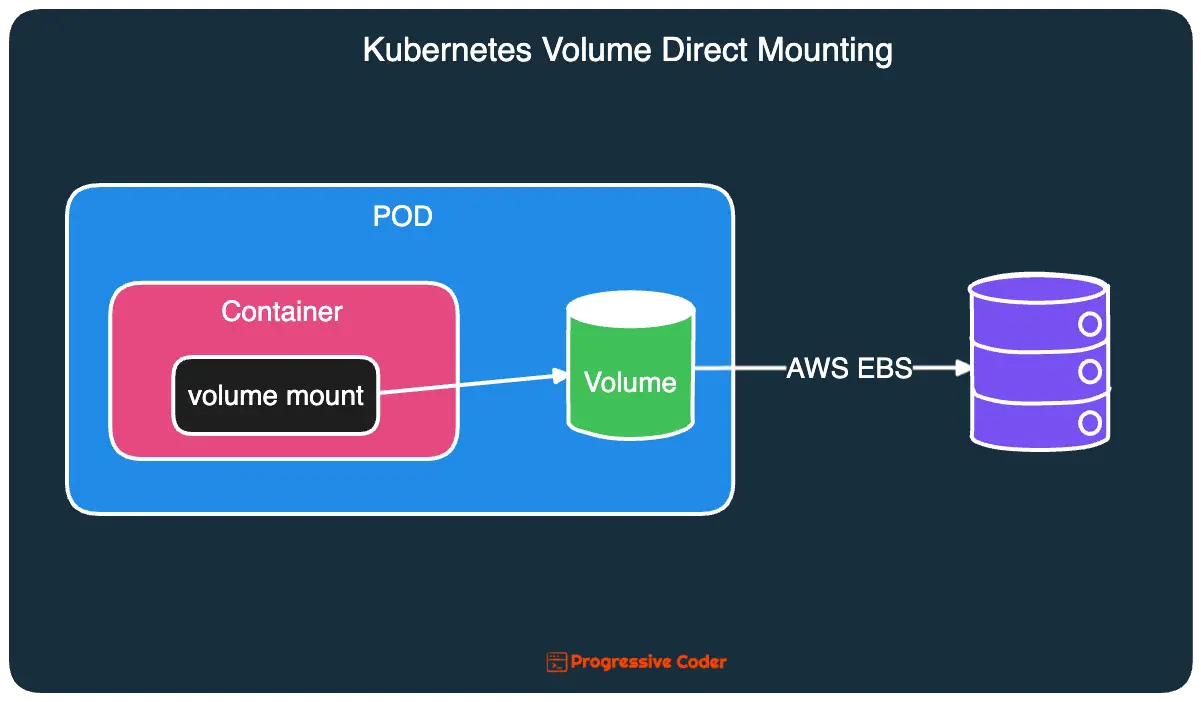
2.1 – Direct Mounting
In this case, you provision some sort of persistent storage such as AWS Elastic Block Store or a Network File System and use this storage in a Kubernetes volume.
Here’s an example of using an AWS Elastic Block Store in a Kubernetes Pod.
apiVersion: v1
kind: Pod
metadata:
  name: mongodb
spec:
  volumes:
  - name: mongodb-data
    awsElasticBlockStore:
      volumeId: my-volume
      fsType: ext4
  containers:
  - image: mongo
    name: mongodb
    volumeMounts:
    - name: mongodb-data
      mountPath: /data/db
    ports:
    - containerPort: 27017
      protocol: TCP
As you can observe, the volume is directly pointing to awsElasticBlockStore.
Here’s an illustration that depicts this arrangement:
2.2 – Decoupling Pods from Underlying Storage
While direct mounting serves its purpose, it also ties your Kubernetes manifest files to the underlying storage technology.
What if you want to deploy the pod on some other platform where AWS EBS is not available?
You’ll be forced to change all such pods according to the new platform.
However, this wasn’t the true promise of Kubernetes. The goal of Kubernetes is to hide the complexities of the actual infrastructure from the application and its developer and make the applications portable across a wide array of cloud providers and on-premises data centers.
The idea is to have manifest files decoupled from the underlying platform so that you can run them on any other Kubernetes installation without causing massive disruption.
This is where Persistent Volumes and Persistent Volume Claims come into the picture.
3 – Introducing Kubernetes Persistent Volume & Persistent Volume Claims
In the normal direct mounting approach, a developer has to worry about the type of storage and how to provision it.
Ideally, developers should not be worrying about these things.
They should just request a certain amount of persistent storage for their application and Kubernetes should take care of the details.
Kubernetes Persistent Volumes (PVs) and Persistent Volume Claims (PVCs) do exactly that.
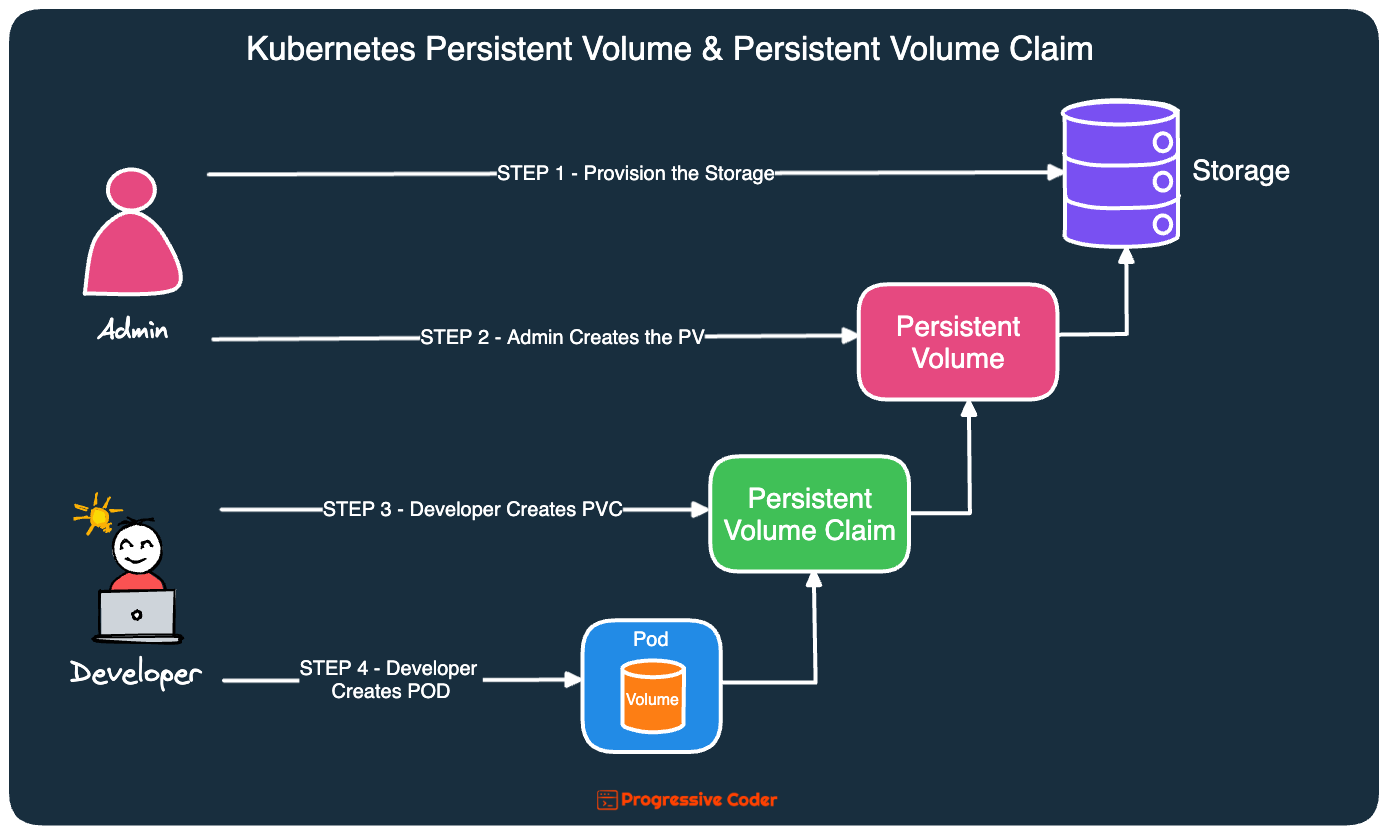
Here’s how the process looks like:
STEP 1 & 2
The cluster administrator sets up the storage and registers it with Kubernetes by creating a Persistent Volume (PV) resource.
This resource basically specifies the size of the storage and the various access modes it supports.
STEP 3
When a developer needs the storage in a pod, they create a Kubernetes Persistent Volume Claim resource.
In the manifest file for the PVC, the developer can specify the minimum size and access mode they require. The manifest is then provided to the Kubernetes API and if everything checks out fine, Kubernetes binds an existing Persistent Volume to the claim.
STEP 4
With the PV and PVC created successfully, the developer can now use the PVC as a Kubernetes Volume within the pod.
The below illustration shows the entire process in detail:
As you can see, this process hides storage-related concerns from the developer workflow.
A developer only creates a PVC and that’s about it. The complexity of the actual storage technology is shifted to the cluster administrator.
Also, the Pod manifests no longer point to the storage directly. They just contain the details of the PVC.
Note that Persistent Volume is available at the cluster level. However, Persistent Volume Claim is at the level of a particular namespace.
Let’s now look at some examples of the PVC.
4 – Kubernetes Persistent Volume Claim Example
To create the PVC, we first need to create a PV.
Here’s a YAML manifest file for a Kubernetes Persistent Volume.
apiVersion: v1
kind: PersistentVolume
metadata:
  name: my-aws-ebs-pv
spec:
  capacity:
    storage: 10Gi
  volumeMode: Filesystem
  accessModes:
    - ReadWriteOnce
  persistentVolumeReclaimPolicy: Retain
  awsElasticBlockStore:
    volumeID: <your_ebs_volume_id>
    fsType: ext4
Explanation for the fields is as follows:
- In the spec section, the storage capacity specifies the storage requirement of the volume.
- The
volumeModespecifies whether the volume should be mounted as a block device or a filesystem. In this case, it’s set to Filesystem. - The
accessModesdefine the access modes for the volume.ReadWriteOncemeans it can be mounted as read-write by a single node. - Next, the
persistentVolumeReclaimPolicydefines what happens to the Persistent Volume when it’s released. In the example, we set it to “Retain” meaning it won’t be deleted automatically and should be manually reclaimed. - Lastly, we have the details about the
awsElasticBlockStorei.e. thevolumeIdand thefsType.
You can apply the persistent volume using kubectl. Once that’s done, you can now create the persistent volume claim.
Here’s the YAML file for PVC:
apiVersion: v1
kind: PersistentVolumeClaim
metadata:
  name: my-aws-ebs-pvc
spec:
  accessModes:
    - ReadWriteOnce
  resources:
    requests:
      storage: 5Gi
  storageClassName: ""
  volumeName: my-aws-ebs-pv
Explanation for the fields is as follows:
- In the spec section, we have the
accessModesset to ReadWriteOnce. - Next, we have the
resourcessection where we specify thestoragecapacity needed by the claim. This should be less than or equal to the one defined in the PV. - You also have the
storageClassNamefield left blank in this case. This is for dynamic provisioning but more on that in a later post. - Lastly, you have the name of the persistent volume.
Once you apply the PVC and it gets bound to the PV, you can now go ahead and use it the PVC within the Pod.
See the below example:
spec:
  containers:
  - name: my-container
    image: nginx:latest
    volumeMounts:
    - name: my-pvc-volume
      mountPath: /data
  volumes:
  - name: my-pvc-volume
    persistentVolumeClaim:
      claimName: my-aws-ebs-pvc
As you can see, the persistentVolumeClaim points to the claimName we created in the previous step.
Once you create the pod, it will claim the storage defined by the persistent volume.
5 – Kubernetes Persistent Volume Lifecycle
PVCs represent requests for PV resources. But their lifecycle is intertwined with each other.
Let’s look at the various phases:
Provisioning – The physical storage is available for consumption by the user.
Binding – This is where the Kubernetes matches the PVC with an appropriate PV. On finding a match, Kubernetes binds the PV to the PVC.
Using – This is the part where a pod consumes a PVC resource by attaching it to a volume.
Reclaiming – This is the phase where the user (pod) is done consuming the volume, allowing for the reclamation of the storage space. Typically, the reclaim policies are RETAIN or DELETE.
Conclusion
With this, you have successfully learned the secrets of Kubernetes Persistent Volume Claim and how to setup one for your pod.
However, Kubernetes is constantly evolving.
Basically, we used static provisioning in this post. But Kubernetes also allows you to perform dynamic provisioning of storage using the concept of storage classes.
Check out my post on Kubernetes Storage Class to learn more about it.
If you have any comments or queries about this post, please mention them in the comments section below.

0 Comments