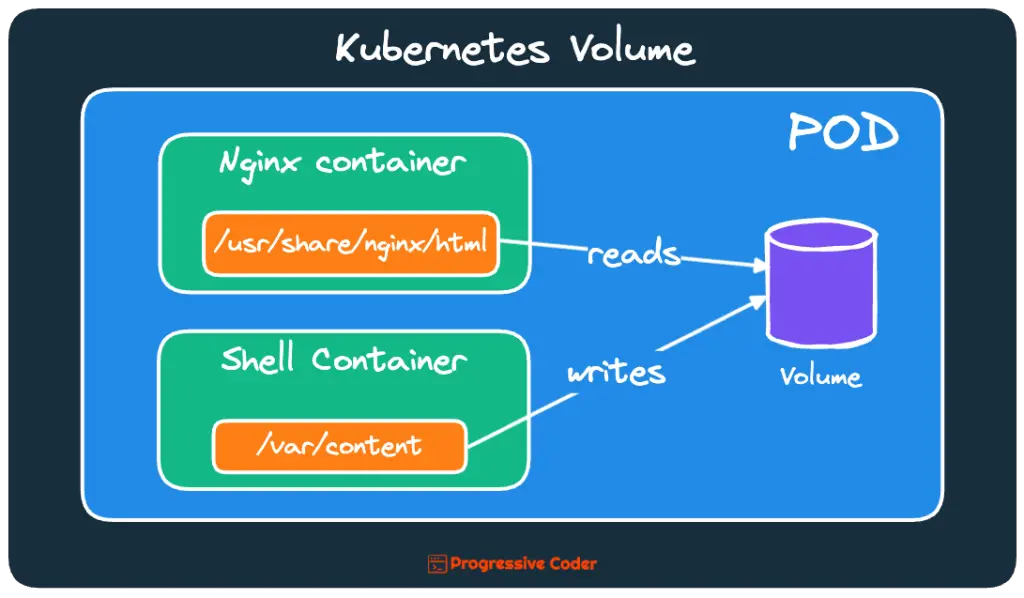
The emptyDir is the simplest type of Kubernetes Volume. As the name suggests, this type of volume starts out as an empty directory.
When the application inside the pod runs, it can write any files to the emptyDir volume.
The best use of an emptyDir Kubernetes Volume is sharing files between containers running inside a single pod. Of course, that does not mean you can’t use this type of volume with a single container.
In this post, I will walk through the process of creating an emptyDir Kubernetes Volume that’s shared between two containers.
1 – The Motivation App
To demonstrate the role of Kubernetes volumes, let’s build a small motivation app.
This app will consist of two parts:
- A shell script that generates motivational quotes every 10 seconds
- Nginx web server that serves those motivational quotes
Both of these parts will be handled in different containers that are part of the same Kubernetes Pod.
Where does volume come into the picture?
Basically, both of these containers are going to share the same Kubernetes volume. The shell script will write the motivational quote into an HTML file. The Nginx web server will server that HTML file.
Here’s what it will look like in practice:
By the way, if you are interested in Kubernetes and Cloud Native technologies, you’d love the Progressive Coder newsletter where I talk about such topics in an interesting way.
Subscribe now to join along.
2 – The Shell Script Container Image
To generate motivational quotes, I’m using the motivate script. Here’s the link to the GitHub repository.
Below is the shell script that will generate a new motivational quote every 10 seconds using the motivate script.
#!/bin/bash
trap "exit" SIGINT
mkdir /var/content
while :
do
    echo ${date} Writing motivational quote to /var/content/index.html
    /usr/local/bin/motivate > /var/content/index.html
    sleep 10
done
Nothing fancy over here.
We just store the output of the motivate script to /var/content/index.html file. Every 10 seconds, this file is going to contain a new motivational quote.
To run this script, you need to create a Docker container. Here’s the Dockerfile for the same:
FROM ubuntu:latest
RUN apt-get update; apt-get -y install git python3
RUN git clone https://github.com/mubaris/motivate.git
RUN cd motivate/motivate; ./install.sh
ADD motivation.sh /bin/motivation.sh
RUN ["chmod", "+x", "/bin/motivation.sh"]
ENTRYPOINT /bin/motivation.sh
Basically, you are cloning the motivate shell script from GitHub and installing the same.
As part of the ENTRYPOINT command, you are simply running the motivation.sh script.
You can build the image using the below command:
$ docker build -t progressivecoder/motivation .3 – Creating a Pod with emptyDir Kubernetes Volume
With the shell script ready, it’s time to create the Kubernetes Pod with the emptyDir Kubernetes Volume.
Below is the YAML file:
apiVersion: v1
kind: Pod
metadata:
  name: motivation
spec:
  containers:
  - name: html-generator
    image: progressivecoder/motivation
    imagePullPolicy: Never
    volumeMounts:
    - name: html
      mountPath: /var/content
  - name: web-server
    image: nginx:alpine
    volumeMounts:
    - name: html
      mountPath: /usr/share/nginx/html
      readOnly: true
    ports:
    - containerPort: 80
      protocol: TCP
  volumes:
    - name: html
      emptyDir: {}
As you can notice, there are 2 containers within the pod.
- The 1st container is named
html-generator. Basically, this container runs the shell script you created in the previous step. ThevolumeMountssection specifies where exactly the Kubernetes volume will be mounted. In this case, themountPathis/var/content. - This means that whenever the shell script will write to the
index.htmlfile within the/var/contentdirectory, it’s going to be written to the Kubernetes volume namedhtml. - The 2nd container is the Nginx webserver. It also uses the same Kubernetes volume named
html. However, in this case, the volume is mounted to the path/usr/share/nginx/html. In case you aren’t aware, Nginx serves theindex.htmlfile present at this path. - At the end of the file, you have the
volumessection. This is where you declare the Kubernetes volume and its attributes. In this case, you simply specify thenameand the type (emptyDir) of the volume.
Time to start the Kubernetes pod.
$ kubectl apply -f motivation-pod.yamlIf everything has gone through fine, the Kubernetes Pod should start up.
To test your web-server, you can quickly forward a port from your local machine to the pod.
$ kubectl port-forward motivation 8080:80Or you can expose a Kubernetes service outside the cluster.
After exposing the web server, you can visit http://localhost:8080 and get motivated by all the amazing motivational quotes.
In case of any issues, here are a few command that can help you figure out things:
To check the logs for both the containers:
$ kubectl logs motivation --all-containersTo open an interactive shell into one of the containers:
$ kubectl exec -it motivation -c html-generator bashOnce you have the access, you can check the quotes generated in the index.html file.
root@motivation:/var/content# cat index.html
"You have no responsibility to live up to what other people think you ought to accomplish. I have no responsibility to be like they expect me to be. It's their mistake, not my failing."
		-- Richard P. Feynman
It’s pretty cool when both the containers work well together.
Conclusion
That’s all for this post.
In this post, you learned how to create an emptyDir Kubernetes Volume to share storage between two containers running in the same pod. You basically made a mini-application to demonstrate how the two containers share storage.
In case you are looking for more such applications, do check out my post about implementing sidecar containers in Kubernetes.
Also, if interested, you can check out this post about how to use a git repository as Kubernetes Volume.
In case you are interested in checking about persistent storage in Kubernetes, the below posts might help you:
If you have any comments or queries, please mention them in the comments section below.
Anyways, before we end this post, a quick reminder about the Progressive Code Newsletter where I explain software concepts using a storytelling approach so that you never forget what you’ve learned. I’m 100% sure you’d love it.
Subscribe now and see you over there.

0 Comments