In this post, we will learn how to create a NestJS Microservice using Request Response approach.
Over the years, Microservices have gained a lot of popularity in the developer community. While microservices are not a silver bullet, they are pretty useful in many use-cases.
NestJS natively supports microservice architectural style. However, there is a key aspect of NestJS Microservices. In NestJS, a microservice is an application that uses a transport layer other than HTTP.
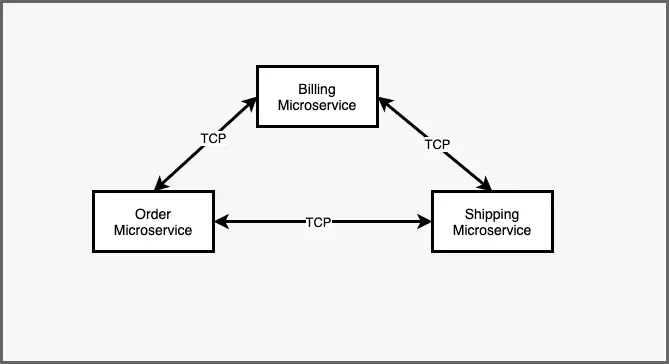
The above illustration depicts an example of microservices in a typical e-commerce scenario. There are different services for managing orders, handling billing and finally, shipping the products. However, all these microservices communicate with each other using TCP.
NestJS supports several transport layers apart from TCP. Also, it supports different approaches such as Request Response and Event-Based. We will explore all the concepts in future posts. However, in this specific post, we will be looking at NestJS Microservice using Request Response approach with TCP Transporter
1 – Installation
We first install the necessary packages using the below command:
$ npm i --save @nestjs/microservices
Basically, this package makes it easy to build microservices using NestJS.
2 – Creating a NestJS Microservice
The next step is to actually create a microservice. To do so, we basically use the createMicroservice() method from the NestFactory class.
See below code:
import { NestFactory } from '@nestjs/core';
import { MicroserviceOptions, Transport } from '@nestjs/microservices';
import { AppModule } from './app.module';

async function bootstrap() {
  const app = await NestFactory.createMicroservice<MicroserviceOptions>(
    AppModule,
    {
      transport: Transport.TCP,
      options: {
        host: '127.0.0.1',
        port: 8080,
      }
    }
  )
  await app.listen();
}
bootstrap();
The createMicroservice() method takes two arguments. First is the AppModule. The second is an options object.
The options object also consists of two parts. First, we specify the transport layer (in this case TCP). Next, we supply another options object. Using it, we specify the host and port for our microservice.
The second options object depends on the chosen transport layer. Below are the TCP Transporter properties as below:
| host | Hostname of the connection |
| port | Connection port |
| retryAttempts | Number of times to retry the message |
| retryDelay | Delay while retrying |
Basically, this properties can vary based on the type of transport used.
3 – Request Response Message Pattern
Patterns are a key part of microservices in NestJS. Microservices recognize messages by using a specific pattern.
Basically, a pattern is a plain value of string format. They are also sent along with the actual data portion of the message. In other words, patterns help senders and consumers co-ordinate on which microservices handles which particular pattern.
These patterns are used in the request response approach. As the name suggests, a request response approach is useful when we need to exchange messages between various services. With this approach, we can be sure that the service has actually received the message.
To enable request response, NestJS creates two separate channels. Basically, these are logical channels. First channel transfers the data while the other waits for responses. This may create an overhead. Therefore, it is advisable to use event-based approach if request response is not strictly required.
See below illustration to understand the message pattern approach.
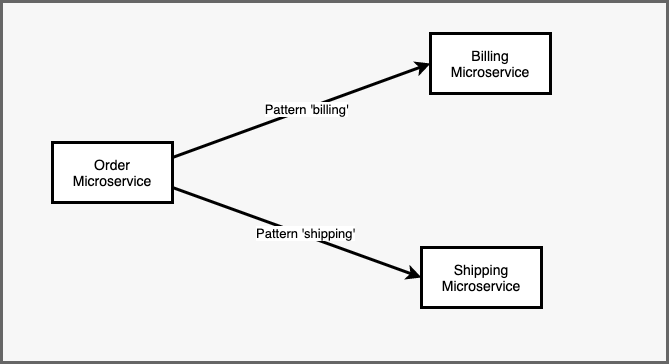
Here, all messages with pattern billing are handled by the billing microservice. Similarly, messages with pattern shipping go to the shipping microservice. In this way, message patterns help routing the messages to their correct destinations within an application. In other words, you can think of patterns as pin codes.
4 – Creating a Message Handler
To create a message handler based on request response approach, we use the @MessagePattern() decorator. See below example:
import { Controller, Get } from '@nestjs/common';
import { MessagePattern } from '@nestjs/microservices';

@Controller()
export class AppController {

  @MessagePattern({cmd: 'greeting'})
  getGreetingMessage(name: string): string {
    return `Hello ${name}`;
  }
}
For demo purpose, we are creating a very simple service that returns a greeting message based on the input string. The message pattern for the same is the object {cmd: ‘greeting’}. Any message with this pattern will be handled by the annotated handler method. The handler method only takes the data as input. In this case, it is a simple string.
Note that the @MessagePattern() decorator can be used only in a controller class. This is because controllers are the entry points to our application. If we use the pattern inside providers, NestJS simply ignores them during runtime.
You can read more about controllers and providers in our detailed posts about NestJS Controllers and NestJS Providers.
Message handlers can also response asynchronously. See below example where our handler returns a Promise.
@MessagePattern({cmd: 'greeting-async'})
async getGreetingMessageAysnc(name: string): Promise<string> {
    return `Hello ${name}`;
}
Note that the message pattern here is {cmd: ‘greeting-async’}.
5 – Creating the Client Application
Now that we have built the service, it is time to build a client. In the context of microservices, a client can also be another service of its own. In our demo, it is simply another NestJS application that sends a request to the greeting-service.
The first step is to configure the client to talk to our greeting-service. See below:
import { Module } from '@nestjs/common';
import { ClientsModule, Transport } from '@nestjs/microservices';
import { AppController } from './app.controller';
import { AppService } from './app.service';

@Module({
  imports: [
    ClientsModule.register([
      {name: 'GREETING_SERVICE',transport: Transport.TCP,
      options : {
        host: '127.0.0.1',
        port: 8080
      }
    }
    ])
  ],
  controllers: [AppController],
  providers: [AppService],
})
export class AppModule {}
Here, we use the register() method of the ClientsModule to register the greeting-service. Notice the token GREETING_SERVICE. We will use this to inject the service in the client. Also, we specify the transport method (TCP) and another options object. This options object provides details of where to access the greeting-service. Basically, this should match the values configured in the greeting-service main.ts file.
Next, we can send a message to the greeting-service. See below code from the app.service.ts file.
@Injectable()
export class AppService {

  constructor(@Inject('GREETING_SERVICE') private client: ClientProxy){}

  async getHello(){
    return this.client.send({cmd: 'greeting'}, 'Progressive Coder');
  }

  async getHelloAsync() {
    const message = await this.client.send({cmd: 'greeting-async'}, 'Progressive Coder');
    return message;
  }
}
We first inject the greeting-service using the token inside the constructor. Basically, the ClientProxy class acts as a bridge between the client and the service. We can use an instance of ClientProxy to send messages.
Finally, we can send a message using the send() method of the ClientProxy instance. The send() method takes the message pattern and the actual data or the payload as input. We use the message pattern {cmd: ‘greeting’} and {‘cmd’: ‘greeting-async’}. The pattern will help determine which handler will handle the message.
Conclusion
With this, we have learnt how to create a NestJS Microservice using Request Response approach. We started by understanding the basic premise of microservices. Then, we built a small greeting-service and also a client to interact with this service to exchange messages using message patterns.
The code for this post is available on Github.
In the next post, we will be looking at NestJS Microservices using Event-Based approach.
If you have any queries or comments, please write in the comments section below.

4 Comments
binhle · June 30, 2022 at 8:32 am
Hello sir, you example so good. But how client receive response from greeting-services? Thank you so much
Saurabh Dashora · July 4, 2022 at 2:08 am
Thanks for the kind feedback!
The client is receiving the response in this particular function. Basically, it uses the TCP protocol.
async getHelloAsync() {const message = await this.client.send({cmd: 'greeting-async'}, 'Progressive Coder');
return message;
}
Precious · September 18, 2022 at 11:05 pm
Hello Saurabh Dashora,
thanks for this article , after following your tutorial, i noticed this thing,
when using Request Response , and messages are send via the client microservice, if their arent any consumers or listeners , the messages would be lost , and they wont be handled ,
do you have any suggestion on how solve such issue, so that even if the consumer is not available , messages can still be in the queue , until a consumers handles it ,
Saurabh Dashora · September 19, 2022 at 1:44 am
Hello, for processing lost messages, you could look into something like a Dead letter queue.