Ingress means the act of going in or entering. Also, a means or place of entering or entryway.
That’s the job of a Kubernetes Ingress Resource.
In a previous post, we saw how to expose the Kubernetes NodePort service to the outside world. But it’s quite a primitive approach to expose a service.
But what makes the Kubernetes Ingress resource special?
That’s because Ingress does so much heavy-lifting in terms of features such as:
- Load balancing
- SSL termination
- Name-based hosting
- Operating at the application layer of the network
- Support for multiple services with a single IP address
Here’s the big-picture view of the Kubernetes Ingress resource.
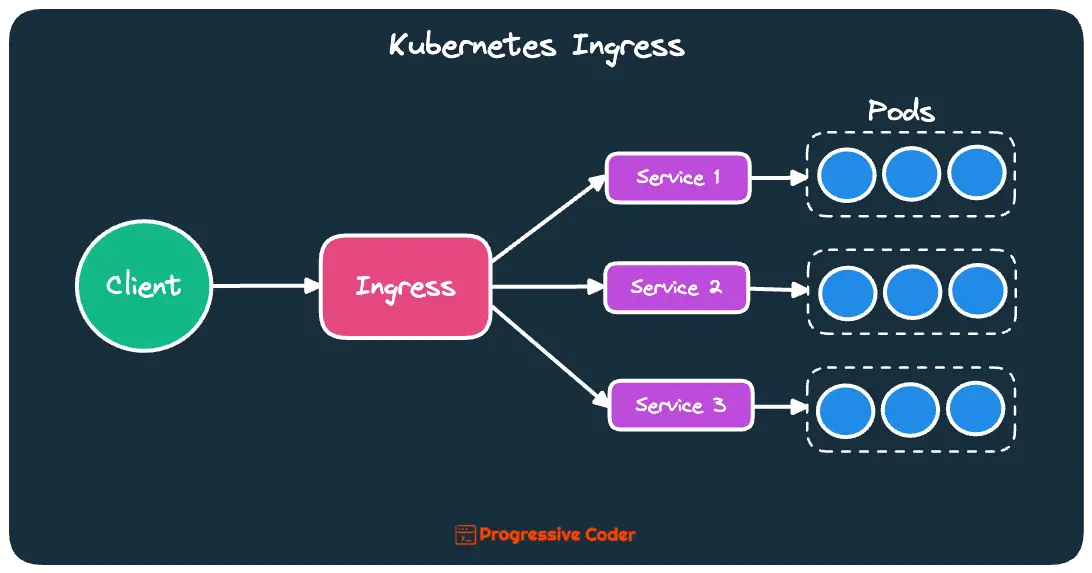
As you can see, one Ingress resource can act as the gatekeeper for multiple services.
Let’s look at setting one up as a demo and see it in action.
1 – The Role of Ingress Controller
The Ingress resource doesn’t work on its own.
You need an Ingress controller running within your cluster. Think of this controller as the brains behind the whole Ingress magic.
Now, the Ingress controller isn’t a straightforward matter, either. Different Kubernetes environments provided by vendors use different implementations of the controller. Some don’t even provide a default controller at all.
Anyways, that’s not the scope of this post. For our demo purpose, you can check whether an Ingress controller is already present by checking all the pods within the cluster.
$ kubectl get po --all-namespacesI’d be looking for something like this:
ingress-nginx ingress-nginx-controller-555596df87-4p46d 1/1 Running 1 (159m ago) 2d2hIf nothing is there, don’t fret. You can always install it as an add-on.
Here’s the command to install the ingress-nginx controller. It’s a particular implementation of the Ingress controller that works well in most cases.
$ kubectl apply -f https://raw.githubusercontent.com/kubernetes/ingress-nginx/controller-v1.8.0/deploy/static/provider/cloud/deploy.yamlWhen you execute the above command, a bunch of resources get created.
namespace/ingress-nginx created
serviceaccount/ingress-nginx created
serviceaccount/ingress-nginx-admission created
role.rbac.authorization.k8s.io/ingress-nginx created
role.rbac.authorization.k8s.io/ingress-nginx-admission created
clusterrole.rbac.authorization.k8s.io/ingress-nginx created
clusterrole.rbac.authorization.k8s.io/ingress-nginx-admission created
rolebinding.rbac.authorization.k8s.io/ingress-nginx created
rolebinding.rbac.authorization.k8s.io/ingress-nginx-admission created
clusterrolebinding.rbac.authorization.k8s.io/ingress-nginx created
clusterrolebinding.rbac.authorization.k8s.io/ingress-nginx-admission created
configmap/ingress-nginx-controller created
service/ingress-nginx-controller created
service/ingress-nginx-controller-admission created
deployment.apps/ingress-nginx-controller created
job.batch/ingress-nginx-admission-create created
job.batch/ingress-nginx-admission-patch created
ingressclass.networking.k8s.io/nginx created
validatingwebhookconfiguration.admissionregistration.k8s.io/ingress-nginx-admission created
Wow, that’s a lot of things to make Ingress work. But I promise it’ll be worth it.
Check for the ingress-nginx pod again and give a moment for the necessary pod to start running.
In the meantime, you can subscribe to the free Progressive Code Newsletter where I explain software concepts using a storytelling approach so that you never forget what you’ve learned. You’d love it.
Anyways, back to the Ingress Controller.
With the setup out of the way, it’s time to create the Ingress resource.
2 – Creating the Kubernetes Ingress Resource
Below is the YAML manifest while for a brand-new Ingress resource:
apiVersion: networking.k8s.io/v1
kind: Ingress
metadata:
  name: ingress-demo
  annotations:
    nginx.ingress.kubernetes.io/rewrite-target: /
    kubernetes.io/ingress.class: "nginx"
spec:
  rules:
  - host: kubernetes.docker.internal
    http:
      paths:
      - path: /demo
        pathType: Prefix
        backend:
          service:
            name: nodeport-demo
            port:
              number: 80
I hope you want to understand what’s going on over here.
Here’s the breakdown:
- The
apiVersionandkindare pretty self-explanatory as we are trying to tell Kubernetes what type of resource we want to create. - Next up, there is the
metadatasection. It has anamefield for the Ingress resource. Then, we have theannotationssection. - The annotation
nginx.ingress.kubernetes.io/rewrite-targetspecifies the Target URI where the incoming traffic must be redirected. It’s important property so don’t miss it. - The next one i.e.
kubernetes.io/ingress.classis meant to link the Ingress resource with the Ingress controller. Hence the value ‘nginx’. - Moving on, we have the
specsection. It’s the place where the Ingress magic happens as we specify therulesthat will govern the routing. - Within the
rulessection, you have thehost. I have usedkubernetes.docker.internalas this is something that’s available out of the box. Within thehost, we have thehttpsection that contains a list ofpaths. - For each path, you need to specify the path value, its type, and the corresponding backend service name.
- In the above example, I’m pointing
/demopath to a service namednodeport-demoavailable on port 80.
And that’s basically all that is needed.
Information
Note that if you use any other host such as demo.example.com, you need to make appropriate changes to the DNS so that it resolves the domain name to the IP of the Ingress controller. If you are trying this out locally on something like Docker Desktop, you can directly use kubernetes.docker.internal as the hostname.
In case you are looking for the definition of the Node Port service, here’s the YAML for that as well.
apiVersion: v1
kind: Service
metadata:
  name: nodeport-demo
spec:
  type: NodePort
  ports:
  - port: 80
    targetPort: 3000
    nodePort: 30100
  selector:
    app: hello-service
Once you have applied the resources and made changes to the DNS if needed, you can actually see the Ingress in action.
You can go to your browser and visit the URL http://kubernetes.docker.internal/demo and if there is proper backing application, you’ll see the response.
3 – How the Kubernetes Ingress actually works?
Though things may be working fine, it’s also important to understand how the wheel actually turns.
And there are a few interesting things about how the Kubernetes Ingress actually works.
Here’s an illustration showing the same.
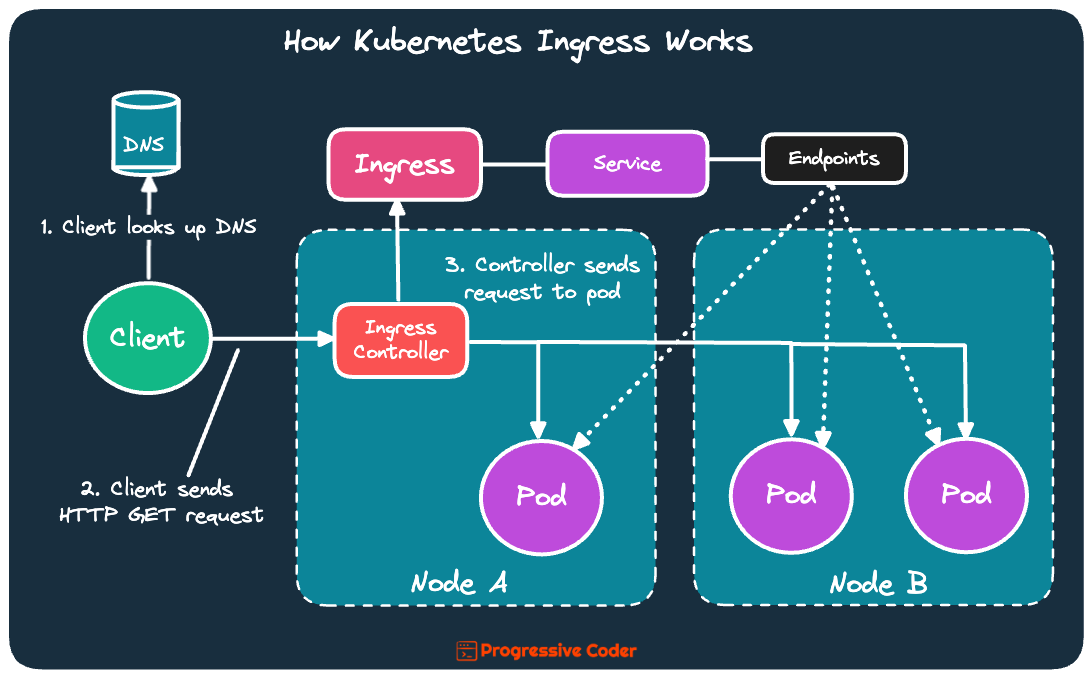
The below steps can help you figure it out:
- The client first performs a DNS lookup of the hostname from the DNS server and gets the IP address of the Ingress controller.
- Then, the client sends an HTTP request to the Ingress controller with the hostname in the
Hostheader. - The controller determines the correct service based on the hostname, checks the Endpoints object for the service, and forwards the client’s request to one of the pods.
- Note that the Ingress controller doesn’t forward the request to the service. It only uses the service to select a particular pod.
If interested, you can read more about the role of Endpoints in Kubernetes.
Conclusion
That’s all for this post. But don’t think that Kubernetes Ingress is done and dusted.
Some of the further topics to explore are:
Anyways, before we end this post, a quick reminder about the Progressive Code Newsletter where I explain software concepts using a storytelling approach so that you never forget what you’ve learned. I’m 100% sure you’d love it.
Subscribe now and see you over there.

0 Comments