In a previous post, I covered the topic of middleware functions in NestJS.
Following on from there, this post will focus on NestJS interceptors and when you may need to use interceptors instead of middleware functions.
Here’s what you are going to learn:
- What is a NestJS interceptor?
- Understanding the concept of Aspect-Oriented Programming
- Creating a NestJS Interceptor
- Binding the Interceptor
- controller-scoped
- method-scoped
- global-scoped
- Response Mapping Interceptor
- Exception Mapping Interceptor
- Timeout Interceptor
Make no mistake. Interceptors are a key component of the NestJS fundamental series and should not be ignored.
1 – What are NestJS Interceptors?
The term “interceptor” might sound like the name of a Jason Statham movie, but it is simply another TypeScript class with a few specific features.
Here are those specific features:
- The class should be annotated with the
@Injectable()decorator. You can read more about this decorator in my post on NestJS providers. - It should implement the
NestInterceptorinterface.
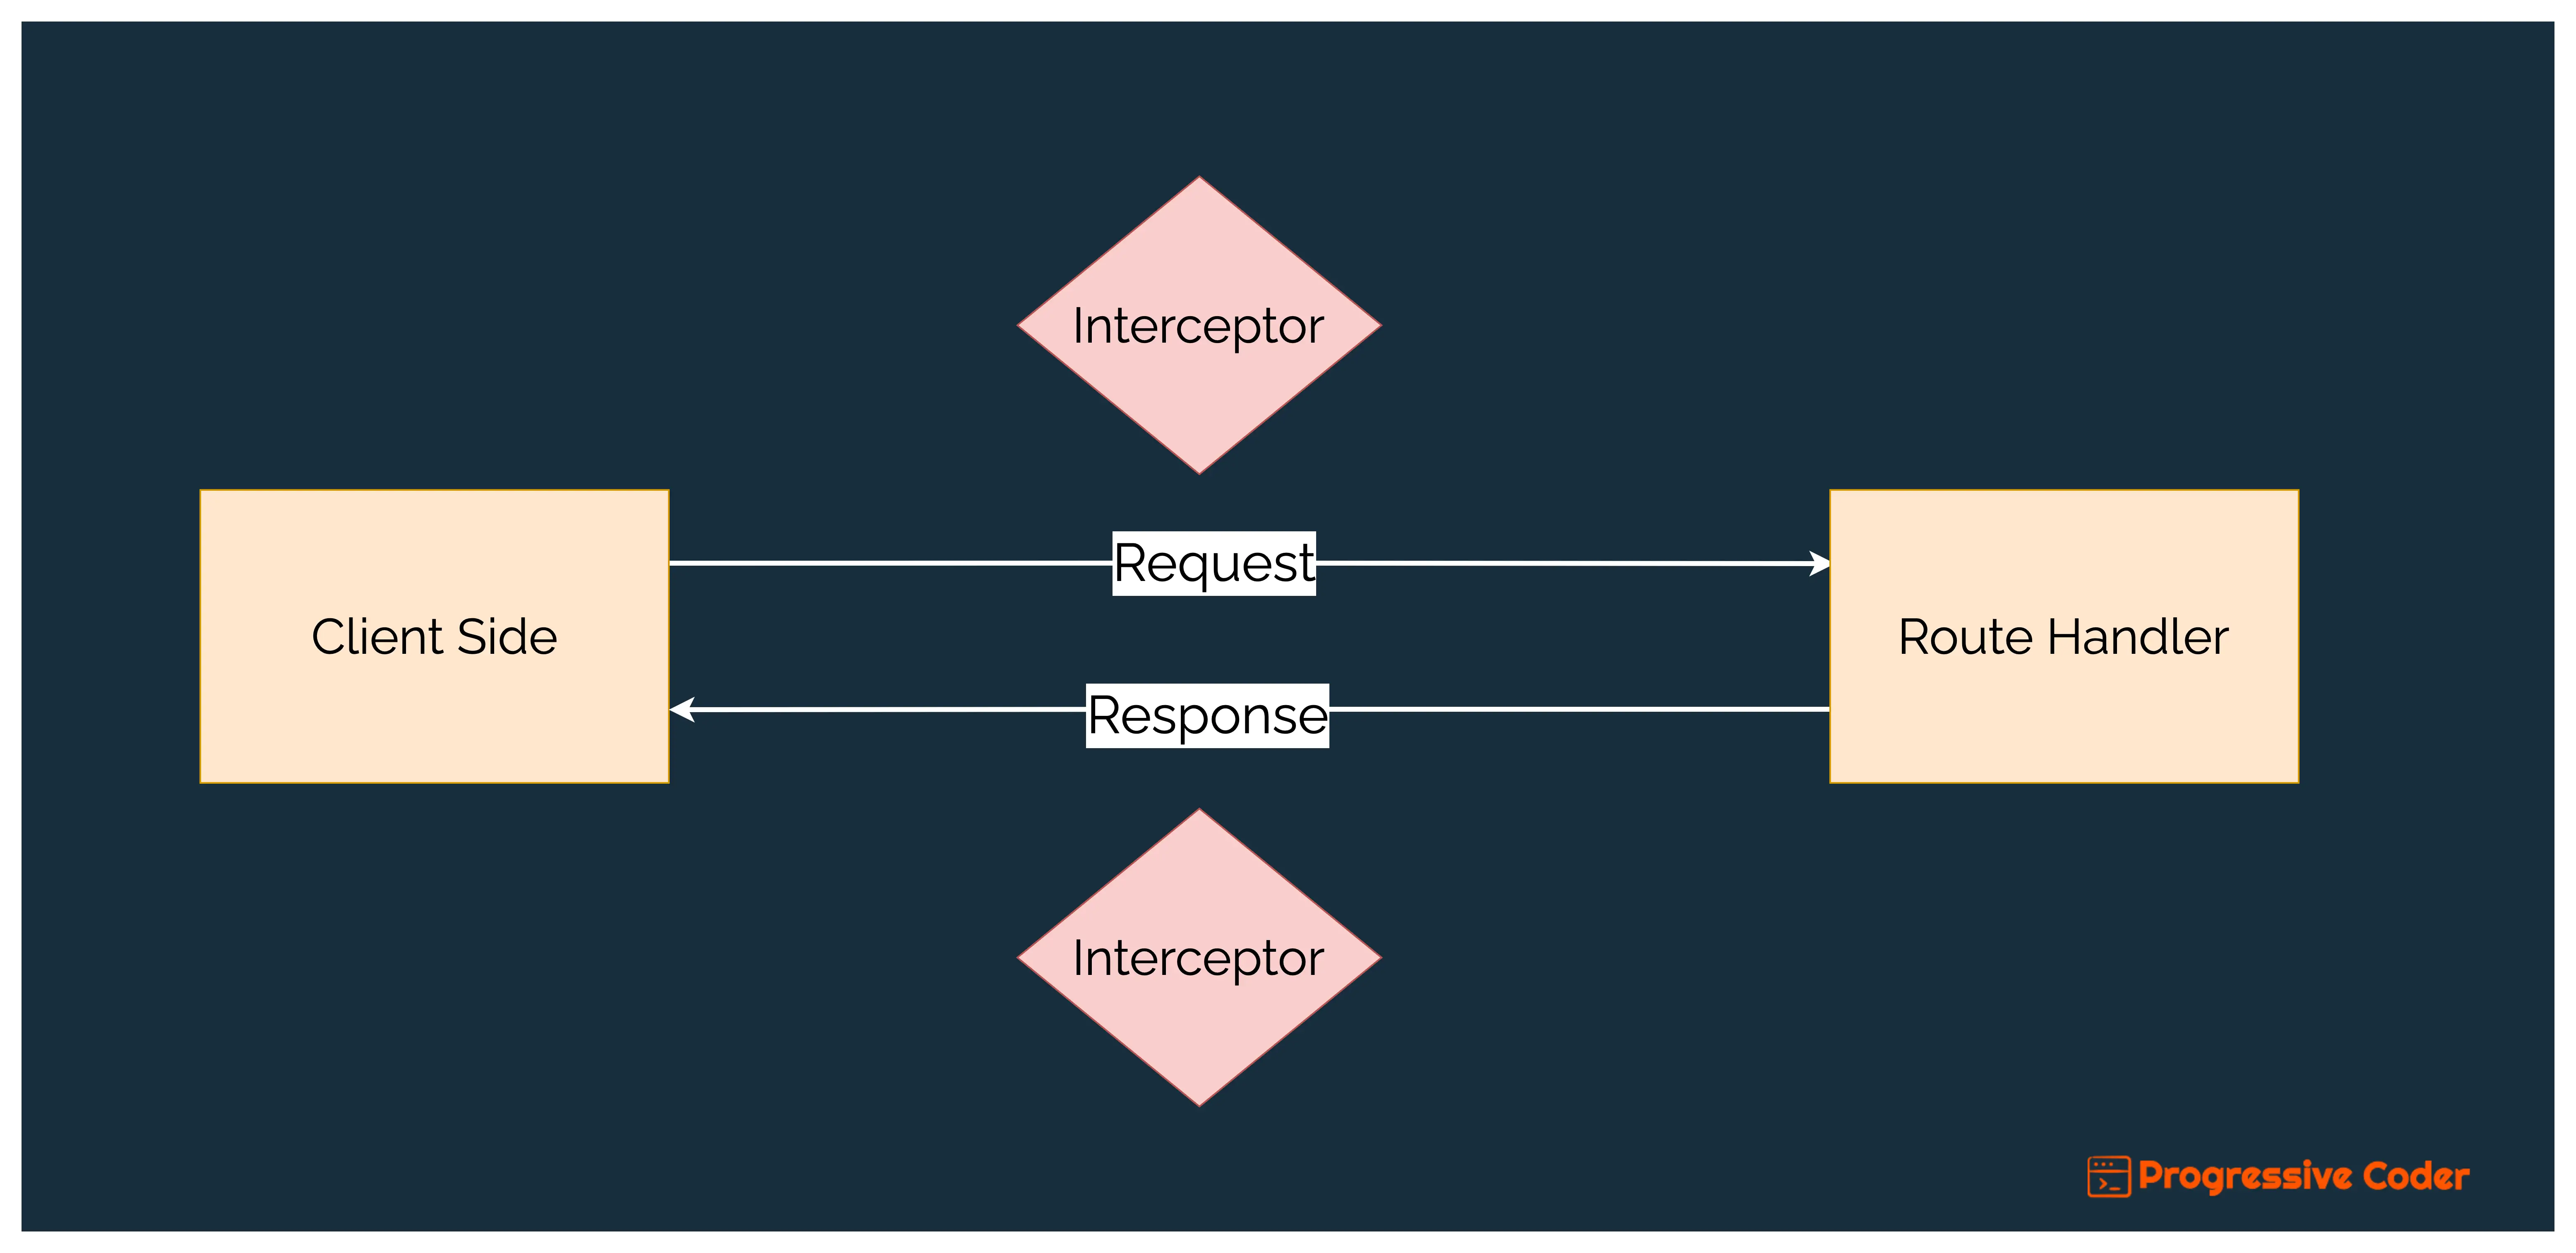
See below illustration for an interceptor.
But what is the use of an interceptor?
The NestJS interceptors are embodiments of Aspect-Oriented Programming or the AOP technique. This means you can do a bunch of cool stuff with them such as:
- executing extra logic before & after a method’s execution
- transform the result or exception returned from a function
- extend the behaviour of a particular function
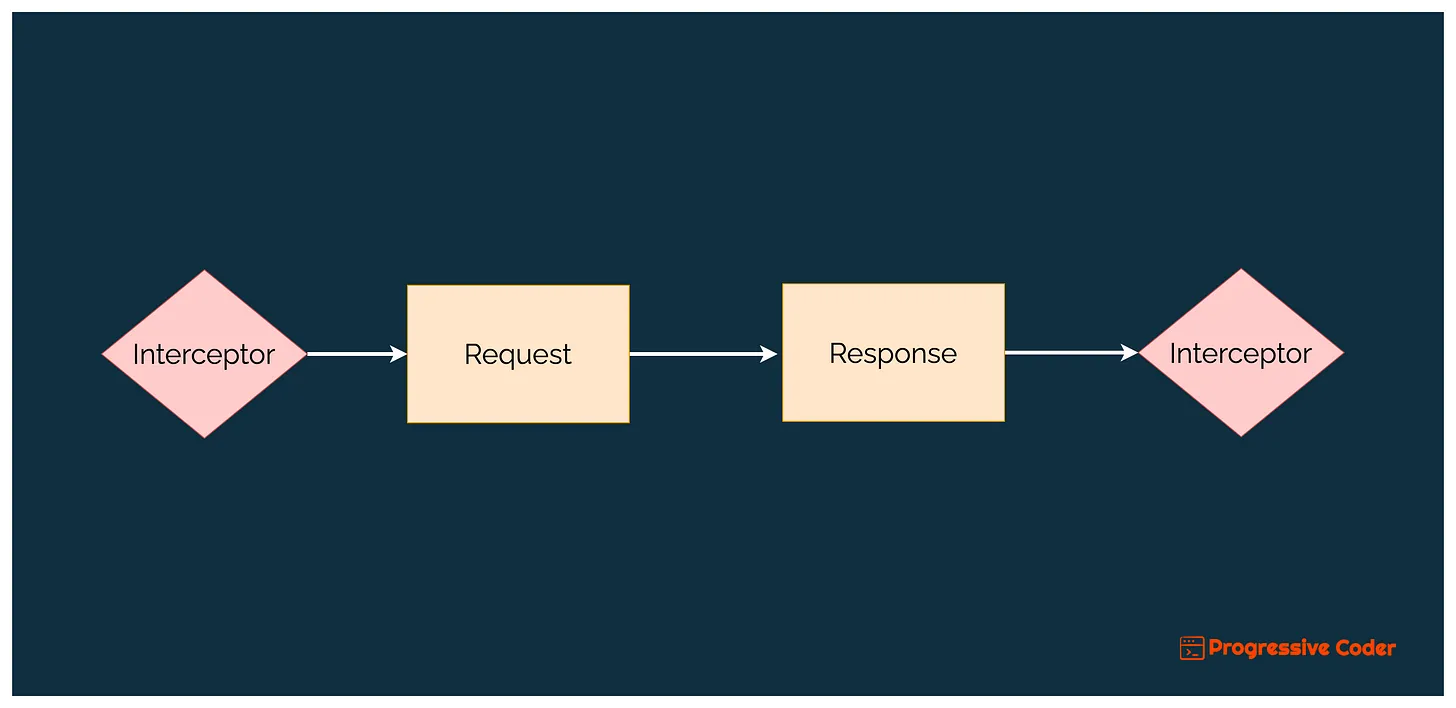
Here’s what the interceptor looks like in a big-picture view.
2 – Understanding the concept of AOP
To understand Aspect-Oriented Programming or AOP, you need to get the hang of a few important terms.
Aspect
An aspect is a piece of code (like a module) that encapsulates a specific behaviour or concern.
You can think of it as a cross-cutting feature or functionality that can be used in different parts of a program.
For example, logging is a cross-cutting concern that can be used in a wide variety of situations in a program.
Pointcut
A pointcut is a specification that defines the place in the program flow where a particular aspect should be applied. It signifies a particular point or set of points in the program’s execution.
For example, let’s say you have a web application that handles user authentication.
You might define an aspect that handles logging and you want this aspect to log all successful and unsuccessful login attempts. In this case, you would define a pointcut that attaches the logging aspect to all authentication-related endpoints.
Ultimately, Aspect-Oriented Programming is a combination of aspects and pointcuts that allow you to write more modular code.
In the context of NestJS, interceptors allow you to implement the concepts of AOP.
3 – Creating a NestJS Interceptor
Let us now create a NestJS interceptor.
In your project’s src directory, create a folder named interceptors with a file named logging.interceptor.ts.
See the below code for this file:
import { CallHandler, ExecutionContext, NestInterceptor } from "@nestjs/common";
import { Observable, tap } from "rxjs";

export class LoggingInterceptor implements NestInterceptor {
    intercept(context: ExecutionContext, next: CallHandler): Observable<any> {
        console.log("Before reaching the request handler");
        const startTime = Date.now();

        const methodName = context.getHandler().name;
        const className = context.getClass().name;

        return next
            .handle()
            .pipe(
                tap(() =>
                    console.log(`Response Lag for ${methodName} in class ${className}: ${Date.now() - startTime}ms`)
                )
            )
    }
}
So, what’s going on in this piece of code?
- The
LoggingInterceptorclass implements theNestInterceptorinterface. This was discussed earlier as a fundamental requirement for creating an interceptor. - To satisfy the requirement of the
NestInterceptor, you need to implement theintercept()method. - The
intercept()method takes two arguments – theExecutionContextobject and theCallHandlerobject. - The
ExecutionContextclass is inherited from theArgumentsHostclass. We talked about it in the chapter on exception filters in NestJS. - In the above example, we are using the
contextobject to extract themethodNameandclassNameof the route handler. - The
CallHandlerclass implements thehandle()method. Basically, this method sends the control to the route handler. If we don’t call thehandle()method within our interceptor, the incoming request will not reach the route handler. - Also, the
handle()method returns an RxJS observable. This provides a wide range of operators to manipulate the stream. - In the above example, we use the
tap()operator. This operator invokes an anonymous function that logs a message upon graceful termination of the stream. In other words, at the end of the response cycle.
In a nutshell, the interceptor function wraps the request and response cycles. Here’s what the flow of control looks like:
4 – Binding a NestJS Interceptor
Declaring the interceptor class is one part of the equation. However, you still need to bind the interceptor to a particular set of functionality. Remember the concept of pointcut in aspect-oriented programming.
You can bind the interceptor at various scopes.
Controller Scoped
As the name suggests, binding an interceptor at the controller scope activates the intercept() method for every request for all the route handlers within that particular controller. Read more about controllers in my detailed post on NestJS controllers.
See the below example:
@Controller('products')
@ApiTags('products')
@UseInterceptors(LoggingInterceptor)
export class ProductsController { }
The @UseInterceptors() decorator takes a list of interceptors as input.
You can directly pass the class definition as in the above case. NestJS will automatically take care of instantiating the class and wiring up the instance as part of its dependency injection process.
If you run the application and visit the /products route, you should the interceptor response in the console.
Before reaching the request handler
Response Lag for getAllProducts in class ProductsController: 3ms
Method Scoped
You can also make an interceptor method-scoped.
See the below example:
@Get()
@UseInterceptors(LoggingInterceptor)
getAllProducts() {
    return this.productsService.getAllProducts();
}
Global Scoped
Lastly, you can also go for a global-scoped interceptor.
For this, you need to make the below changes to the main.ts file of your application.
import { NestFactory } from '@nestjs/core';
import { DocumentBuilder, SwaggerModule } from '@nestjs/swagger';
import { AppModule } from './app.module';
import { LoggingInterceptor } from './interceptors/logging.interceptor';

async function bootstrap() {
  const app = await NestFactory.create(AppModule);
  app.useGlobalInterceptors(new LoggingInterceptor())

  const swaggerConfig = new DocumentBuilder()
    .setTitle('Products API')
    .setDescription('This is the Products API')
    .setVersion('1.0')
    .addTag('products')
    .build();

  const document = SwaggerModule.createDocument(app, swaggerConfig);
  SwaggerModule.setup('api-docs', app, document);

  await app.listen(3000);
}
bootstrap();
Here, we call the useGlobalInterceptors() method available on the app object.
5 – Response Mapping Interceptors in NestJS
There are other use-cases for interceptors. One such case is to transform the response.
Let’s create an interceptor for the same as below.
import { CallHandler, ExecutionContext, Injectable, NestInterceptor } from "@nestjs/common";
import { map, Observable } from "rxjs";

export interface Response<T> {
    data: T;
}

@Injectable()
export class TransformationInterceptor<T> implements NestInterceptor<T, Response<T>> {
    intercept(context: ExecutionContext, next: CallHandler): Observable<Response<T>> {
        return next.handle().pipe(map(data => ({ data })));
    }
}
Basically, we use RxJS map() operator to assign response object to the data property. In other words, we return a new object to the client.
Below is how we use it.
@Get('/transform-interceptor')
@UseInterceptors(TransformationInterceptor)
getTransformInterceptor() {
   return [1, 2, 3, 4, 5]
}
The output will be as below:
{"data":[1,2,3,4,5]}As you can see, we wrap the array within a new object with property name data.
6 – Exception Mapping Interceptor in NestJS
There is another useful use case for interceptors. Basically, we can override exceptions using the RxJS’s catchError() operator.
See below example:
import { BadGatewayException, CallHandler, ExecutionContext, Injectable, NestInterceptor } from "@nestjs/common";
import { catchError, Observable, throwError } from "rxjs";

@Injectable()
export class ExceptionInterceptor implements NestInterceptor {
    intercept(context: ExecutionContext, next: CallHandler): Observable<any> {
        return next
        .handle()
        .pipe(
            catchError(err => throwError(() => new BadGatewayException())),
        );
    }
}
Basically, we catch the error and instead throw BadGatewayException. We can use this interceptor as follows:
@Get('/exception-interceptor')
@UseInterceptors(ExceptionInterceptor)
getExceptionInterceptor() {
    return throwError(() => new BadRequestException());
}
As you can see, we override the exception thrown in the route handler. On calling the endpoint, we get the below response.
{"statusCode":502,"message":"Bad Gateway"}7 – Timeout Interceptor in NestJS
Many times, you want some special behaviour when the request timeout happens. You can use interceptors for the same.
See below example:
import { CallHandler, ExecutionContext, Injectable, NestInterceptor, RequestTimeoutException } from "@nestjs/common";
import { catchError, Observable, throwError, timeout, TimeoutError } from "rxjs";

@Injectable()
export class TimeoutInterceptor implements NestInterceptor {
    intercept(context: ExecutionContext, next: CallHandler): Observable<any> {
        return next.handle().pipe(
            timeout(1000),
            catchError(err => {
                if(err instanceof TimeoutError){
                    return throwError(() => new RequestTimeoutException());
                }
                return throwError(() => new Error());
            })
        )
    }
}
Basically, you call the handle() method to invoke the route handler. However, if the request takes more than 1000 milliseconds, you can throw a RequestTimeoutException.
You can use it as below:
@Get('/timeout-interceptor')
@UseInterceptors(TimeoutInterceptor)
async getTimeoutInterceptor() {
  await new Promise(r => setTimeout(r, 2000));
}
Here, we make the request hang for 2000 milliseconds. This causes a force timeout.
On calling the endpoint, we get the below response.
{"statusCode":408,"message":"Request Timeout"}8 – What’s Next?
The code for this post is available on GitHub. You can download it and play around with it to practice the concepts discussed in this post.
Here’s a summary of what you have learnt in this post.
- What is a NestJS interceptor?
- Understanding the concept of Aspect-Oriented Programming
- Creating a NestJS Interceptor
- Binding the Interceptor
- controller-scoped
- method-scoped
- global-scoped
- Response Mapping Interceptor
- Exception Mapping Interceptor
- Timeout Interceptor
Moving on, you can learn about the next important concept – NestJS pipes.
If you have any comments or queries about interceptors, please feel free to mention in the comments section below.
NestJS is a fundamental pillar in my Cloud & Backend learning path. To know more, don’t forget to subscribe to the Progressive Coder newsletter.
Also, say ‘Hi’ on Twitter for more real-time updates on what’s happening at Progressive Coder.

4 Comments
YFLooi · February 27, 2022 at 3:54 pm
Studied series 1 to 8 of your course. I found it to be the most concise and well-explained Nestjs 101 guide out here. Nice one!
Saurabh Dashora · February 28, 2022 at 2:22 am
Hi, Thanks for the great feedback! Really glad that the posts helped.
Mohamad · September 26, 2022 at 2:13 pm
That is great, thank you
Saurabh Dashora · September 27, 2022 at 2:18 am
Thanks for the feedback!