No discussion about the fundamentals of NestJS can be complete without talking about the NestJS module system.
In this post, you are going to learn how to structure your application code using the power of modules in NestJS.
With the help of providers, you were able to make your fledgling Product API a little bit more useful. If you directly landed on this page, you can check out the detailed post on NestJS Providers.
Here’s what you are going to learn in this particular post:
- What is a NestJS Module?
- The role of
@Module()decorator - Creating a feature module for Products API
- Sharing functionalities between modules
- Re-exporting a module
- The use of global modules
1 – What is a NestJS Module?
Literally, every programming language or framework out there has some concept of modules.
But why is there such a fascination with modules?
? Firstly, modules help structure our code into boxes by grouping related functionality.
This is a huge benefit when you have to build large applications. You can add more features to the code without making it confusing and unmanageable.
? Second, modules improve the reusability of your code.
If you have built a general-purpose module to do some common stuff like logging, you can simply reuse that module everywhere you want to log something. No need to reinvent the wheel every single time.
Ultimately, you can’t do much without modules. They are like the essential blocks required to build a super-structure.
Talking about NestJS, a module is a way to organize related components, controllers and services into a single unit.
Each application has at least one module – the root module.
Here’s the code for the root module (also known as the AppModule) from our demo application:
import { Module } from '@nestjs/common';
import { AppController } from './app.controller';
import { AppService } from './app.service';
import { ProductsController } from './products.controller';
import { ProductsService } from './products.service';
@Module({
imports: [],
controllers: [AppController, ProductsController],
providers: [AppService, ProductsService],
})
export class AppModule {}Think of the root module as the starting point of a forest trail. NestJS uses the root module to create an application graph to resolve relationships between modules and their dependencies.
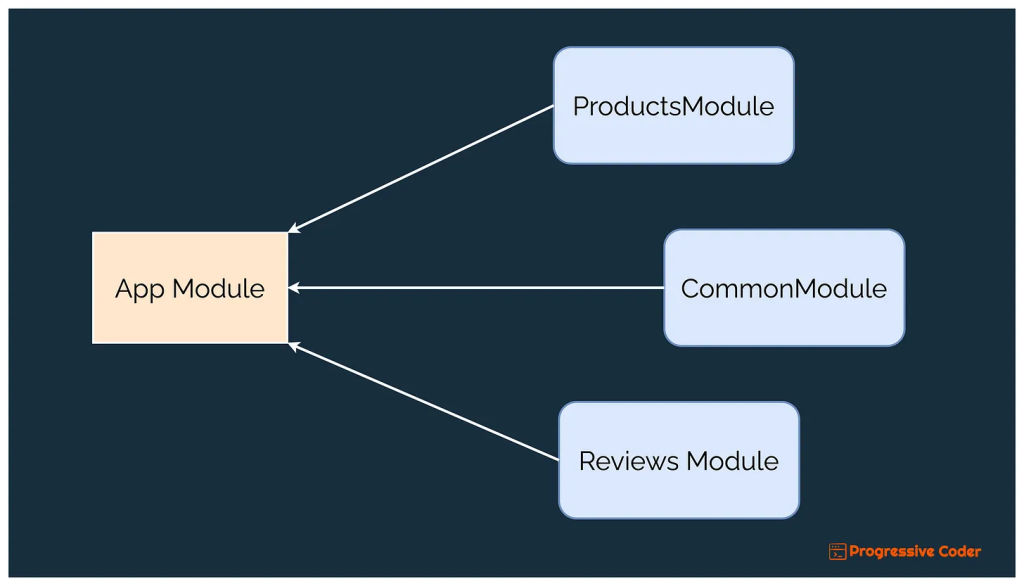
A good way to determine the scope of a module is to map them to the key domain objects in your overall design.
Check the below illustration.
For example, in a service about Products, you might have domain objects for basic product information, details about its features, reviews pricing and so on. Each of these objects and their functionalities could be encapsulated into an individual module.
Again, there is no one-size-fits-all answer when determining the scope of a module. You can make them as big or as small as you want. Ultimately, it boils down to the kind of structure you are comfortable with.
? The @Module() decorator
To define a module in NestJS, you need to use a special decorator @Module().
This decorator tells NestJS whether a particular class is a module and makes it available for injection.
You can configure the module by passing an object to the @Module() decorator.
Here are the properties of this object:
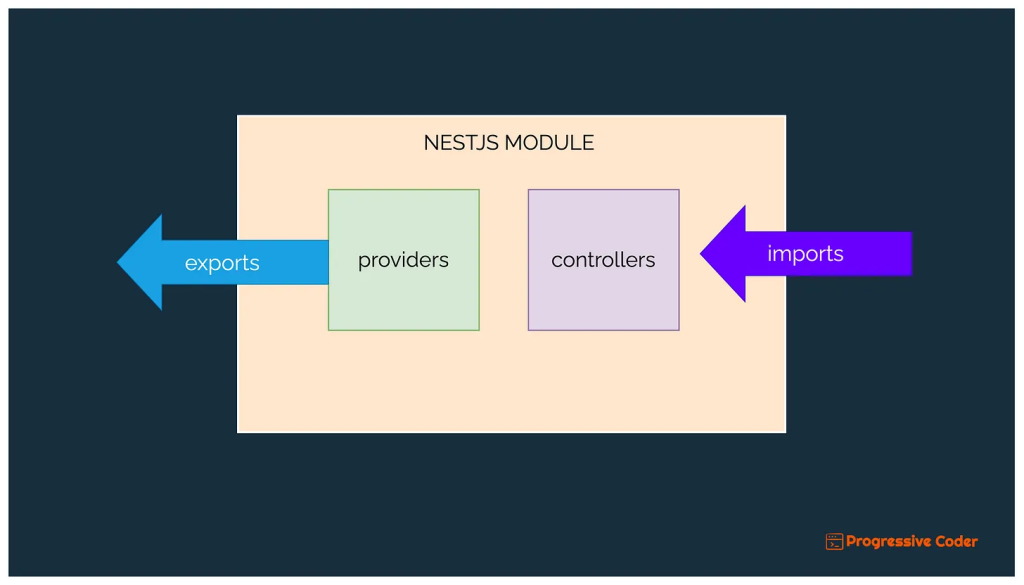
? providers – List of providers declared within the module. Basically, the idea is that these providers can be shared within the context of the module and NestJS has to instantiate them.
? controllers– List of controllers declared within the module. Again, NestJS makes sure to instantiate these controllers at startup time.
? imports – A module can use the functionality exposed by another module. This array contains the list of other modules that are required by this particular module.
? exports – Think of it as the interface or API of the module. Here, we set the list of providers that are exported by this module. Other modules can use these exported providers after importing the module.
Check out the below illustration that tries to depict the structure of a module.
Don’t worry if the above definitions still sound confusing. You will be seeing them in action in the upcoming sections of this post.
2 – Creating a NestJS feature module
Time to create your first module.
Within the demo application’s source directory, you need to create a new folder named products. Within this folder, create a file named products.module.ts.
import { Module } from "@nestjs/common";
import { ProductsController } from "./products.controller";
import { ProductsService } from "./products.service";
@Module({
controllers: [ProductsController],
providers: [ProductsService]
})
export class ProductsModule {}Notice the object within the @Module() decorator. It contains the list of controllers and providers within the scope of the module.
Since you want this module to be concerned with product-related functionality, you must move the ProductsController and ProductsService within the products folder. This helps with better code organization.
After declaring the module, you also need to import this module into the root module i.e. the AppModule (app.module.ts)
Check the imports array in the AppModule. Based on the list of imports, NestJS discovers the ProductsModule and instantiates the necessary classes.
import { Module } from '@nestjs/common';
import { AppController } from './app.controller';
import { AppService } from './app.service';
import { ProductsModule } from './products/products.module';
@Module({
imports: [ProductsModule],
controllers: [AppController],
providers: [AppService],
})
export class AppModule {}At this point, you can start the application using the npm run start command.
If the module import was successful, you should see that NestJS has successfully mapped the GET, POST, PUT and DELETE endpoints for /products. This means that NestJS was able to successfully discover the route handlers declared within the ProductsModule.’
[Nest] 1600  - 07/02/2023, 08:12:55     LOG [NestFactory] Starting Nest application...
[Nest] 1600  - 07/02/2023, 08:12:55     LOG [InstanceLoader] AppModule dependencies initialized +37ms
[Nest] 1600  - 07/02/2023, 08:12:55     LOG [InstanceLoader] ProductsModule dependencies initialized +0ms
[Nest] 1600  - 07/02/2023, 08:12:55     LOG [RoutesResolver] AppController {/}: +3ms
[Nest] 1600  - 07/02/2023, 08:12:55     LOG [RouterExplorer] Mapped {/, GET} route +1ms
[Nest] 1600  - 07/02/2023, 08:12:55     LOG [RoutesResolver] ProductsController {/products}: +0ms
[Nest] 1600  - 07/02/2023, 08:12:55     LOG [RouterExplorer] Mapped {/products, GET} route +1ms
[Nest] 1600  - 07/02/2023, 08:12:55     LOG [RouterExplorer] Mapped {/products/:id, GET} route +0ms
[Nest] 1600  - 07/02/2023, 08:12:55     LOG [RouterExplorer] Mapped {/products, POST} route +0ms
[Nest] 1600  - 07/02/2023, 08:12:55     LOG [RouterExplorer] Mapped {/products/:id, PUT} route +1ms
[Nest] 1600  - 07/02/2023, 08:12:55     LOG [RouterExplorer] Mapped {/products/:id, DELETE} route +0ms
[Nest] 1600  - 07/02/2023, 08:12:55     LOG [NestApplication] Nest application successfully started +1ms
3 – Sharing module functionalities in NestJS
NestJS modules are singletons by default.
What does it mean?
It means you can share the same instance of any provider belonging to a particular module between multiple other modules.
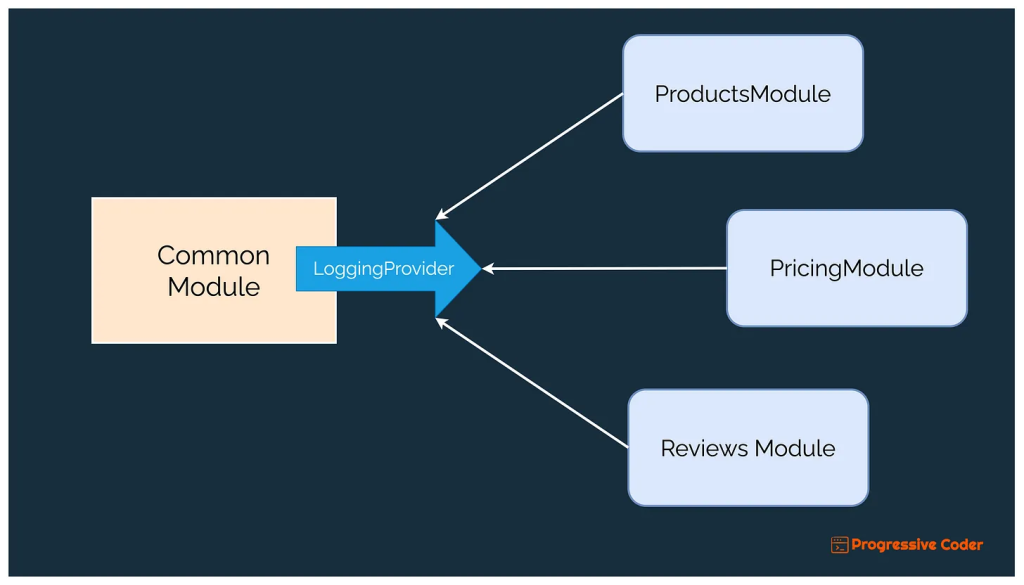
This is a very useful property when you want to share reusable functionality (such as logging, configuration and so on) within the scope of an entire application.
See the below illustration where a common module can expose a logging service that can be consumed by other modules in the application.
However, though the module is automatically shared by default, you need to specifically export the provider that has to be exposed outside a module’s scope.
For example, if you wanted that the ProductsService was available to other modules within the application, you need to export the ProductsService provider from the ProductsModule.
Here’s how you can do it:
import { Module } from "@nestjs/common";
import { ProductsController } from "./products.controller";
import { ProductsService } from "./products.service";

@Module({
    exports: [ProductsService],
    controllers: [ProductsController],
    providers: [ProductsService]
})
export class ProductsModule {}
Just by adding the ProductsService to the exports array, you are making this service available to the entire application. It’s like exposing an interface from the ProductsModule.
Now, any module within the application that imports the ProductsModule can access ProductsService.
? If interested, you can refer to the post about sharing NestJS services between modules for more details.
4 – Re-exporting Modules in NestJS
Another interesting feature provided by the NestJS module system is re-exporting imported modules.
As your application gets more complicated, you can build wrapper modules to encompass lower-level modules. For example, you might have a ProductsWrapperModule module that wraps the ProductsModule.
In this case, you can import ProductsModule into the ProductsWrapperModule and then, re-export it.
See the below example:
@Module({
  imports: [ProductsModule],
  exports: [ProductsModule],
})
export class ProductsWrapperModule {}
5 – Making a Module Global in NestJS application
This one is not my favourite approach. But it might come in handy sometimes when you are tired of importing a particular module or a set of modules everywhere.
You can declare a module as global by using the @Global() decorator.
import { Module, Global } from "@nestjs/common";
import { ProductsController } from "./products.controller";
import { ProductsService } from "./products.service";

@Global()
@Module({
    exports: [ProductsService],
    controllers: [ProductsController],
    providers: [ProductsService]
})
export class ProductsModule {}
In this case, the ProductsService will be available to all the modules that need to inject the service without importing the ProductsModule in their imports array.
Global modules should be registered only once by the root module.
? If interested, you can read more about global modules in NestJS.
What’s Next?
The code for this post is available on GitHub. You can download it and play around with it to practice the concepts discussed in this post.
Here’s a summary of what you have learnt in this post:
- What is a NestJS Module?
- The role of
@Module()decorator - Creating a feature module for Products API
- Sharing functionalities between modules
- Re-exporting a module
- The use of global modules
Modules are an important way to structure and organize our applications based on functionality. In my view, you should always try to carve out appropriate modules based on the scope of the application.
In the next post, I’m going to talk about dynamic modules in NestJS and how they can make your application more flexible.
NestJS is a fundamental pillar in my Cloud & Backend learning path. To know more, don’t forget to subscribe to the Progressive Coder newsletter.
Also, say ‘Hi’ on Twitter for more real-time updates on what’s happening at Progressive Coder.


2 Comments
John · July 4, 2022 at 9:03 pm
Thanks for the tutorial, I love your style.
BooksService is registered in the Book module, why is it registered in the App module again?
Saurabh Dashora · July 6, 2022 at 3:23 am
Thanks for the feedback John! Yes, your point is correct. It may not be necessary to register the BooksService again.