As the name suggests, Elastic Load Balancer allows you to balance the traffic and load to your application instances. In other words, this makes your application highly-available. In this post, we will specifically look at setting up Elastic Load Balancer for AWS EC2 Instances.
Basically, these EC2 Instances are nothing but multiple instances for our application.
Our plan for this post is as follows:
- Understand different types of application scaling.
- What is a Load Balancer?
- Different types of Load Balancers in Amazon Web Services?
- Setting up Elastic Load Balancer for AWS EC2 Instances
- Seeing the Load Balancer in action.
- Some Good to Know Points about Load Balancer in AWS
- Summary of the Post.
So without further ado, let’s start.
Types of Scalability
Scalability basically means that an application or system can handle greater loads by adapting over time.
Typically, scalability is of two types:
Vertical Scalability
In a real life situation, we can understand vertical scalability by taking the example of a phone operator. A junior operator can take 10 calls per minute. However, to increase the number of calls, we can hire a senior operator who can take up-to 20 calls per minute.
We call this approach vertical scalability.
In AWS terms, vertical scalability means increasing the size of the instance. For example, you run an application on t2.micro. However, in case of needing more resources, you might have to run the application on t2.large.
This type of scalability is common in the case of non-distributed systems such as databases. However, vertical scaling has a downside in that you are limited by the hardware capability.
Horizontal Scalability
Horizontal scalability means increasing the number of instances of your application.
In the case of our real life example, if the phone operator is overloaded, we will hire a second operator to take up the additional load. Depending on the need, we will hire 3, 4, 5 operators to handle our workload.
As can be seen, horizontal scalability is quite suited to distributed systems. In other words, it is quite common for web applications or modern applications.
What is a Load Balancer?
Load Balancer is basically a front for your application. It forwards all incoming requests to multiple application instances or EC2 instances downstream.
The below illustration helps demonstrate the role of a Load Balancer.
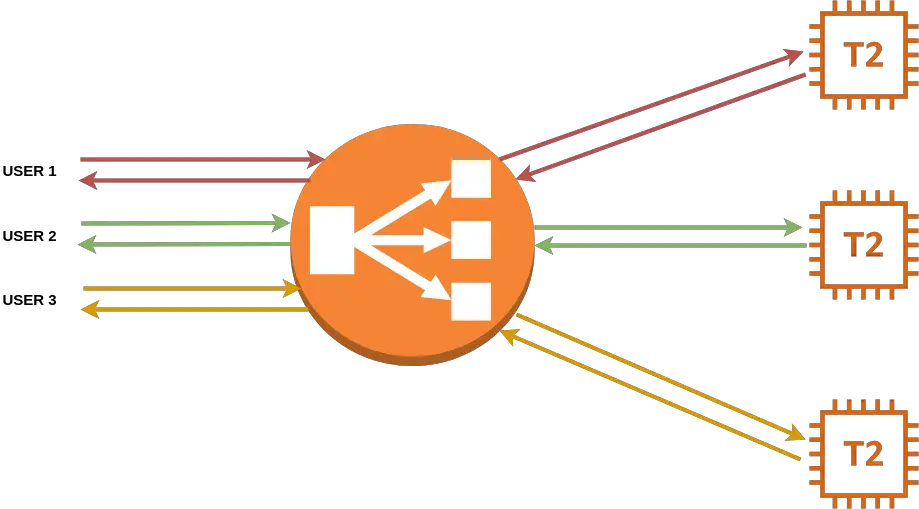
Here, User 1 tries to access our application. The Load Balancer directs the request to the first EC2 instance. Next, User 2 hits our application. This time the Load Balancer directs the request to the second EC2 instance. Similarly, User 3 is directed to third EC2 instance.
As you can see, this is a Load Balancer as it is basically balancing the incoming requests to different EC2 instances. In other words, it is helping share the load of handling users to multiple application instances.
With this in mind, let’s investigate some reasons for using a Load Balancer.
- Spread the load evenly across multiple downstream instances or resources.
- Expose a single entry point using DNS for your application.
- Handle failures of downstream instances. In other words, if a particular instance is down, the request will be directed to another instance without impacting the consumer.
- Perform health checks of the running instances. Basically, if an instance is not healthy, its traffic will be directed to other instances.
- It can also provide SSL termination (HTTPS) for websites.
- Enforce stickiness. We will discuss stickiness in detail later in the post.
Types of Load Balancers in AWS
Formally, the AWS Load Balancer is also known as Elastic Load Balancer or ELB.
ELB is a managed load balancer. Basically, this means that AWS guarantees that it will be working. Also, all upgrades and maintenance work to keep it running is managed by AWS. At the end of the day, it costs less to use ELB as compared to setup your own Load Balancer from scratch.
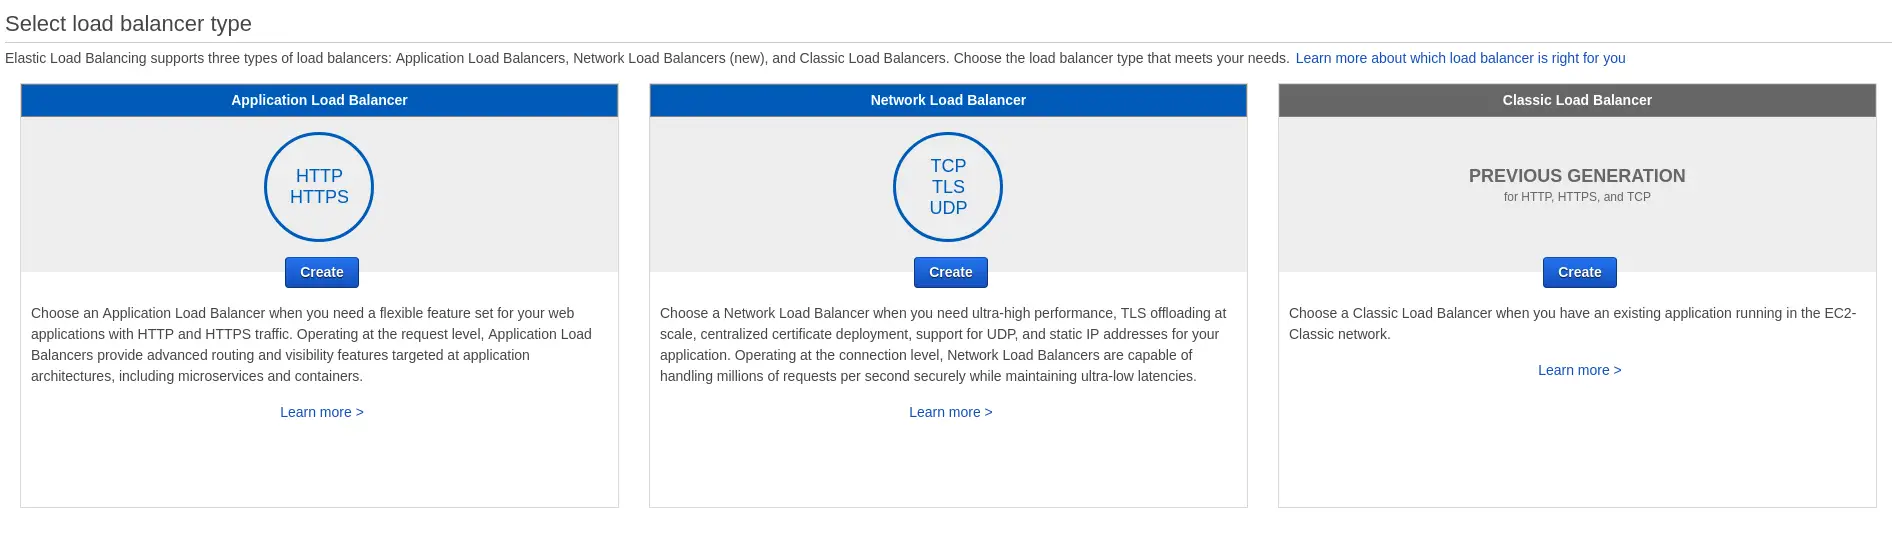
Going into detail, the Elastic Load Balancer is also of 3 types. We will look at them one by one.
1. Classic Load Balancer
This is the previous generation load balancer that was used for EC2 classic instances. Overall, this type is now considered as deprecated and shouldn’t be used.
It doesn’t support features like host-based routing or path-based routing. In other words, it simply distributes the load across all instances that are registered. As a result, the Classic Load Balancer can only distribute traffic to a single URL.
2. Application Load Balancer
This Load Balancer is specially designed for web application with HTTP or HTTPS traffic.
If you consider OSI Networking Model that 7 layers, the Application Load Balancer works at the Application Layer that is also the top layer.
The Application Load Balancer allows the below operations:
- Load balancing to multiple HTTP applications across machines using target groups
- Load balancing to multiple applications on the same machine using containers
- URL route based load balancing
- Load balancing using hostname in URL
Let’s understand the last two points in more detail:
Host-Based Routing
As the name suggests, this type of routing depends on the name of the host. Consider that we are having two sites namely progressivecoder.com and admin.progressivecoder.com. Each website is hosted on a separate EC2 instance to ensure high-availability.
Now, we want to distribute the traffic to both these sites. If we were using the Classic Load Balancer, we would have to create two Load Balancers. However, Application Load Balancer supports host-based routing and can easily take care of this requirement without any additional cost.

The above illustration shows the host based routing approach.
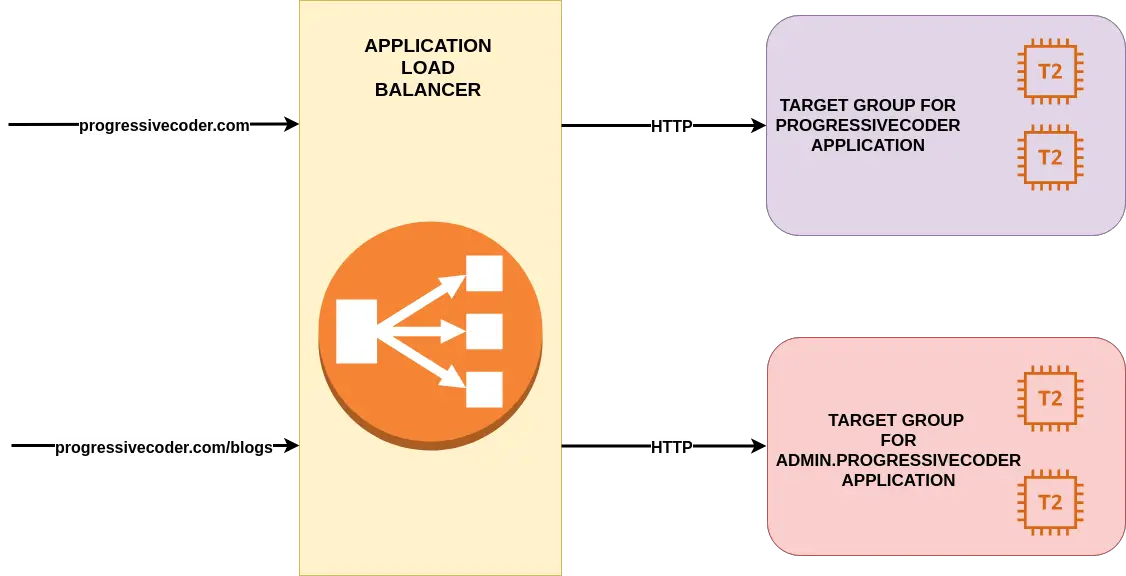
Path-Based Routing
Path-Based Routing is more about the URL paths in your website. For example, if we have a site on path progressivecoder.com and we have blogs at progressivecoder.com/blogs. For performance reasons, we host both the paths on different EC2 instances.
An ALB or Application Load Balancer can easily handle this scenario as well and route traffic based on the path. See below illustration for the example.
3. Network Load Balancer
The Network Load Balancer operates at Network Layer of the OSI model. Due to this, it is much faster and can handle millions of requests per second.
It also has very less latency (~100 ms) as compared to around ~400 ms for Application Load Balancer.
Usually, Network Load Balancer are only used for extreme performance scenarios. They should not be used for normal use cases.
Setting up Application Load Balancer
Let’s start with creating an Application Load Balancer for EC2 instances.
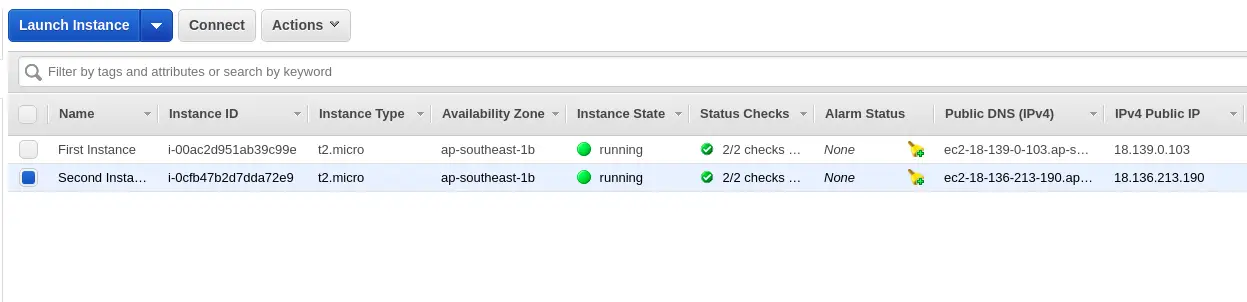
Step 1 – Create EC2 Instances
We will create two EC2 instances using the Amazon Linux 2 AMI. If you are not sure on how to create EC2 instances, I have a detailed guide for the same.
Once we launch the two instances, our EC2 dashboard should look like below.
Step 2 – Install HTTPD Server on the two instances
To test our Load Balancer, we need to configure our EC2 instances to return some data over HTTP. For this, we will use HTTPD Server.
To install HTTPD Server, we need to SSH into the EC2 instances one-by-one using our AWS key pair. To SSH, we can use the below command:
ssh -i EC2-key-pair.pem ec2-user@<IP-address>Next, we need to install the server and create a dummy file for it to serve. To do so, issue the below commands in order.
sudo su
yum update -y
yum install -y httpd.x86_64
systemctl start httpd.service
systemctl enable httpd.service
echo "Hello World from $(hostname -f)" > /var/www/html/index.html
If we now hit the public IP address of the EC2 instances in the browser, we will see the below Hello World message. Note that the hostname is different for the different EC2 instances.
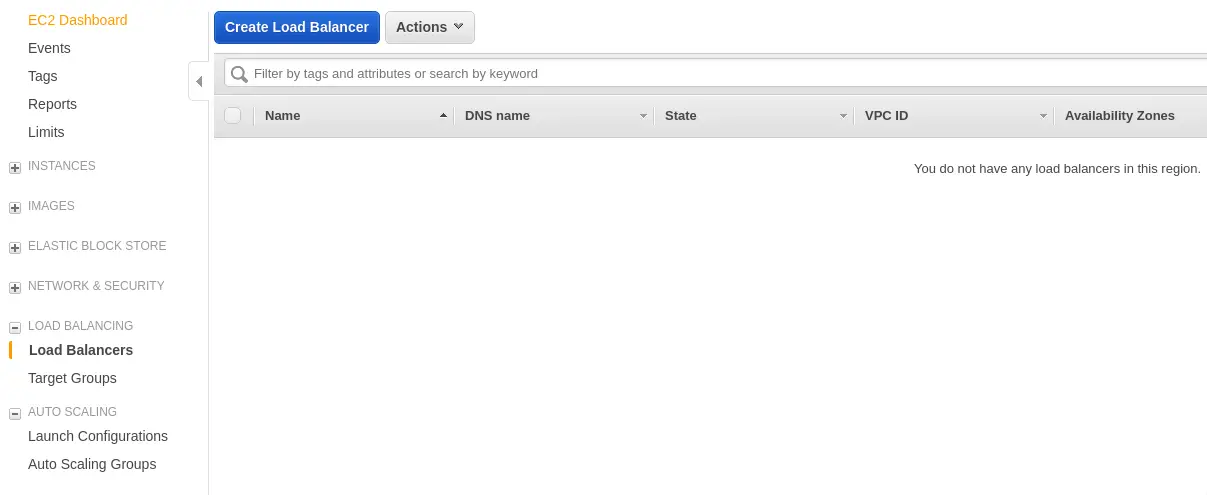
Hello World from ip-172-31-25-200.ap-southeast-1.compute.internalHello World from ip-172-31-19-21.ap-southeast-1.compute.internalStep 3 – Create an Application Load Balancer
To create a Load Balancer, click on the Load Balancers option in the left scroll bar.
From the window that opens up, we will select Application Load Balancer.
Next, we need to fill up the basic details about our ALB. For example, the name of the ALB. We also select the availability zones within our region where we want the Load Balancer to be present.
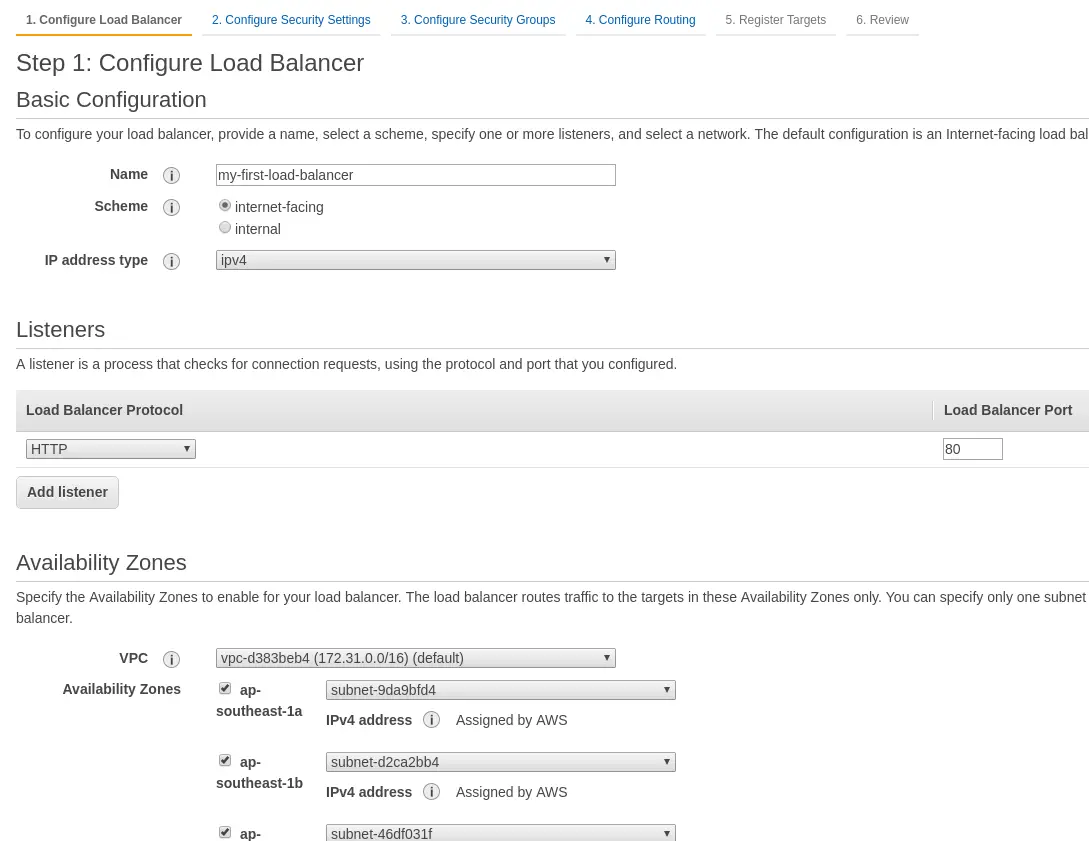
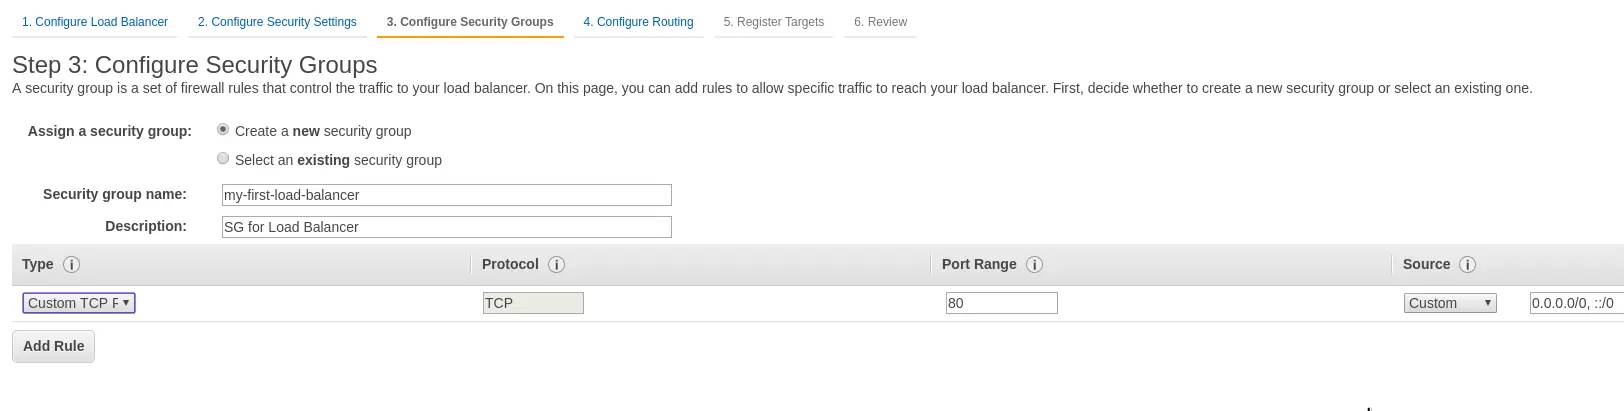
We then select create a new security group to go with our Load Balancer. Basically, the security group will allows any connection to the ALB over port 80.
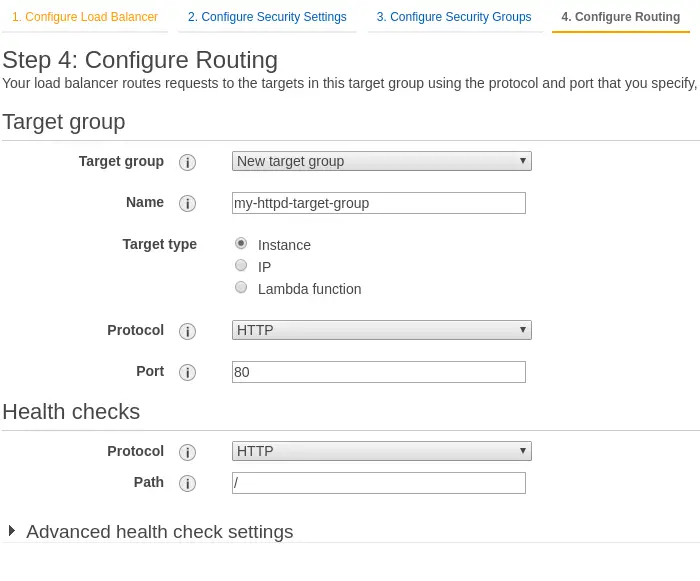
Next step is to create a target group for our Application Load Balancer. To do so, we have to fill some details in the below screen. Basically, target group will contain our EC2 instances. We can also specify health-checks for our Load Balancer in this step.
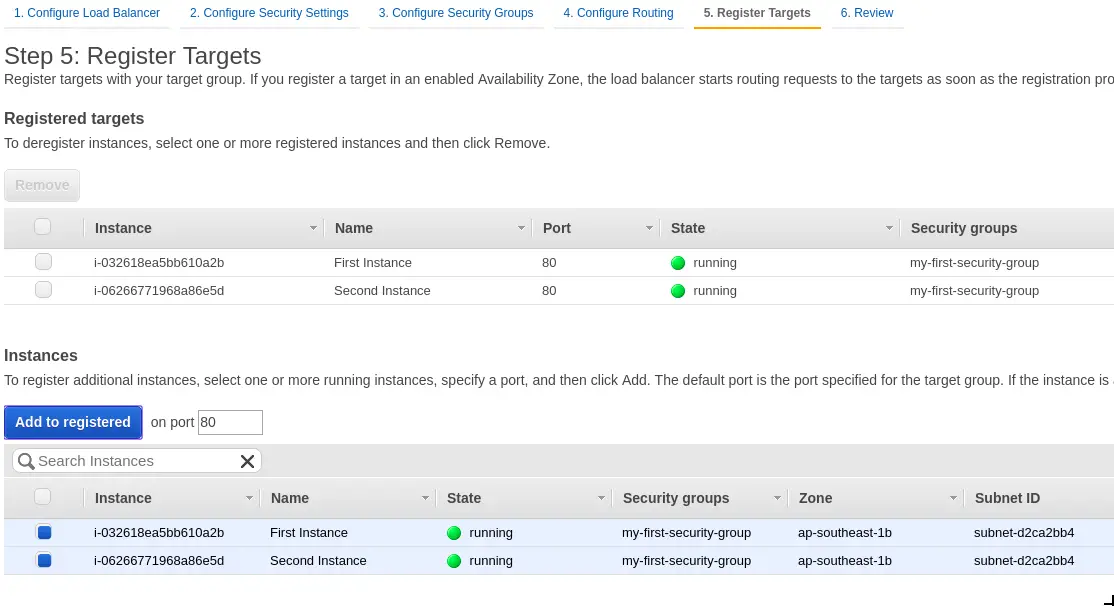
In the next step, we have to register the targets. In the other words, these are the EC2 instances we already created. To do so, we can select the EC2 instances and click the Add to Registered button.
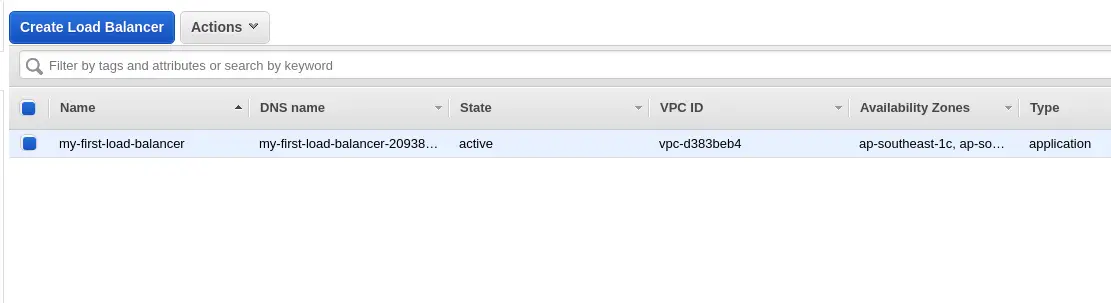
Finally, we can review the details in the last step and click Create to finally provision the Load Balancer. It takes a while to provision the Load Balancer after which you can see it in the dashboard.
With this, we have successfully provisioned an Application Load Balancer and attached it to our EC2 instances.
Seeing the Application Load Balancer in Action
Now, we can test our newly created Application Load Balancer. To test, we need to take the DNS for the ALB from the Description area.
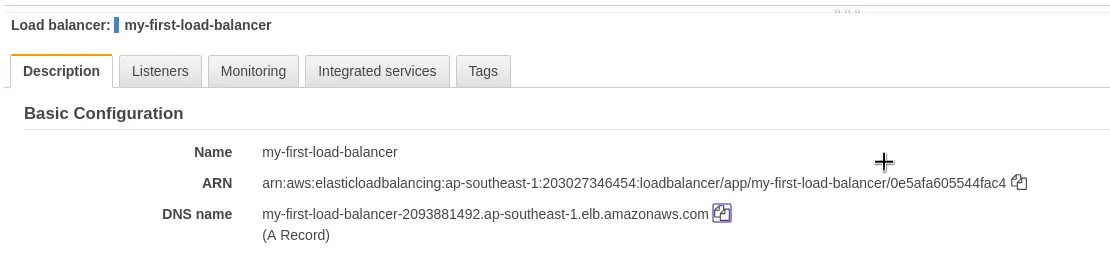
If we hit the DNS URL using a browser, we should see the Hello World message. Depending on the number of times we hit the URL, we will see the Hello World message coming from a different EC2 instance.
First Hit
Hello World from ip-172-31-25-200.ap-southeast-1.compute.internalSecond Hit
Hello World from ip-172-31-19-21.ap-southeast-1.compute.internalThird Hit
Hello World from ip-172-31-25-200.ap-southeast-1.compute.internalBasically, the Load Balancer is balancing the incoming traffic between the two EC2 instances.
Good to Know Points
Some of the important points that we should know about Load Balancers in AWS are as follows:
- Any Load Balancer (CLB, ALB and NLB) gets a static host name. We should not resolve it to the underlying IP and instead use the host name itself.
- Load Balancers are scalable but not instantaneously. If we expect a lot of incoming traffic, we need to contact AWS support to warm-up our Load Balancer.
- If the Load Balancer cannot connect to the application, we should first check the Security Group settings.
- All Load Balancers have a health check capability. We can also customize the same.
Conclusion
With this we have gone through the basics of Elastic Load Balancer for AWS EC2. We also created a Load Balancer and saw it in action for a couple of EC2 instances.
Some important summary items to remember are as follows:
- Load Balancers are used for high-availability of applications.
- AWS ELB comes in three variants – the Classic Load Balancer, the Application Load Balancer and the Network Load Balancer
- The Classic Load Balancer is deprecated and we should ideally use the ALB or NLB.
- Network Load Balancer is ideal for very high-performance scenarios. For normal cases, Application Load Balancer is sufficient.
- ALB supports both host-based and path-based routing.
- ALB works at Level 7 of the OSI Networking Model. NLB works at Level 4.
If you have any queries or comments, do sound off in the comments section below.
Happy Learning!
0 Comments