Spring Boot Method-Level Security provides some great features. Using method-level security, you can handle the more fine-grained authorization requirements of your Spring Boot Microservices.
In the previous post, we implemented Spring Boot Security using UserDetailsService. That is the foundation of Spring Security. If you have directly come to this post, I strongly recommend you to go through that post and then, come back here.
In this post, we will build on our current security solution and implement Spring Boot Method-Level Security.
What is Spring Boot Method-Level Security?
To understand the concept better, we have to first look at how Spring Security works under the covers.
In Spring Security, the AbstractSecurityInterceptor handles the initial authorization of an incoming request.
The AbstractSecurityInterceptor has two concrete implementations:
- FilterSecurityInterceptor – This is the default filter in Spring Security filter chain. All authenticated user requests will go through the FilterSecurityInterceptor for authorization.
- MethodSecurityInterceptor – This is required to implement method level security. It allows us to add security at method-level within our application.
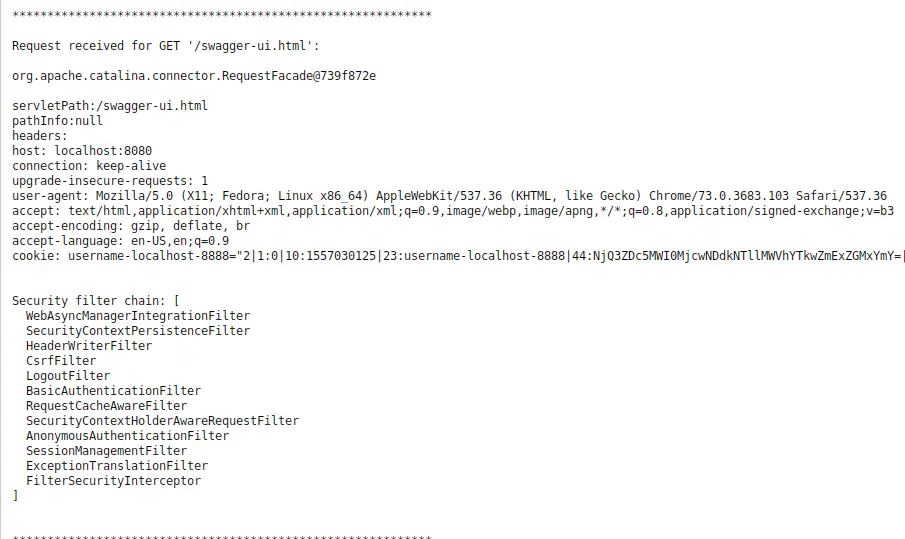
To put things in perspective, if we start our current application without making any changes, you can see the FilterSecurityInterceptor at the end of the security filter chain.
To enable Spring Boot Method-Level Security, we have to modify our SecurityConfig class.
@Configuration
@EnableWebSecurity(debug=true)
@EnableGlobalMethodSecurity(prePostEnabled = true, securedEnabled = true)
public class SecurityConfig extends WebSecurityConfigurerAdapter {

    @Autowired
    private UserDetailsService userDetailsService;

    @Autowired
    private PasswordEncoder passwordEncoder;

    @Override
    protected void configure(AuthenticationManagerBuilder auth) throws Exception {
        auth.authenticationProvider(authenticationProvider());
    }

    @Override
    protected void configure(HttpSecurity http) throws Exception {
       http
               .httpBasic()
               .and()
               .authorizeRequests()
               .anyRequest().authenticated();
    }

    @Bean
    public DaoAuthenticationProvider authenticationProvider(){
        DaoAuthenticationProvider provider = new DaoAuthenticationProvider();
        provider.setPasswordEncoder(passwordEncoder);
        provider.setUserDetailsService(userDetailsService);
        return provider;
    }

}
We have added the annotation @EnableGlobalMethodSecurity. We also set prePostEnabled and securedEnabled properties to true.
Security using @Secured
By setting the securedEnabled property to true, we can use @Secured annotation. To see it in action, let’s implement a few dummy end-points in our application.
@RestController
@RequestMapping(value = "/api")
public class SecurityTestController {

    @GetMapping(value = "/admin")
    @ResponseStatus(HttpStatus.OK)
    @Secured("ROLE_ADMIN")
    public ResponseEntity<String> getAdminResponse(){
        return new ResponseEntity<>("This is the admin response", HttpStatus.OK);
    }

    @GetMapping(value = "/user")
    @ResponseStatus(HttpStatus.OK)
    @Secured("ROLE_USER")
    public ResponseEntity<String> getUserResponse(){
        return new ResponseEntity<>("This is the user response", HttpStatus.OK);
    }

    @GetMapping(value = "/general")
    @ResponseStatus(HttpStatus.OK)
    @Secured({"ROLE_ADMIN", "ROLE_USER"})
    public ResponseEntity<String> getGeneralResponse(){
        return new ResponseEntity<>("This is the general response", HttpStatus.OK);
    }
}
Basically, here we have implemented 3 end-points. One end-point is for the admin users. The second one for normal users. The third one or the general end-point is for both admin and user.
In the above example, we use @Secured annotation to handle Spring Boot Method-Level Security. @Secured annotation takes the Role as input. We have used ROLE_ADMIN and ROLE_USER to tell Spring what role should have access to the method. In the general end-point, we have used both ROLE_ADMIN and ROLE_USER
Also, we are now inserting an admin user and a normal user into our user table at the time of application startup.
@Component
class DemoCommandLineRunner implements CommandLineRunner{

	@Autowired
	private VehicleRepository vehicleRepository;

	@Autowired
	private UserRepository userRepository;

	@Autowired
	private PasswordEncoder passwordEncoder;

	@Override
	public void run(String... args) throws Exception {

		Vehicle audi = new Vehicle();
		audi.setId(UUID.randomUUID());
		audi.setVehicleIdentityNumber("Reg#1234");
		audi.setMake("Audi");
		audi.setModel("Q5");

		vehicleRepository.save(audi);

		Vehicle tesla = new Vehicle();
		tesla.setId(UUID.randomUUID());
		tesla.setVehicleIdentityNumber("Reg#6789");
		tesla.setMake("Tesla");
		tesla.setModel("Model S");

		vehicleRepository.save(tesla);

		User admin = new User();
		admin.setUsername("application-admin");
		admin.setPassword(passwordEncoder.encode("password"));
		admin.grantAuthority(Role.ROLE_ADMIN);

		userRepository.save(admin);

		User user = new User();
		user.setUsername("application-user");
		user.setPassword(passwordEncoder.encode("password"));
		user.grantAuthority(Role.ROLE_USER);

		userRepository.save(user);
	}
}
@PreAuthorize and @PostAuthorize
The @Secured annotation is an easy way to handle Spring Boot Method-Level Security. However, there are few drawbacks with this approach.
- With @Secured, you cannot have multiple roles condition. However, if there are multiple roles like in the /general end-point, they get combined with an OR operator.
- The @Secured annotation does not support SpEL (or Spring expression language).
To get around these challenges, Spring added @PreAuthorize and @PostAuthorize annotations. These annotations provide more fine-grained control over the authorization part.
@PreAuthorize checks for authorization before method execution. On the other hand, @PostAuthorize checks authorization after method execution. However, for all practical purposes, @PreAuthorize is more common.
Below is how these annotations can be used:
@RestController
@RequestMapping(value = "/api")
public class PrePostAuthorizationController {

    @GetMapping(value = "/preAuth/admin")
    @ResponseStatus(HttpStatus.OK)
    @PreAuthorize("hasRole('ADMIN')")
    public ResponseEntity<String> getPreAuthAdminResponse(){
        System.out.println("Inside the Get Response Method");
        return new ResponseEntity<>("This is the admin response", HttpStatus.OK);
    }

    @GetMapping(value = "/preAuth/user")
    @ResponseStatus(HttpStatus.OK)
    @PreAuthorize("hasRole('USER')")
    public ResponseEntity<String> getPreAuthUserResponse(){
        System.out.println("Inside the Get Response Method");
        return new ResponseEntity<>("This is the user response", HttpStatus.OK);
    }

    @GetMapping(value = "/preAuth/general")
    @ResponseStatus(HttpStatus.OK)
    @PreAuthorize("hasRole('USER') AND hasRole('ADMIN')")
    public ResponseEntity<String> getPreAuthGeneralResponse(){
        System.out.println("Inside the Get Response Method");
        return new ResponseEntity<>("This is the general response", HttpStatus.OK);
    }

    @GetMapping(value = "/postAuth/admin")
    @ResponseStatus(HttpStatus.OK)
    @PostAuthorize("hasRole('ADMIN')")
    public ResponseEntity<String> getPostAuthAdminResponse(){
        System.out.println("Inside the Get Response Method");
        return new ResponseEntity<>("This is the admin response", HttpStatus.OK);
    }

    @GetMapping(value = "/postAuth/user")
    @ResponseStatus(HttpStatus.OK)
    @PostAuthorize("hasRole('USER')")
    public ResponseEntity<String> getPostAuthUserResponse(){
        System.out.println("Inside the Get Response Method");
        return new ResponseEntity<>("This is the user response", HttpStatus.OK);
    }

    @GetMapping(value = "/postAuth/general")
    @ResponseStatus(HttpStatus.OK)
    @PostAuthorize("hasRole('USER') AND hasRole('ADMIN')")
    public ResponseEntity<String> getPostAuthGeneralResponse(){
        System.out.println("Inside the Get Response Method");
        return new ResponseEntity<>("This is the general response", HttpStatus.OK);
    }

}
Note that we have added a condition to the /general end-point to be accessed only when the user has both ROLE_USER and ROLE_ADMIN. Also, note that we don’t explicitly mention the word ‘ROLE’. It is added automatically.
We have also added a System.out.println() to display a simple message. Using that you can test the behavior difference between @PostAuthorize and @PreAuthorize.
In the case of @PreAuthorize, the control flow does not even enter the method if authorization fails. However, in the case of @PostAuthorize, the message is printed whether authorization fails or not.
Conclusion
With this we have successfully delved into Spring Boot Method-Level Security.
Basically, we have looked at two approaches for achieving the same. We have also understood the differences between the two approaches.
The code till this point is available on Github for reference.
0 Comments