As infrastructure evolves, it becomes more complex. Technically, you can describe the complete infrastructure of an application in a single Terraform file.
But eventually, you will run into issues such as:
- You can’t update the configuration without the dreaded feeling of breaking something. Updates in one section may mess up other sections.
- There is an increase in configuration duplication. Your project becomes a maintenance nightmare.
- You can’t share common functionality between multiple teams. Everyone has to reinvent the wheel.
Terraform modules are the most-effective way to avoid the above issues and reduce the complexity of your infrastructure code. After all, simplicity was the main reason you started using Terraform.
In this post, we are going to use Terraform Modules from the public registry to create an AWS EC2 cluster with all the bells and whistles such as VPC, Private and Public Subnets, NAT Gateways and so on.
1 – What is a Terraform Module
A Terraform module is a bunch of configuration files grouped within a single directory.
Even a directory with a single Terraform file is a module. Such a module becomes the root module if you end up executing the Terraform commands from this module’s directory.
In a way, every piece of Terraform code happens to be a part of some module. For example, the below directory structure is a module.
.
- LICENSE
- README.md
- main.tf
- variables.tf
- output.tf
2 – Terraform Registry Modules
Similar to other programming languages, we can split our complex configuration files into individual modules. However, we can also do a lot with modules available on official Terraform registry.
Check out the below screenshot of the Terraform AWS EC2 module hosted on the registry. There is a great amount of documentation about how to use the module along with the input and output parameters.
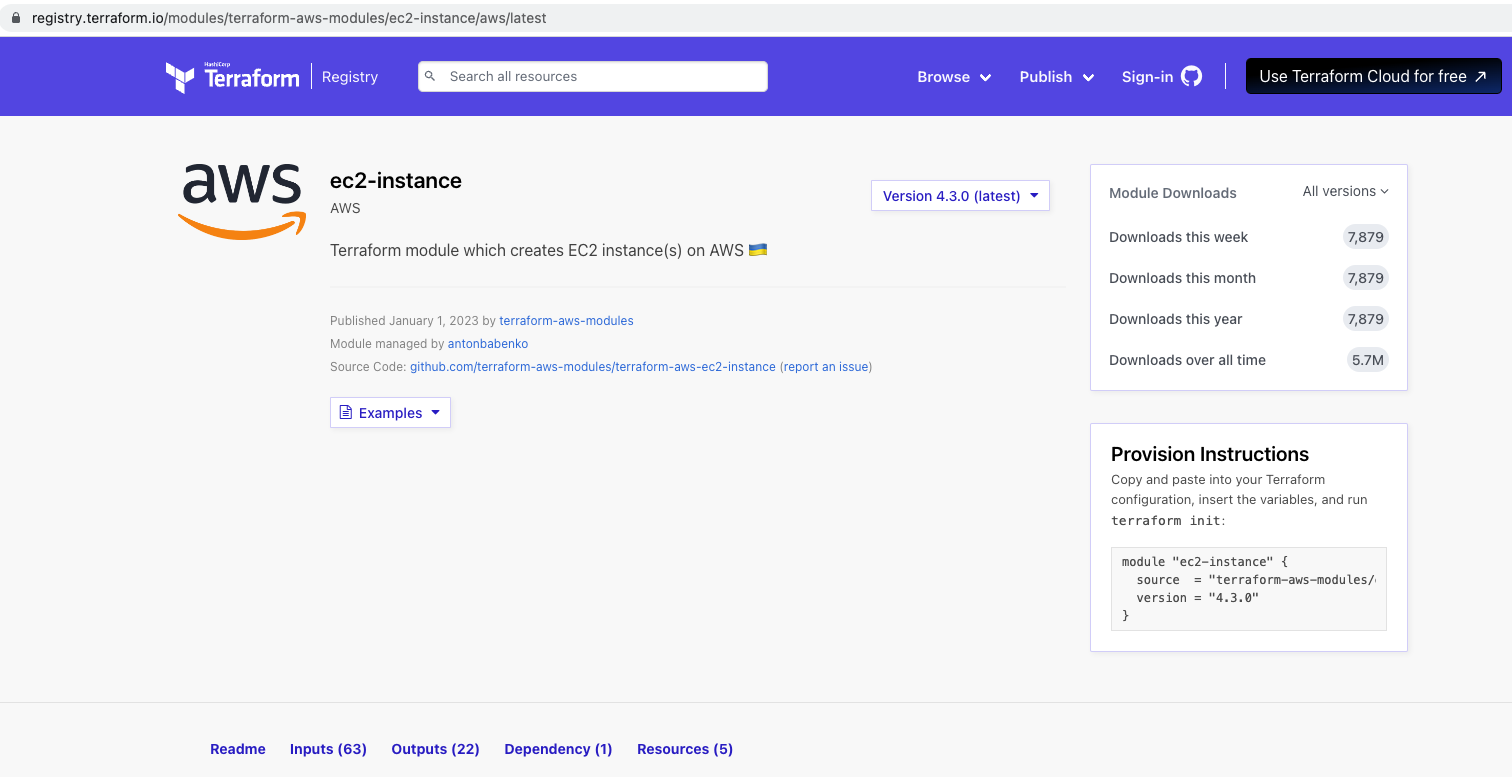
If you see the Provision Instructions, you get to know how to use the module. The sample configuration sets two arguments – source and version.
- The
sourceargument specifies where to look for the module. Terraform will search for a module in the registry that matches the given string value. - The
versionargument tells Terraform which version of the module it should use. If we don’t mention a specific version, Terraform uses the latest version. Specifying an exact version number is a good practice to ensure you don’t run into surprises with the latest version.
3 – Provisioning AWS EC2 Cluster with Terraform Modules
Let us now write the configuration to provision an AWS EC2 Cluster with Terraform modules from the registry.
To place our configuration files, we create a source directory:
$ mkdir terraform-module-demo-aws
$ cd terraform-module-demo-aws
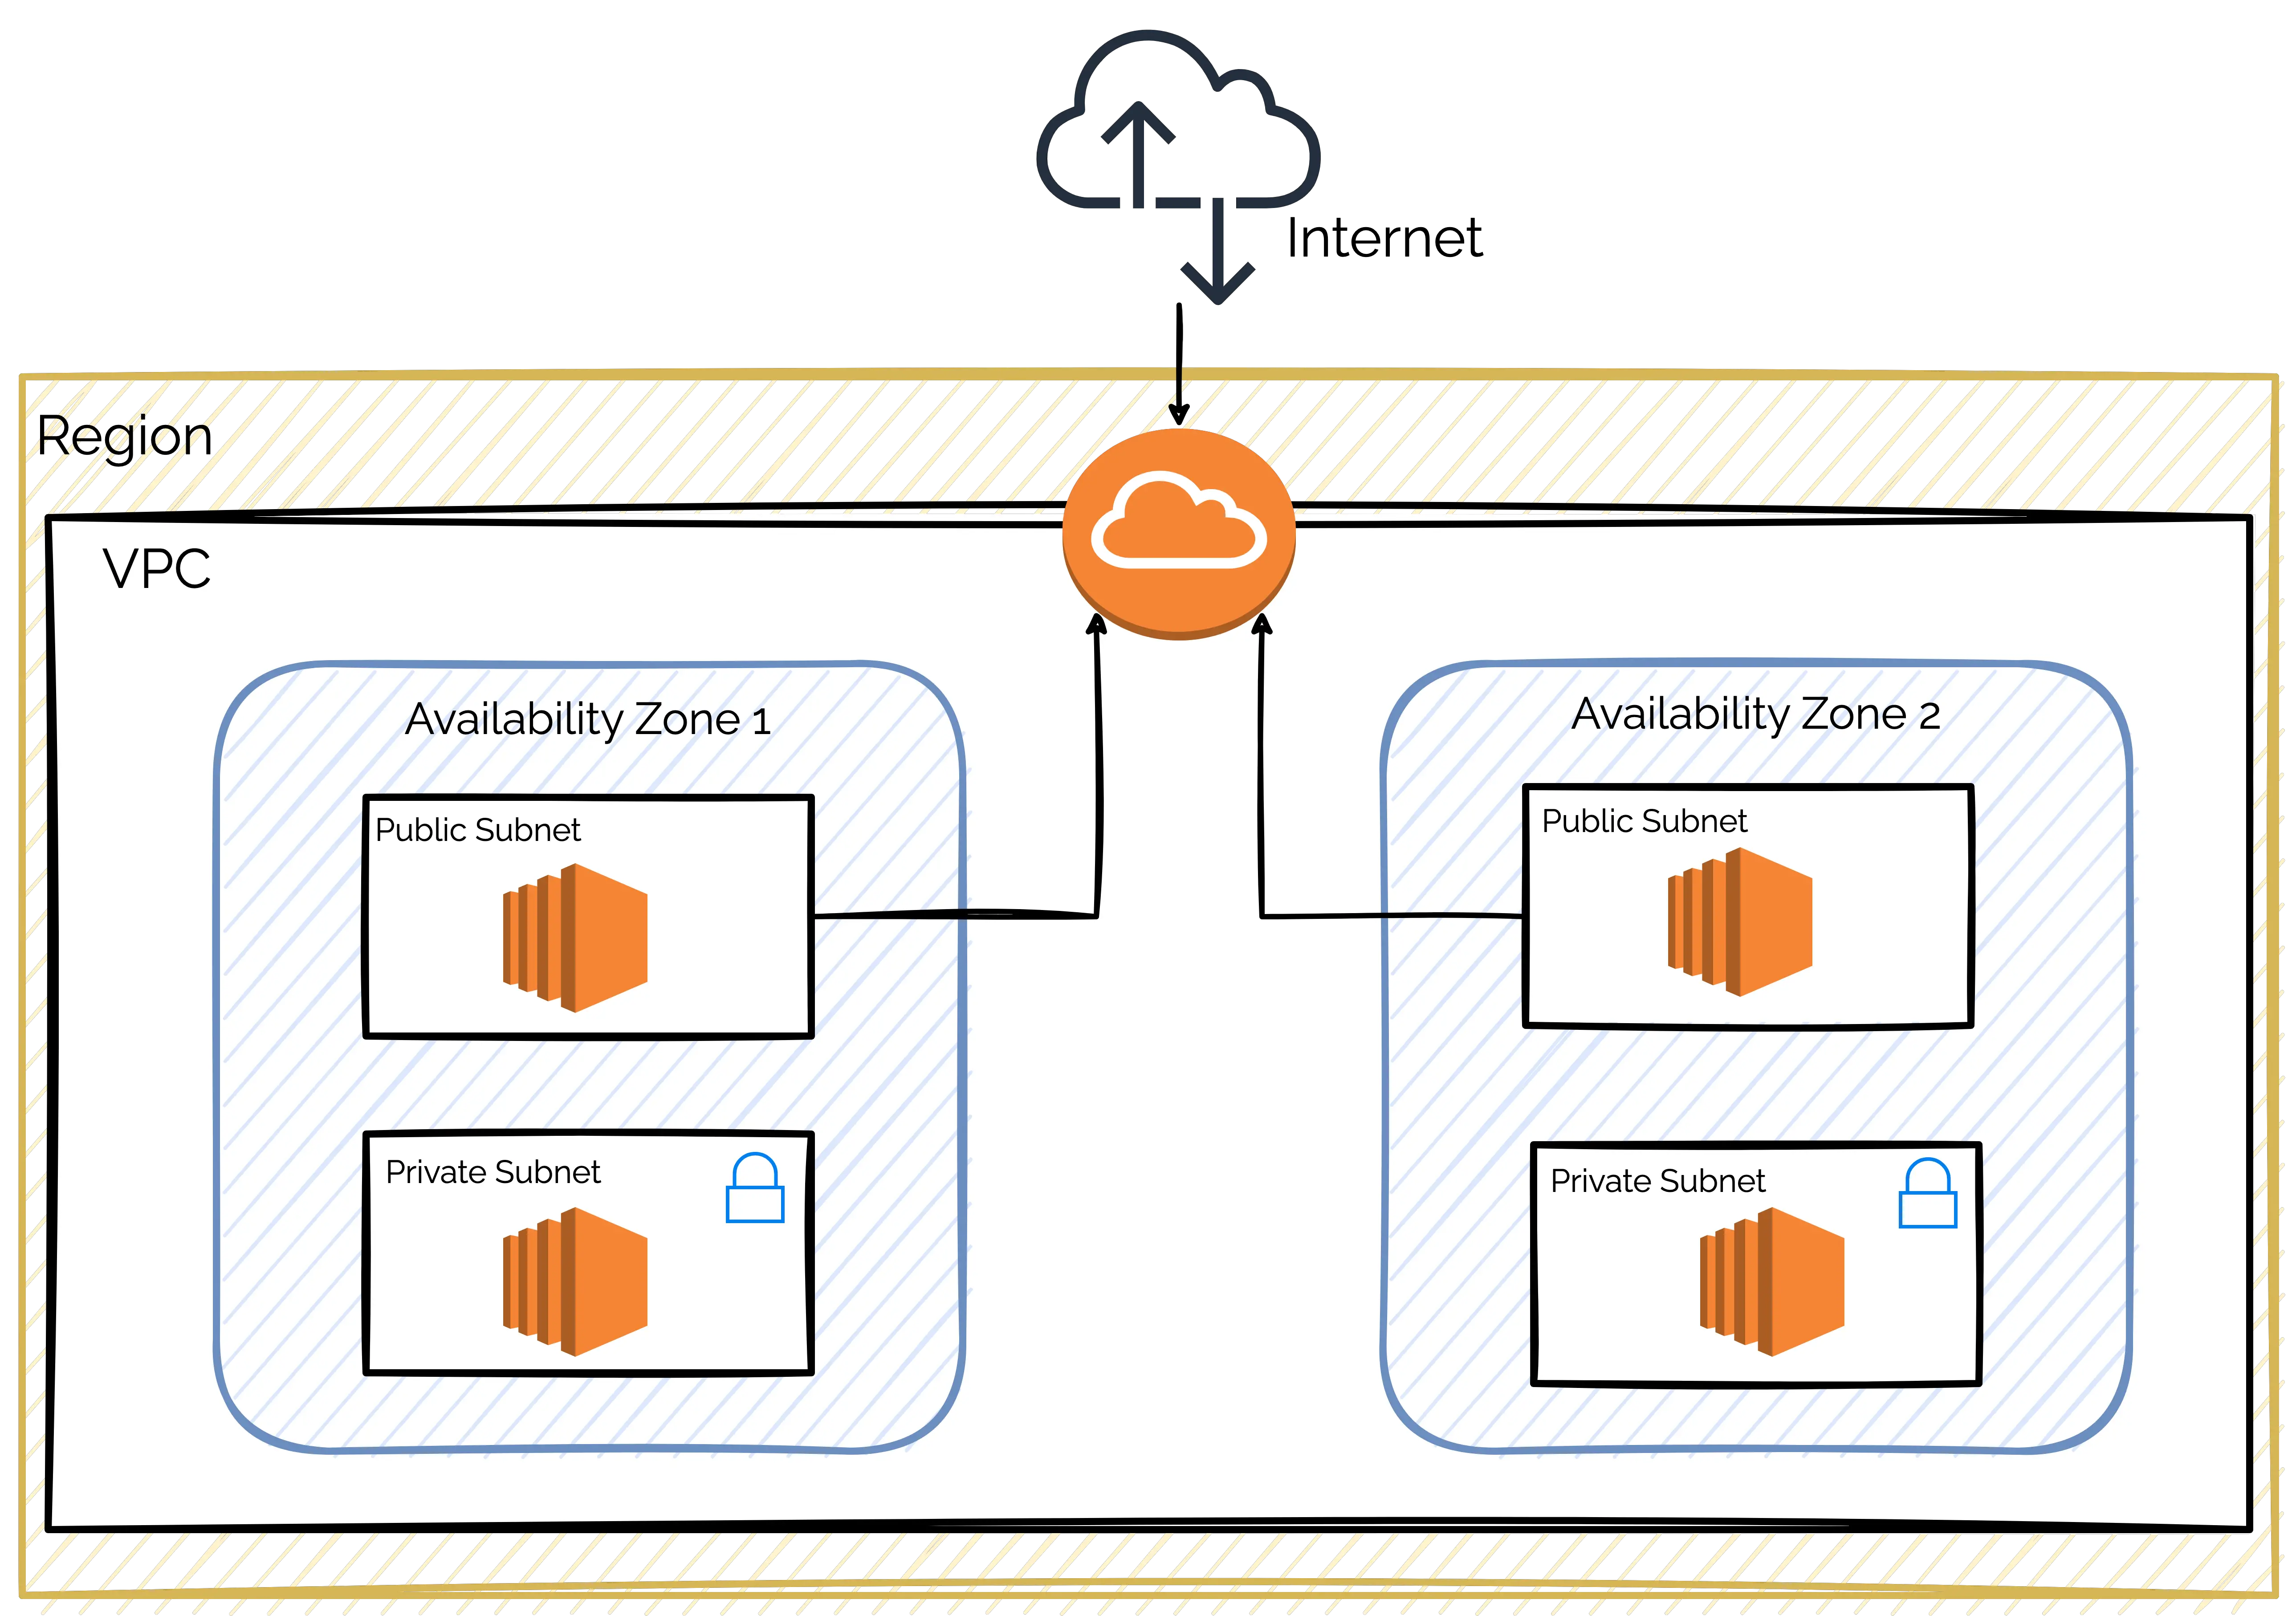
We will now look at the individual files that will make up our project. Our aim is to provision EC2 instances within a VPC that has a couple of subnets and also an Internet Gateway. Check out the below illustration that demonstrates the big picture.
3.1 – Configuring Terraform
First file is terraform.tf. The job of this file is to configure Terraform itself.
See below the contents of the file:
terraform {
    required_providers {
        aws = {
            source = "hashicorp/aws"
            version = "~> 4.4.0"
        }
    }
    required_version = ">=1.1.0"
}
The terraform {} block basically specifies that the configuration must use the AWS Provider version within the v4.4.0 release. Also, we set the Terraform version to above v1.1.0. If interested, you can read more about using the Terraform AWS Provider to provision AWS resources.
3.2 – The Terraform Main Configuration
The next file is the main.tf file. In this file, we configure all the major parts of our infrastructure such as VPC, subnets and EC2 instances.
Check out the code below:
provider "aws" {
    region = "us-west-2"
    profile = "terraform-user"
}

module "vpc" {
    source = "terraform-aws-modules/vpc/aws"
    version = "3.14.0"

    name = var.vpc_name
    cidr = var.vpc_cidr

    azs = var.vpc_azs
    private_subnets = var.vpc_private_subnets
    public_subnets = var.vpc_public_subnets

    enable_nat_gateway = var.vpc_enable_nat_gateway

    tags = var.vpc_tags
}

module "ec2_instances" {
  source  = "terraform-aws-modules/ec2-instance/aws"
  version = "3.5.0"
  count   = 3

  name = "demo-ec2-cluster"

  ami                    = "ami-0ceecbb0f30a902a6"
  instance_type          = "t2.micro"
  vpc_security_group_ids = [module.vpc.default_security_group_id]
  subnet_id              = module.vpc.public_subnets[0]

  tags = {
    Terraform   = "true"
    Environment = "development"
  }
}
In the beginning, we configure the AWS provider using the provider {} block. Within the block, we set the AWS region and the user profile.
Note that we have created a special IAM user terraform-user to provision the infrastructure. After obtaining the credentials, we set up the same user within the local machine so that our Terraform commands can utilize the credentials to create the various resources. Refer to this link to configure your own credentials.
The next block is a module block (named vpc) for defining the VPC or Virtual Private Network. This is a module block where we use the registry module terraform-aws-modules/vpc/aws to configure the VPC along with private and public subnets and the internet and NAT Gateways. Notice the use of variables in this section. We will be getting to them in a bit.
The last block in this file is another module block (named ec2_instances) for defining the EC2 instance. Here also, we are using the registry module.
3.3 – Variables for Terraform Modules
Modules can contain both required and optional arguments. We can check a module’s arguments in the documentation available on the registry. At a bare minimum, we need to specify values for the required arguments.
But how to manage a large number of arguments in a Terraform configuration?
Variables are a great way to handle module arguments. By using variables, we can separate configuration properties from the configuration itself.
To start off, we should identify module arguments that we may want to change in the future. Then, we can create matching variables in our configuration’s variables.tf file. In this file, we can declare a bunch of variable blocks with sensible default values.
Check out the code from the variables.tf file.
variable "vpc_name" {
  description = "VPC Name"
  type        = string
  default     = "demo-vpc"
}

variable "vpc_cidr" {
  description = "CIDR block for VPC"
  type        = string
  default     = "10.0.0.0/16"
}

variable "vpc_azs" {
  description = "VPC Availability Zones"
  type        = list(string)
  default     = ["us-west-2a", "us-west-2b", "us-west-2c"]
}

variable "vpc_private_subnets" {
  description = "Private subnets for VPC"
  type        = list(string)
  default     = ["10.0.1.0/24", "10.0.2.0/24"]
}

variable "vpc_public_subnets" {
  description = "Public subnets for VPC"
  type        = list(string)
  default     = ["10.0.101.0/24", "10.0.102.0/24"]
}

variable "vpc_enable_nat_gateway" {
  description = "Enable NAT gateway for VPC"
  type        = bool
  default     = true
}

variable "vpc_tags" {
  description = "Resource Tags for VPC Module"
  type        = map(string)
  default = {
    Terraform   = "true"
    Environment = "development"
  }
}
If you notice, these are all variables required by the vpc module as we defined in the previous section. Feel free to change the default values for these variables according to your requirement.
A module can also use the output attribute of another module as a variable. See the below configuration for the EC2 instances.
module "ec2_instances" {
  source  = "terraform-aws-modules/ec2-instance/aws"
  version = "3.5.0"
  count   = 3

  name = "demo-ec2-cluster"

  ami                    = "ami-0ceecbb0f30a902a6"
  instance_type          = "t2.micro"
  vpc_security_group_ids = [module.vpc.default_security_group_id]
  subnet_id              = module.vpc.public_subnets[0]

  tags = {
    Terraform   = "true"
    Environment = "development"
  }
}
The vpc_security_group_ids and subnet_id are set to values from the output of the vpc module. Also, the ec2_instances module uses the count meta argument to define the number of instances that should be created.
3.4 – Terraform Module Output Attributes
Lastly, we may also want some output from our Terraform configuration once the resources have been provisioned. You can check the output of a registry module from the documentation.
To make Terraform display some output attributes, we need to create a file named outputs.tf.
output "vpc_public_subnets" {
  description = "IDs of the VPC's public subnets"
  value       = module.vpc.public_subnets
}

output "ec2_instance_public_ips" {
  description = "Public IP addresses of EC2 instances"
  value       = module.ec2_instances[*].public_ip
}
In the above example the vpc_public_subnets references the the vpc module’s public_subnets output and the ec2_instance_public_ips references the public IP addresses of the three EC2 instances that will be created by the configuration.
4 – Provisioning the Infrastructure
With our configuration ready, we can now provision the infrastructure.
First, we need to run the terraform init command to initialize the workspace.
Below is the output:
Initializing modules...
Downloading registry.terraform.io/terraform-aws-modules/ec2-instance/aws 3.5.0 for ec2_instances...
- ec2_instances in .terraform/modules/ec2_instances
Downloading registry.terraform.io/terraform-aws-modules/vpc/aws 3.14.0 for vpc...
- vpc in .terraform/modules/vpc

Initializing the backend...

Initializing provider plugins...
- Finding hashicorp/aws versions matching ">= 3.63.0, >= 3.72.0, ~> 4.4.0"...
- Installing hashicorp/aws v4.4.0...
- Installed hashicorp/aws v4.4.0 (signed by HashiCorp)

Terraform has created a lock file .terraform.lock.hcl to record the provider
selections it made above. Include this file in your version control repository
so that Terraform can guarantee to make the same selections by default when
you run "terraform init" in the future.

Terraform has been successfully initialized!

You may now begin working with Terraform. Try running "terraform plan" to see
any changes that are required for your infrastructure. All Terraform commands
should now work.

If you ever set or change modules or backend configuration for Terraform,
rerun this command to reinitialize your working directory. If you forget, other
commands will detect it and remind you to do so if necessary.
Terraform downloads the modules and providers from the registry and created a lock file to document the provider selections. The modules will be installed in the .terraform/modules directory.
In the next step, we can execute terraform plan to check the various infrastructure pieces Terraform will create. This command does not actually provision the infrastructure. It just displays the plan.
Finally, we can execute terraform apply to provision the infrastructure. If everything was fine till this point, Terraform will create the infrastructure and print the specified output.
See below:
Apply complete! Resources: 23 added, 0 changed, 0 destroyed.

Outputs:

ec2_instance_public_ips = [
  "54.200.133.107",
  "18.236.66.17",
  "34.222.142.227",
]
vpc_public_subnets = [
  "subnet-09b2212fe3d1b0195",
  "subnet-0058f669967aeb092",
]
You can also check the resources in the AWS Console.
For example, below is the VPC that was created. You can identify the resources by the name of VPC set to “demo-vpc” .

Next, we have the public and private subnets within the VPC.

Also, we have the NAT Gateways.

Lastly, we can see the three EC2 instances up and running.

5 – Cleaning up the Infrastructure
Some of the AWS resources we created in this tutorial may result in cost. Therefore, it is always important to destroy the resources in case you don’t need them running.
To destroy the infrastructure, simply execute the terraform destroy command. After confirmation, Terraform will delete all the resources created as part of the plan.
Conclusion
Terraform Modules help us treat our infrastructure code in small manageable pieces. This makes it easy to maintain and upgrade the code for future uses.
The Terraform registry has a plethora of modules we can use in our projects. However, if there is something that is not available, we can also create our own custom Terraform module. More on that in a later post.
The code for this tutorial is available on Github for reference.
Do you want to manage multiple environments like dev, staging and prod? Check out this guide on Terraform workspaces.
If you found this post useful, consider sharing it with friends and colleagues. In case of any queries, please write them in the comments section below.

0 Comments