Kubernetes is the preferred system to deploy microservices. And when you have microservices, you usually want interaction between them.
Since each microservice runs within its own Kubernetes Pod, you need a way for one pod to find another pod within the cluster.
This is where the Kubernetes service resource plays a crucial role.
1 – Why the Need for Kubernetes Service?
In a non-Kubernetes world, a sysadmin would configure the client application to talk to the correct service host.
By configuration, I mean specifying the exact IP address of the server where the service is hosted.
That’s not possible in Kubernetes because of 3 reasons:
- Kubernetes pods are ephemeral. They can get created or removed any time based on the decisions made by the control plane.
- Pods get their IP address after it has been scheduled and just before it’s started. This means that you can’t know upfront about the IP address that will be assigned.
- With the magic of horizontal scaling, multiple pods might run the same service and each of those pods will have its own IP address. It doesn’t make any sense for the client to know how many pods run a particular service and which one they should talk to.
The bottom line is that all pods should be accessible through a single IP address.
And to solve this challenge, Kubernetes provide a special resource type – Services.
2 – Big Picture View of Kubernetes Service
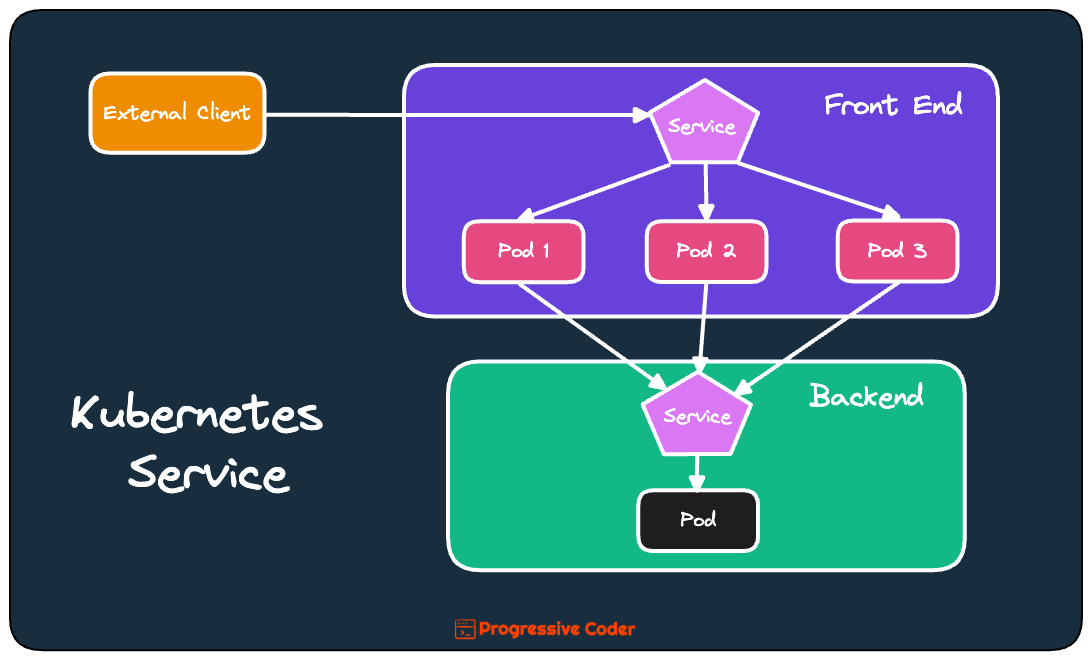
Let’s take a typical example of an application that has a frontend and a backend database server.
You may deploy the frontend web server on multiple pods for scalability reasons. However, the database server is deployed on a single pod.
There are two problems that we have to handle over here:
- External clients need to connect to the frontend pods without worrying about the exact pod.
- Frontend pods need to connect to the backend database. Though the database is deployed on a single pod, there are chances it may move around the cluster causing a change in the IP address. You don’t want to reconfigure the frontend pods every time that happens.
To solve these problems, you can create two Kubernetes services:
- One service for the frontend pods that makes the application accessible from outside the cluster. It’s basically a constant IP address through which external clients can connect to the pods.
- Similarly, a new service for the backend database pod that gives it a stable address that does not change when the pod is moved around.
Here’s what it looks like in practice:
3 – Kubernetes Service Demo
Let’s now create a Kubernetes service and see it in action.
To make things easy, I have divided the whole process into steps.
STEP 1 – Creating a Docker Image
Right off the bat, you can create a Docker image to run on your Kubernetes pods.
Here’s the Dockerfile I’ve used.
#Specify a base image
FROM node:alpine

#Specify a working directory
WORKDIR /usr/app

#Copy the project
COPY ./ ./

#Install dependencies
RUN npm install

#Default command
CMD ["npm","start"]
It’s a pretty basic image that runs a Node.js application using the node:alpine image.
Here’s the code for the Node.js application in case you are looking for it. Just be aware that it is designed to give 500 status code if you call it more than twice.
const express = require('express');

const app = express();

let requestCount = 0;

app.get('/', (req, res) => {
    requestCount++;
    if (requestCount > 2) {
        res.status(500).send("The app is not well. Please restart!")
    }
    res.send("Hello World from our Kubernetes Pod Demo")
})

app.listen(3000, () => {
    console.log("Listening to requests on Port 3000")
})
STEP 2 – Building a Docker Image
Next up, you need to build the image and provide an appropriate name.
$ docker build .
$ docker tag <image_id> progressivecoder/nodejs-demo
STEP 3 – Creating the Replication Controller
Next, you also create a replication controller or a replica set for running multiple pods. Either will do for this example. All we want is to have multiple pods running the same Node.js application.
Here’s the YAML file for a replication controller.
apiVersion: v1
kind: ReplicationController
metadata:
  name: basic-rc
spec:
  replicas: 3
  selector:
    app: hello-service
  template:
    metadata:
      labels:
        app: hello-service
    spec:
      containers:
      - name: hello-service
        image: progressivecoder/nodejs-demo
        imagePullPolicy: Never
The replicas attribute tells Kubernetes how many pods it has to create.
At the bottom, you have the containers section where you specify the image that should be deployed.
If interested, you can read more about Kubernetes replication controller.
STEP 4 – Create the Service
Finally, we get to the Kubernetes service.
Here’s the YAML for that:
apiVersion: v1
kind: Service
metadata:
  name: basic-service
spec:
  ports:
  - port: 80
    targetPort: 3000
  selector:
    app: hello-service
It is super-simple to understand.
The kind is “Service”.
Then, you have the spec section where we specify the port mapping. Basically, the configuration in the example states that you are routing incoming traffic on port 80 to port 3000 on the pod. Port 3000 is where our Node.js web server is listening.
The selector specifies the label value the service uses to find out the underlying pods it has to connect to. Here the label is app: hello-service.
STEP 5 – Testing the Service
Time to test our Kubernetes service.
Firstly, you need to get the pods up and running by applying the replication controller.
$ kubectl apply -f basic-pod-rc.yamlHere, basic-pod-rc.yaml is the name of the YAML file.
Next, you need to create the service.
$ kubectl apply -f basic-service.yamlYou can now check the status of the service by running the command kubectl get svc.
saurabhdashora@Saurabhs-MacBook-Air basic-pod-demo % kubectl get svc
NAME            TYPE        CLUSTER-IP       EXTERNAL-IP   PORT(S)          AGE
basic-service   ClusterIP   10.109.67.193    <none>        80/TCP           3s
The interesting property here is the CLUSTER-IP. This is the IP address assigned to the service within the cluster. You cannot access it from outside the cluster as yet, but pods within the cluster can access it.
To see that in action, we can use one of the pods that was created. Execute kubectl get pods to get the list of pods.
NAME             READY   STATUS    RESTARTS   AGE
basic-rc-jsm5p   1/1     Running   0          2m19s
basic-rc-vsn7f   1/1     Running   0          2m19s
basic-rc-wjf44   1/1     Running   0          2m19s
Next, execute a curl request from within one of the pods. You will get the response from the Node.js application.
$ kubectl exec basic-rc-jsm5p -- curl -s http://10.109.67.193
Hello World from our Kubernetes Pod Demo
You might face issue while executing curl because the node:alpine image does not contain curl by default.
However, you can install it using the below command.
$ kubectl exec basic-rc-jsm5p -- apk --no-cache add curlAlternatively, you can also install the curl package within the Docker image itself but for demo purpose, I installed it directly within the pod.
Conclusion
That’s all for this post.
This post was meant to get you a basic understanding of services in Kubernetes and how you can get one up and running in hardly any time.
Now there’s a lot more to Kubernetes services. Here are a few other posts that might interest you:
- How to access Cluster IP service in Kubernetes?
- How to access external service using a Kubernetes service?
- How to access external service using Kubernetes Node Port service?
- How to expose a Kubernetes service using Ingress resource?
- How to create and test a Kubernetes Headless Service?
If you have any queries or comments, please mention in the comments section below.
0 Comments