In this post, we will continue with our topic about securing applications using Spring Boot Keycloak Integration.
Primarily, we will be dealing with the Spring Boot side of things in this post. If you wish to know more about how we setup Keycloak, you can refer to Part 1 of this topic.
So let’s start with setting up our Spring Boot application to work with Keycloak as the authentication mechanism.
1 – The Dependencies
To start working with Keycloak, the bare minimum dependencies we need are the Spring Web, Spring Security and Keycloak package.
Below is how the pom.xml should look like.
<properties>
		<java.version>1.8</java.version>
		<keycloak.version>9.0.2</keycloak.version>
</properties>

<dependencies>
		<dependency>
			<groupId>org.springframework.boot</groupId>
			<artifactId>spring-boot-starter-security</artifactId>
		</dependency>
		<dependency>
			<groupId>org.springframework.boot</groupId>
			<artifactId>spring-boot-starter-web</artifactId>
		</dependency>
		<dependency>
			<groupId>org.keycloak</groupId>
			<artifactId>keycloak-spring-boot-starter</artifactId>
			<version>${keycloak.version}</version>
		</dependency>

		<dependency>
			<groupId>org.springframework.boot</groupId>
			<artifactId>spring-boot-starter-test</artifactId>
			<scope>test</scope>
			<exclusions>
				<exclusion>
					<groupId>org.junit.vintage</groupId>
					<artifactId>junit-vintage-engine</artifactId>
				</exclusion>
			</exclusions>
		</dependency>
		<dependency>
			<groupId>org.springframework.security</groupId>
			<artifactId>spring-security-test</artifactId>
			<scope>test</scope>
		</dependency>
</dependencies>
The test related dependencies are basically optional. However, Spring Security, Web and Keycloak are mandatory.
2 – Spring Boot Keycloak Configuration
The next important aspect of Spring Boot Keycloak Integration is to write the keycloak configuration class. Basically, this class sets up Keycloak to work with Spring Security.
Below is the configuration class for your reference.
@Configuration
@EnableWebSecurity
@EnableGlobalMethodSecurity(jsr250Enabled = true)
public class KeycloakSecurityConfig extends KeycloakWebSecurityConfigurerAdapter {

    @Override
    protected void configure(HttpSecurity http) throws Exception {
        super.configure(http);
        http.authorizeRequests()
                .anyRequest()
                .permitAll();
        http.csrf().disable();
    }

    @Autowired
    public void configureGlobal(AuthenticationManagerBuilder auth) {
        KeycloakAuthenticationProvider keycloakAuthenticationProvider = keycloakAuthenticationProvider();
        keycloakAuthenticationProvider.setGrantedAuthoritiesMapper(new SimpleAuthorityMapper());
        auth.authenticationProvider(keycloakAuthenticationProvider);
    }

    @Override
    @Bean
    protected SessionAuthenticationStrategy sessionAuthenticationStrategy() {
        return new RegisterSessionAuthenticationStrategy(new SessionRegistryImpl());
    }

    @Bean
    public KeycloakConfigResolver keycloakConfigResolver() {
        return new KeycloakSpringBootConfigResolver();
    }
}
Basically, here we are configuring HTTPSecurity to authorize every request using Keycloak as the security provider.
3 – The REST Endpoints
To test our application, we would also be setting up a few endpoints using Spring Web package. If you would like to know more about how to create REST endpoints using Spring Boot, please refer to this post.
For our example, we will just use a few simple GET endpoints as below:
package com.progressivecoder.demo.controllers;

import org.springframework.http.ResponseEntity;
import org.springframework.web.bind.annotation.GetMapping;
import org.springframework.web.bind.annotation.RestController;

import javax.annotation.security.RolesAllowed;

@RestController
public class DummyController {

    @GetMapping(value = "/unknown")
    public ResponseEntity<String> getUnknownUser() {
        return ResponseEntity.ok("Hello Unknown User");
    }

    @RolesAllowed("user")
    @GetMapping(value = "/normal-user")
    public ResponseEntity<String> getNormalUser() {
        return ResponseEntity.ok("Hello Normal User");
    }

    @RolesAllowed("admin")
    @GetMapping(value = "/admin-user")
    public ResponseEntity<String> getAdminUser() {
        return ResponseEntity.ok("Hello Admin User");
    }

}
As you can see, we have 3 endpoints. The first one is for Unknown User. In other words, no authentication required. The second is for a normal user. Basically, a user with the role of USER. The last endpoint can only be accessed by user having ADMIN role. We specify these details using @RolesAllowed annotation.
4 – Application Properties File
Lastly, we need to also write some properties in the application.properties file.
See below the properties we have to mention:
server.port=8000

keycloak.realm = demo-realm
keycloak.auth-server-url = http://localhost:8080/auth
keycloak.ssl-required = external
keycloak.resource = demo-springboot-app
keycloak.credentials.secret = XXXXXXXXXXXXXXXXXXXXXXXXXXXXXXX
keycloak.use-resource-role-mappings = true
keycloak.bearer-only = true
Let’s look at the various properties one-by-one:
- The first property i.e. server port is used to configure the port on which our application will start up. By default it is 8080. However, since our keycloak instance uses 8080, we change the port for our application so that there is no conflict.
- The second property is the keycloak realm that we created in Part 1.
- Next, we have the keycloak uth server url. This is basically the URL we have to hit for authenticating users.
- Next is the SSL-required flag. Currently, we set it to external.
- The fifth property is the resource we are protecting through Keycloak. We name it demo-springboot-app.
- Next, we have the keycloak client credentials. This should be obtained from the keycloak server and here, I have entered a dummy value.
- The next property is to signify using the resource role mappings.
- Lastly, we set keycloak bearer as true to signify that we will be using the bearer token.
5 – Testing the Spring Boot Keycloak Integration
With is we are basically done with all the Spring Boot related code. Our application is ready to work with Keycloak.
5.1 – Generate Tokens
The first step is to generate tokens for our users. We can generate the token by using the below endpoint:
http://localhost:8080/auth/realms/demo-realm/protocol/openid-connect/tokenHere, the word demo-realm corresponds to the name of the realm we setup.
We can make the request using any tool or even CURL. For this example, we will use POSTMAN.
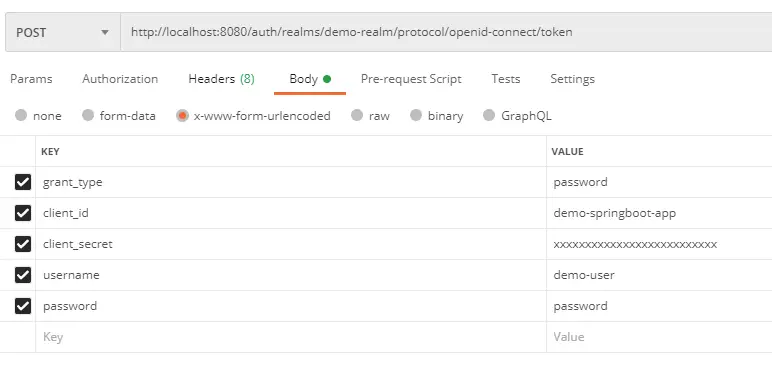
Note that the client_secret should be the secret for the particular client id. It can be obtained from keycloak admin dashboard under the particular client menu.
When we make the request, we will get an access token back from keycloak for that particular user. Also, we get other important information such as the validity of the token (expires_in value) and also a refresh token that we can use to get a new access_token.
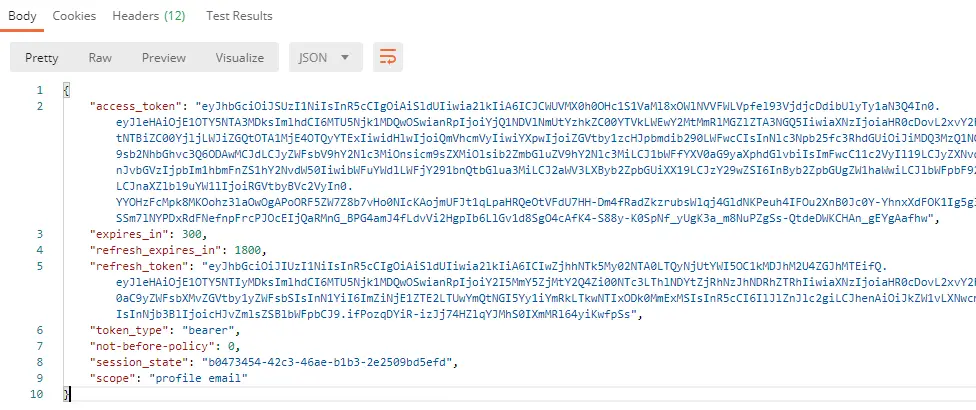
We can check what is in that token by visiting jwt.io and copying the access token in the debugger.
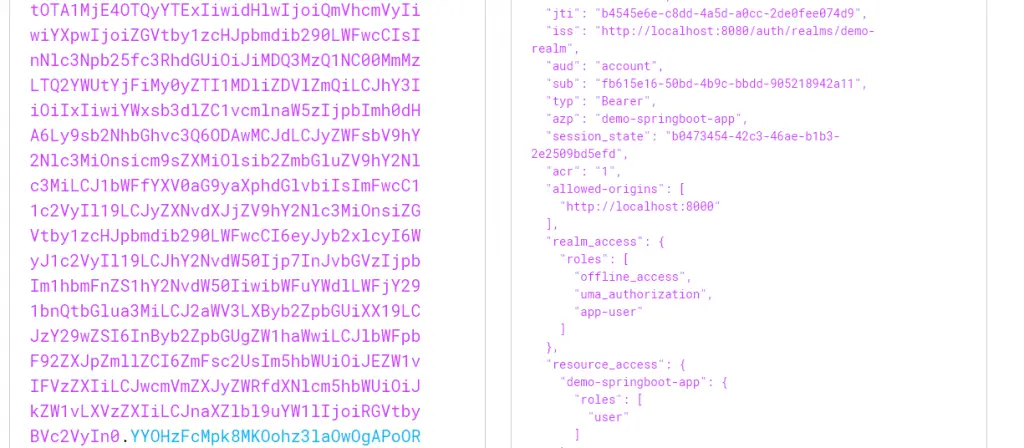
Basically, if you see the above screenshot, the token provides all the details about our demo-user. Also, most importantly, it provides details on the user roles. In this case, the demo-user has a role of USER.
5.2 – Use the Token in the API Call
Now that we have the token, we can make the API Call to our application endpoint.
If we make a call to the endpoint localhost:8000/unknown, we get the response without any authorization. This is because this endpoint is open for all users.
However, if we go to POSTMAN and make the GET request to localhost:8000/normal-user, we get an error with HTTP Code 401 (i.e. Unauthorized).
This is because only a user with Role USER can access the endpoint as we have configured by using the RolesAllowed annotation.
To authenticate and authorize the user, we have to also pass the access token as a Bearer token. Below is how you can do it in POSTMAN.
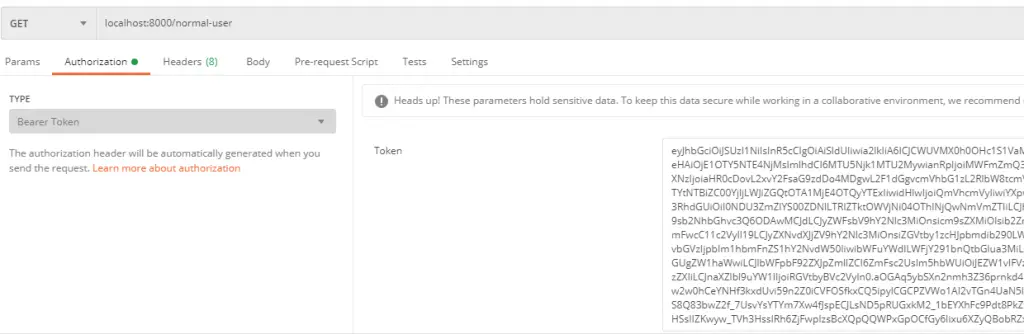
After using the token, we get the response back saying Hello Normal User. If we use the same token on the localhost:8000/admin-user endpoint, it will again give the 401 error.
{
    "timestamp": "2020-08-09T05:41:38.530+00:00",
    "status": 403,
    "error": "Forbidden",
    "message": "",
    "path": "/admin-user"
}
This is because demo-user only has USER role whereas this endpoint requires ADMIN role.
With this, we have successfully setup our Spring Boot Keycloak integration and thereby, secured our API endpoints using Keycloak authentication and authorization mechanism.
As you can see, the configuration is pretty easy with most of the heavy-lifting done by Spring Boot. The application code is available on Github for reference.
If you have any comments or queries, please do mention in the comments section below.
0 Comments